Page 13 of 18
Re: Got a Before & After to share? Let's see 'em!
Posted: Tue Aug 08, 2017 3:45 pm
by Texas_Ranger
Oh yes, I can't tell you how glad I am to be rid of that paint! It might have looked good outside when it was new but in a somewhat dark room (except with afternoon sun) it was a horrible idea even freshly painted. We still have a tin of leftover paint somewhere, I might try a swatch in bright sunlight just for the fun of it. And those tiles... greige on the walls and greige and brown on the floor!
You made a whole lot of progress on your house in a lot less time than we did! Looks great! Much brighter and friendlier!
Re: Got a Before & After to share? Let's see 'em!
Posted: Tue Sep 19, 2017 6:27 pm
by phil
Texas did you paint the tiles? how do you get paint to stick to tile? is there a trick to this?
Re: Got a Before & After to share? Let's see 'em!
Posted: Mon Sep 25, 2017 7:15 pm
by Texas_Ranger
No, we gutted the whole room down to the bare brick walls! The tiles are new 20x20 cm (8"x8") both on the walls and floor, the black trim pieces are hand-cut from 20x20 cm tiles. Nothing I'd do again but finding 5x20 cm border tiles turned out to be pretty much impossible.
Brief review of what we did:
- remove all old tile and plaster
- remove 1976 wall between bathroom and hall
- remove thin slab of concrete that ran underneath the wall and had a low spot (5 cm step down in a dark, cramped hall) around a door
- remove all crappy wiring and galvanised plumbing
At that point we had a dirt floor, no wall between the bathroom and hall and bare brick walls everywhere else.
Then we:
- rebuilt the wall 10 cm further into the hall, moving a door and enclosing a smaller part for getting the toilet out of the bathroom
- had a new concrete slab poured
- all plumbing and wiring re-done
- insulated the floor
- had the walls plastered with lime plaster
- tiled
- installed a new salvaged door
- replaced the failing window
- had all new fixtures installed (extra-long bath for us tall folks, cheap but classy-looking sink, etc.)
The original wood ceiling cleaned up nicely but well after we were done we discovered that dirt from the attic keeps falling through cracks so we'll have to do something about that. Above the boards they levelled the floor with sand or dirt and then poured mortar to act as a fire stop and now the sand is falling down. Ugh!
Re: Got a Before & After to share? Let's see 'em!
Posted: Mon Oct 02, 2017 3:20 pm
by phil
wow that sounds like a huge project. sand in the attic sounds like a strange idea.. I guess if the flor ever burned through it would act like a sprinkler

I bet you can use a big shop vac and suck it out that way. Mine will gladly fill itself with 3/4 crushed rock. seems weird but that's the easiest way I found to clean my gravel parking pad up after the leaves fall. if I dont' it turns to dirt and stuff starts growing in there. I get some gravel too but I find I can sort of separate that out and just dump the gravel back. If I try raking it just moves the gravel and buries them.
Re: Got a Before & After to share? Let's see 'em!
Posted: Thu Oct 19, 2017 1:15 pm
by Texas_Ranger
The idea was to keep an attic fire from spreading downstairs so the floors were usually covered with some kind of mineralic material, either sand or crushed mortar and bricks, usually with a layer of paving bricks on top. Since this was originally a working farm they likely stored hay, straw and other flammable stuff in the attic but the method was fairly common in cities too. Some larger cities even required dowelled beam floors below attics, i.e. ceilings built entirely from logs sawn flat on three sides, installed round-side up. Since these logs were usually thinner than your average floor joists, they were connected with long wooden dowels to make the ceiling sturdier. Fancy larger houses used that construction method throughout.
Re: Got a Before & After to share? Let's see 'em!
Posted: Sun Apr 01, 2018 7:52 pm
by Willa
1860's (?) chaise I found on the street one night in November:

- chaisebefore.jpg (1.34 MiB) Viewed 7431 times
After many, many hours of agonizing over upholstery velvet colors/weights, waiting for swatches to be mailed, dealing with a nearly impossible US seller, pulling several pounds of upholstery tacks, and many "valuable learning experiences". I hope it just looks like a piece of furniture, not Amateur Upholstery Hour (which it was).
The frame is really built but the wood has been dinged up a little, prior to me, so this was no museum quality piece to start with. If it was I would have handed it to a professional. In fact, unless you really enjoy this kind of struggle I strongly recommend a professional. I reused all the antique tacks, as I did not have an air powered stapler like the pros. That's one reason why a pro could do this in 1/20th of the time. The springs for the seat was missing, and no way was I going to fight that battle. I subbed 3/4" plywood plus dense upholstery foam and Dacron.
The velvet matches the walls - a slightly minty chartreuse. I didn't have a covered button kit, so I used some antique glass buttons, and a pair of antique carved wood buttons for the bolster. The bolster had indigo dyed striped ticking, so it was probably the original bolster, too. A few traces of horsehair upholstery, and a little horsehair padding on the back. Judging from the nail holes, I am guessing this had been re-upholstered at least a couple of times.
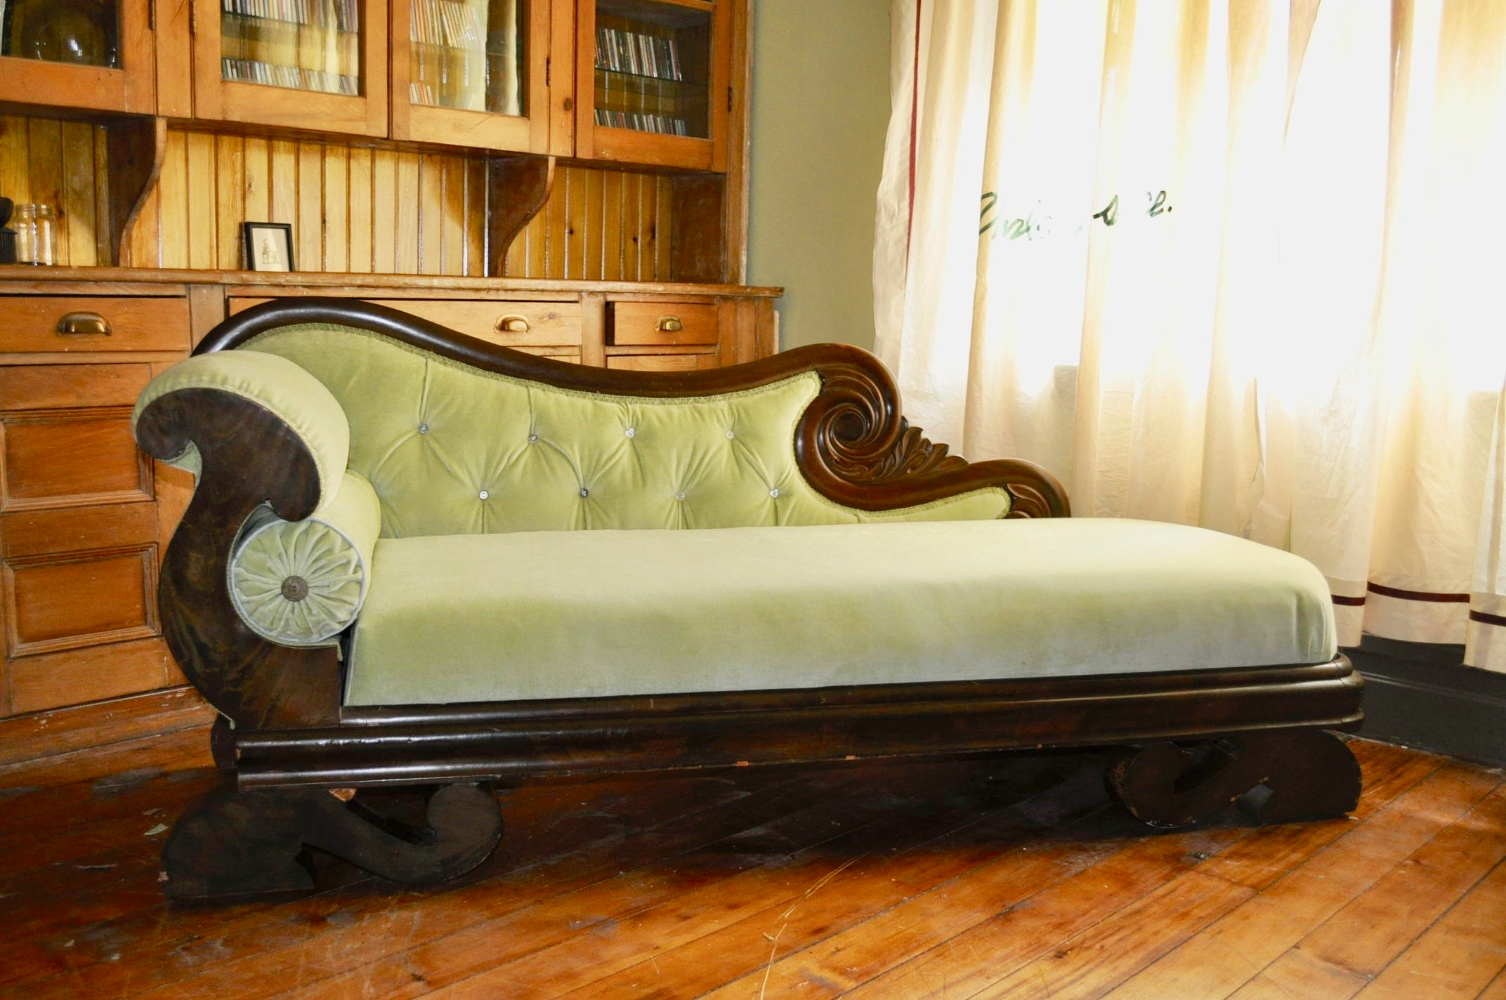
- chaiseafter.jpg (1.44 MiB) Viewed 7431 times
Re: Got a Before & After to share? Let's see 'em!
Posted: Mon Apr 02, 2018 5:21 am
by Lily left the valley
Very nice, Willa!

And I love that the bolster fits in the curve like that. Details of that nature make me happy. Great color match too.
Thank you for sharing this. I shall use it for inspiration when the time comes for a few projects in that department.
Re: Got a Before & After to share? Let's see 'em!
Posted: Mon May 14, 2018 6:55 pm
by MJ1987
Simple changes, but significant to me. Huge hedge removed from in front of the porch on the right and roof replacement.
Re: Got a Before & After to share? Let's see 'em!
Posted: Tue May 15, 2018 2:34 am
by Manalto
Much,
much better! Ahhhhh...
Here's mine; forgive the repost.
Re: Got a Before & After to share? Let's see 'em!
Posted: Tue May 15, 2018 9:47 pm
by Gothichome
MJ(Matt) that looks great, nice and tidy now. One problem though now that you’ve let the light hit them they have started to grow.
James (Manalto), seeing how bright and open the room looks you have to ask yourself, why would you hide such things.