
Gothichome, the restoration of.

Re: Gothichome, the restoration of.
It looks fantastic ! The weight of the trims kills me anew each time I see it. The details really stand out.
-
GinaC

- Forgotten more than most know
- Posts: 437
- Joined: Sat Jan 26, 2019 8:19 pm
- Location: Newport, VT
Re: Gothichome, the restoration of.
It kills me that this is the *back* door! It's so grand and beautiful!
1939 Minimal Traditional
-
Gothichome

- Moderator

- Posts: 4187
- Joined: Sun Aug 16, 2015 8:34 pm
- Location: Chatham Ont
Re: Gothichome, the restoration of.
Folks, just thought I would post my next winter project.
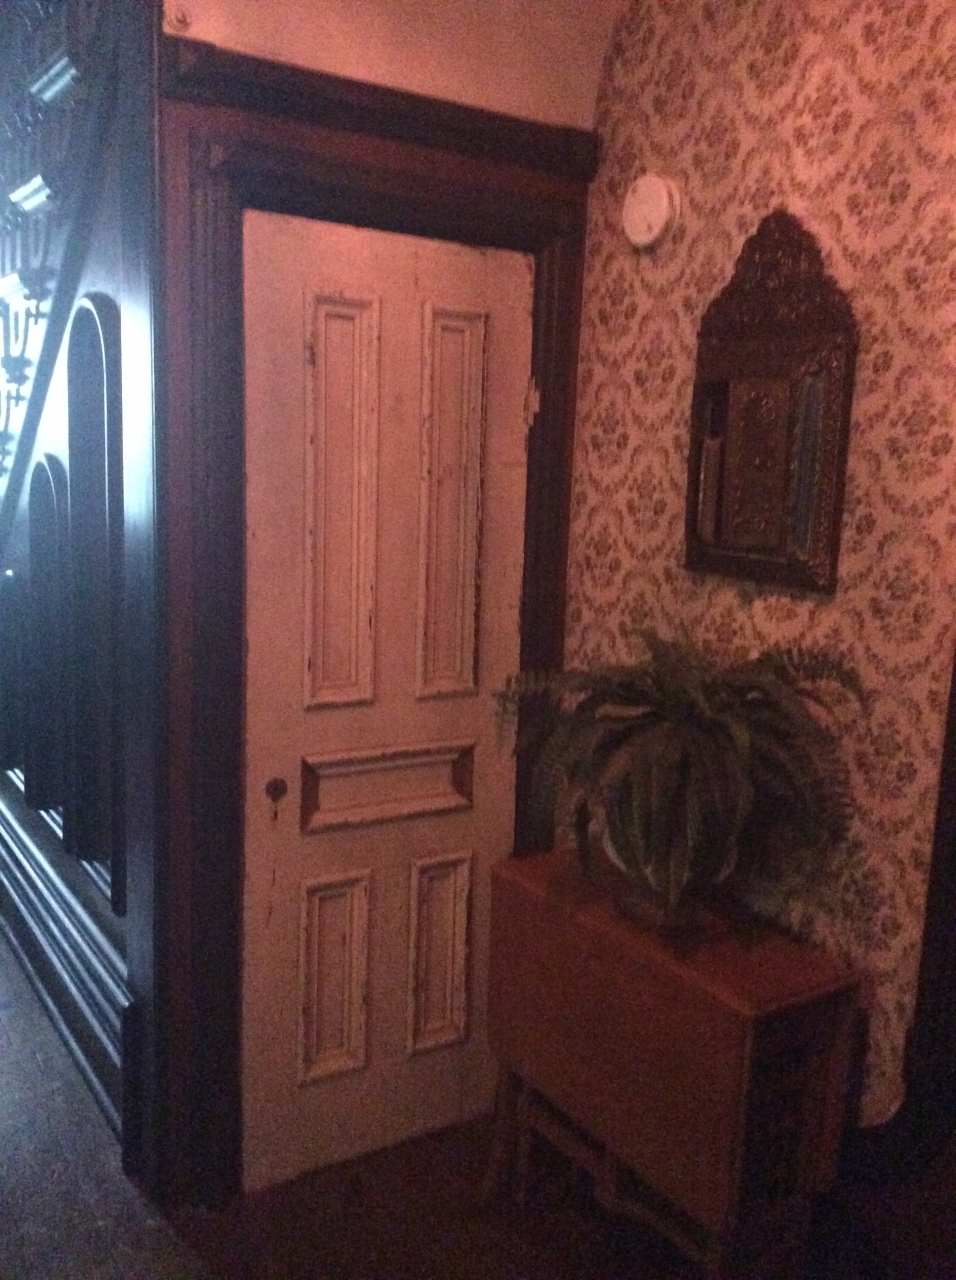
This is the original main hall closet door. I will get it fitted up, stripped and stained over the next month or so.
This door has been sitting in the basement for almost ten years. When we first bought Gothichome we found it outside leaning against the wall behind the overgrown lilac bushes. It has a couple of issues. Fist off it has lost some of its moulding, the two vertical pieces on the middle recessed panel and a bit of dry rot in one corner from being outside I would think. As usual, the here will be pics to amuse all as this project moves along.
-
awomanwithahammer

- Knows where blueprints are hidden
- Posts: 911
- Joined: Fri Jan 22, 2016 1:19 am
- Location: Maryville, TN
Re: Gothichome, the restoration of.
Ron, do you think it is the door that originally went to that closet?
Bonnie
-
Gothichome
- Moderator
- Posts: 4187
- Joined: Sun Aug 16, 2015 8:34 pm
- Location: Chatham Ont
Re: Gothichome, the restoration of.
Bonnie, yes it is the original door for this hole. It’s the only door this size. As pictured it is just leaning in the frame.
Re: Gothichome, the restoration of.
It's great that you've got the door. Maybe the missing bits can be harvested elsewhere ?
I would have thought that the basement stairs would have been located behind the door vs a closet. But maybe that is just my former Toronto house orientation thinking that ?
How far back does the closet go ?
I would have thought that the basement stairs would have been located behind the door vs a closet. But maybe that is just my former Toronto house orientation thinking that ?
How far back does the closet go ?
-
Gothichome
- Moderator
- Posts: 4187
- Joined: Sun Aug 16, 2015 8:34 pm
- Location: Chatham Ont
Re: Gothichome, the restoration of.
Willa, yes it is the only door that was off the hinges that didn’t go to auction. The closet slopes down to the floor about four meters (thirteen feet) in. Our basement stairs are off the rear vestibule.
Re: Gothichome, the restoration of.
Oh boy ! That sounds like the closet of doom, where things inexplicably turn up months or years after they have been missing, in the furthest corner of the tight wedge.
-
awomanwithahammer
- Knows where blueprints are hidden
- Posts: 911
- Joined: Fri Jan 22, 2016 1:19 am
- Location: Maryville, TN
Re: Gothichome, the restoration of.
Willa wrote:Oh boy ! That sounds like the closet of doom, where things inexplicably turn up months or years after they have been missing, in the furthest corner of the tight wedge.
I don't know--maybe it will lead to Narnia!
Bonnie
-
phil
- Has many leather bound books
- Posts: 4616
- Joined: Tue Aug 18, 2015 6:11 pm
- Location: Near Vancouver BC
Re: Gothichome, the restoration of.
The accomplishments are sure piling up. Ron you are making the rest of us feel kind of lazy 
making that trim bit is a little challenge. My dad showed me how to make a hand scraper by first making my own scraper holder with a little block of wood to guide it using, basically copy the profile on a piece of blade , a piece of a cracked old handsaw will work. then you just scrape a block of wood until it takes the shape. if you apply some tape to keep the part clean, and then put blueing ( or ink or paint) on the part then file the blade where it touches until it touches all along the profile. then you have a hand scraper the right shape.
or you could quite easily make a mold of one that is there and make a cast part from epoxy and wood dust. with the dark stain it might just blend in with whats there. That could be less labor intensive. It could be cast separate from the door and attached, like repwood would be. I'd try to pull a piece off, then make a mold , cast two from the mold and adhere them.
maybe if you painted the part with mold release, then applied some rubber, maybe latex or silicone, then make a cast of plaster to support that, then remove the wood part to leave the mold? something along those lines. Not much to loose because you'd get the part back. Ive been playing with the method. basically just mix up the epoxy then mix in enough wood dust that the mixture becomes completely saturated, sort of like mixing plaster. once its not runny it is easier to place. I fixed one of my chairs last night. needed to use epoxy to glue two parts together , clamped it up. there was a small splinter missing so I filled it with that. when dry it helps strength whereas if I used putty ,or filled it with lacquer stick, no strength in that. It looks close enough to wood that I can finish it in , use some pens or stain if it needs a little darkening and graining.
depending on the condition of the part and the molding materials you can actually lift the wood grain pattern and make it appear in the new part then rub on some color to enhance the grain pattern. Its almost cheating I know.. Ive seen radio knobs replicated like that that were very convincing for example. because the sample had some grain that you could feel , so did the copy. the epoxy and wood dist mixture creates a very solid durable part that most would just assume is wood, the same as the rest.
you can even make even stronger parts by using metal bits, like rebar in concrete.
how you make the mold may depend on what's at hand, there are many mateirals you can use. there are materials made for mold making but you can also get there with more common stuff, silicone takes a bit of time to set up which is why Id use the plaster to support it. because the plaster dries fast. for some things you need a two part mold or a mold with stretch to get your old part back but with this it would be easy because the shape will pull out of a mold easily. I haven't worked much with latex but you can make molds using plaster to support it and the latex is stretchy and can be applied thin enough to stretch and get unusual shaped parts back out of the mold.. I might be overexplaining..
of course you can cut more profile with the right blades but for this, you dont need a lot. I think you'd find the casting method works well without it taking a lot of time. the hand scraper method is good if you are bent upon the originality but I think either would be acceptable to most when done especially if it has a fairly heavy stain like the rest.
I think Mick said he has family history related to making plaster molds and objects so he might have tips and there is a lot of info available on different casting techniques.
I tried making some samples with the wood dust and epoxy mix. Its really tough stuff, stronger than wood in it's own. you can alter the color by choosing the dust you like the color of or mix light colored and darker dust in.. or if you dont like the color you can always just remove some from material from the surface to make room for putty. If I find it too dark or too light sometimes I just sand a bit off , apply my tinted putty and work like that until I'm happy with the color match. you could use artist paints too, with that you can mix and blend colors to match and introduce some grain patterns so the repair isn't a monotone, so it looks like wood.
one thing to keep in mind is the thing needs to match the finished product and when you put a finish on wood it darkens the wood but the finish may not absorb quite like wood so you need to match with the final result in mind, not the color of bare wood. If you match the color of bare wood it may jump out with the finish applied.
making that trim bit is a little challenge. My dad showed me how to make a hand scraper by first making my own scraper holder with a little block of wood to guide it using, basically copy the profile on a piece of blade , a piece of a cracked old handsaw will work. then you just scrape a block of wood until it takes the shape. if you apply some tape to keep the part clean, and then put blueing ( or ink or paint) on the part then file the blade where it touches until it touches all along the profile. then you have a hand scraper the right shape.
or you could quite easily make a mold of one that is there and make a cast part from epoxy and wood dust. with the dark stain it might just blend in with whats there. That could be less labor intensive. It could be cast separate from the door and attached, like repwood would be. I'd try to pull a piece off, then make a mold , cast two from the mold and adhere them.
maybe if you painted the part with mold release, then applied some rubber, maybe latex or silicone, then make a cast of plaster to support that, then remove the wood part to leave the mold? something along those lines. Not much to loose because you'd get the part back. Ive been playing with the method. basically just mix up the epoxy then mix in enough wood dust that the mixture becomes completely saturated, sort of like mixing plaster. once its not runny it is easier to place. I fixed one of my chairs last night. needed to use epoxy to glue two parts together , clamped it up. there was a small splinter missing so I filled it with that. when dry it helps strength whereas if I used putty ,or filled it with lacquer stick, no strength in that. It looks close enough to wood that I can finish it in , use some pens or stain if it needs a little darkening and graining.
depending on the condition of the part and the molding materials you can actually lift the wood grain pattern and make it appear in the new part then rub on some color to enhance the grain pattern. Its almost cheating I know..
you can even make even stronger parts by using metal bits, like rebar in concrete.
how you make the mold may depend on what's at hand, there are many mateirals you can use. there are materials made for mold making but you can also get there with more common stuff, silicone takes a bit of time to set up which is why Id use the plaster to support it. because the plaster dries fast. for some things you need a two part mold or a mold with stretch to get your old part back but with this it would be easy because the shape will pull out of a mold easily. I haven't worked much with latex but you can make molds using plaster to support it and the latex is stretchy and can be applied thin enough to stretch and get unusual shaped parts back out of the mold.. I might be overexplaining..
of course you can cut more profile with the right blades but for this, you dont need a lot. I think you'd find the casting method works well without it taking a lot of time. the hand scraper method is good if you are bent upon the originality but I think either would be acceptable to most when done especially if it has a fairly heavy stain like the rest.
I think Mick said he has family history related to making plaster molds and objects so he might have tips and there is a lot of info available on different casting techniques.
I tried making some samples with the wood dust and epoxy mix. Its really tough stuff, stronger than wood in it's own. you can alter the color by choosing the dust you like the color of or mix light colored and darker dust in.. or if you dont like the color you can always just remove some from material from the surface to make room for putty. If I find it too dark or too light sometimes I just sand a bit off , apply my tinted putty and work like that until I'm happy with the color match. you could use artist paints too, with that you can mix and blend colors to match and introduce some grain patterns so the repair isn't a monotone, so it looks like wood.
one thing to keep in mind is the thing needs to match the finished product and when you put a finish on wood it darkens the wood but the finish may not absorb quite like wood so you need to match with the final result in mind, not the color of bare wood. If you match the color of bare wood it may jump out with the finish applied.