I might have mentioned in my intro I like books. I also have about 10,000 of them, and three bedrooms though I only need one. So I'm making the 2 downstairs bedrooms into my library - a long wished for (previously never actually believed possible) dream.
The two rooms are off the dining room connected by a small 3-way mini-hallway with the downstairs loo (with shower) in the room between the 2 'library wings'. I call them the north and south library rooms; the N is a bit wider by a meter or two, else similarly-sized, with nice 2x DH windows overlooking what I call 'the bird garden'. I've got the big old 6-legged wood conference table I'll put in the S room, and a 1920s desk & older library table for the N room, plus some great lamps, etc. I have some good old rolling wood chairs - a 'RR station' type and a 'typists' type (I'll also be putting my 1940s Underwood mechanical typewriters in each room), but am still on the prowl for a couple fancier padded chairs - which I am certain I will find the perfect ones. Geez I'm looking forward to getting this done!
All of this of course from junkshops, restore, yard sales; and the conference table is one of two (the other is now looking good with 1930s junkshop mission chairs as my dining room table!) I bought ca. 1996 from the university where I was doing my MSc ($25/ea; the tables not the degree). I remember thinking at the time "these'll be good in a few years when I've got a real life and house!". After a few more years of grad school they stayed in storage for 20 years, but sure come in handy now!
Anyway, the S room had paneling on one wall. This obviously covered up plaster damage because the adjacent ceiling plaster had a crude but dry and stable hatchet-job plaster fix (painted over in glossy white paint, geez!). I suspect this repair was done sometime 40-55 years ago, based on the quality & aging of the veneer plywood used (I've got the same plywood on all walls in the living room!).

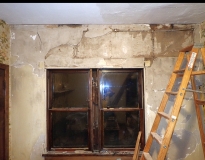
As I was getting ready to paint the ceiling & one white painted plaster wall (two have old wallpaper I like which will be behind shelves anyway) before building the shelves ('getting ready' - ! - I bough the wood in May 2021 and as of this /still/ haven't quite started building them,though the wood is now in the room!) I figured I may as well do it right and get rid of that paneling now & fix whatever's behind.
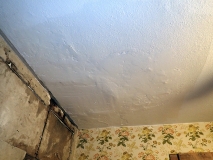
A lot of plaster fell out & down, with a lot of dust, as I peeled the paneling off. Most of the upper 1/3 of the wall's plaster either fell or pried off pretty easily, and under that was a fairly awful product of the 1920s-40 era, 'Celotex' lath, a sort of fiberboard that was sold as a lath back then. A reminder from almost 100 years ago that particle board and its idiot kin are and have been a bad idea for building materials!
OK,I think I've figured out how to add pix:
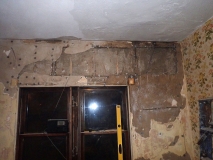
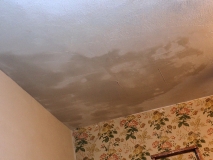
Even if the water damage (which I think may have come from condensation in a (then) uninsulated attic space above it perhaps from poor adjacent bath venting - somewhere I saw a good diagram of this which 'lit my bulb' to the idea) hadn't done enough damage I think the 50+ years of ambient wall temperature & humidity change also added to its decay.
In any event, I pried off as much as would come easily - much of the brown/scratch coat and a little more of the surface - and appraised the situation. I'd expected to find wood lath underneath! This wall, maybe more, must have had some reconstruction in the 20s or 30s or so because it's, in the original footprint (1890) of the house. They must've decided to try some of the newfangled 'radio age' materials available...
The plaster was thick enough & I didn't want to get in too deep so decided best way would be to attach metal lath over the $#@! celotex where plaster was missing (to avoid having to take out that fuzzing old material) & use plaster washers on the adjacent remaining plaster.
I managed with some difficulty to get the lath screwed onto adjacent materials, though had a hard time finding where the studs were underneath the celotex... I also put some slivers of wood (~2-3mm thick, from paint stirrers) between the celotex & lath, which I'd stretched tight against the celotex, to give a little space behind for good keying.
I used quick-crete concrete bonding adhesive 9902 as bonding agent (it's all that was available locally, and apparently works for plaster etc. also even if not pink) and slathered that well onto the celotex, lath, and sanded plaster (I used gardz on the few remaining areas of paint).
After much, much reading & u-tube learning all about plaster, plaster repair, & materials I'd decided on trying structolite -- until I noticed the $#@! 'asterisk' in the product description saying "Not recommended over metal lath when a smooth trowel finish is required." Not being a plasterer (I'm a botanist!) I wasn't sure what constituted a smooth trowel finish or if that only applied to the structolite but not subsequent coats... So, unable to find the answer I ditched that idea and decided I'd try durabond as first layers, then (because I'd read how impossible to sand of shape it was after drying) easy-sand over that in hopes of getting as level a wall surface as I could (I'd also read 'don't try an entire wall if you are a beginner', etc. but I'm more of the ready fire aim type (but with pre-study) also too cheap to hire it out (in an area with probably no plasterers anyway). And sure didn't want to cover it in drywall!
In the end I had a lot of fun with the durabond, got good keys, added a few 4-5 thinner (and thicker) coats then when the level was getting closer to the needed surface switched to easy-sand (in actuality I think both of these are far from non-sandable, but I didn't need to do any), then built it up to near-desired surface with the easy-sand. As I was getting close to that I decided to try plus-3 as a top coat to get things smoother.
In the end on this ~ 10x9 wall (and the bit of ceiling) I used almost 2 20# bags of durabond (one got unopened for $4 at the restore, btw!), a bag of easy-sand, and a 4.5 gal pail of plus-3! There were some areas where the plaster was sort of 'curved in' near the base, so I thickened that up, and added from ~ 1-3mm over the remaining plaster elsewhere to level things out. So good solid wall.
Then I started on the ceiling, which was uneven by maybe 1" between high and low areas, and looks as though whoever did the job back then slathered it on crudely then couldn't sand it at all, so left as was and painted over with a coat of glossy white paint!
As the previous owners had kids most of the 30 years they lived there even that little fix would have displaced a kid or two, so I'm also seeing my duty & place in the house's history here; able to do work that others were unable to do because of occupied space.
I sanded things as level as I could & the 'high spots & ridges' with my RO sander & 100 paper. Areas where the original sanded plaster edges came to the 'patch' were pretty much unsandable, but the rest I managed to get a lot closer to plane with some effort. Everything remained solid, so with bonding agent applied as appropriate I leveled things out with numerous thin coats of plus-3.
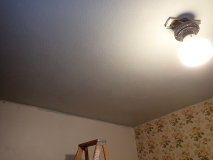
When I got it about level I started thinking/reading/u-tubing all about decorative textures and determined that my ceiling (in this room) has a sort of 'sand swirl' texture. So I trued my hand at adding silica sand to the plus-3 to get the micro-texture (the sand), then looking into how to get the larger, swirl, texture.
I wasn't quite able to get it perfect (I mistook a u-tube video showing how to get this texture by sponging off sanded finish coat, when actually what I think I needed was applying a sanded texture coat with a brush; additive not subtractive). However at this point this ~ 3x5 area of the corner of the ceiling already looked 1000% better, has a hint of the swirl texture, and was going to be painted properly with the rest of the ceiling in a flat paint - in a reading room with table lamps & where I don't plan on doing too much ceiling gazing and I was ready to wrap it up
!
Another little bit of detail: since this is an outside wall, and my house had cellulose insulation added to the walls maybe ca. 1985 and shows no sign of ill-effects from that (as in condensation in walls), I wanted to make sure I had a good vapor barrier. So I used zinser 'BIN' shellac primer over the new plaster (which provides a much better vapor barrier than other primer or paint).
Over that I painted several coats of BM regal latex paint mixed in SW #6713 'verdant' green on the wall (& opposite, undamaged). This sort of matches one of the colors on the newer of the overlapping/peeled old/older wallpaper (newer:1960s? .. no wallpaper under paneling, so same time or later than that repair; the older: 1940s?) that is still on the S & N walls, & which may show through here & there behind the bookshelves, which won't have an entirely closed wall side.

I used zinser gardz primer on the opposite wall (with some tape residue, etc. from years as a kid's bedroom) & the ceiling away from the repaired area (that done with the BIN). The ceiling I painted with BM 'ultra flat' ceiling paint mixed to SW 6211 'rainwashed' color.
I also sanded, primed, etc. the metal covering of the hot water heat convector & cover; this was probably swapped for the original radiators back before they did that paneling maybe 1940s or 50s (out with the old in with the new!) ... I've got the same items in the N library & living room. While not as ugly and junky as 'baseboard' heaters, they're not works of industrial art like the radiators elsewhere in the house! More like what you'd see in a 1950s school.
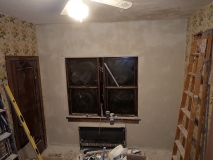
Here's wall mostly painted, before the convector painting:
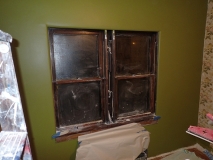
(By the way, the windows have metal rounded corners on the side & upper wall joints and the pine sill as seen, a rather nice design I think. The two wooden squares at upper corners must've been intended to securely hang curtain rods from so as not to have to attach to plaster.)
Making matters harder, the cover part of the convector has these $#@! flanges on the bottom that prevent full removal without disconnecting the water lines also! (else it'd simply lift up & off after a couple screws removed)... So that made some plaster repair behind it a real PIA! I did the best I could, primed it, then put a sheet of that whatsitcalled shiny mylar 'corrugated' roll insulation between the convector rear & wall, tightened it down & screwed against the wall, then caulked the convector body top the wall, and painted that & the cover in the wall color. It looks pretty good.
OK, that only took 2 months! (but looks great). Now I've got the shelf wood inside, the plans drawn up (over my 20 years as migrating book-loving government scientist I've built many bookshelves; each always a little better or fancier than the previous, always having to leave them behind when moving at own expense to next gig; sometimes selling sometimes giving away when I moved on because they were so big - so I have a lot of experience making basic functional attractive pine bookshelves of which these'll be the 'final exam' of 25 years!).
I was going to start on one wall's shelf this weekend but got lazy...
Here's the wood awaiting though!: