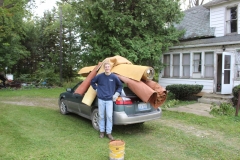
I decided I'd start a thread for my house restoration as well. My house was built approximately 1912 by Chris Roth, the grandfather of the gentleman I purchased it from. It sets on the edge of what used to be the Columbia swamp in the thumb of Michigan. The swamp was drained many moons ago via an exceptionally large and deep ditch that passes right in front of my house. 'The Moat'. Mostly, I've just begun the deconstruction process, and replaced the roof, but I'm getting to where I can start putting a few things back together. I'll hopefully get some better digital pictures of the house, but all I really have right now is one a buddy took of me removing the old carpet and piling it on his Subaru. Easier than carrying it!
when you hit reply you'll see a button below the text window that says "full editor and preview" the next window will look similar but then you will see a tab below the text box where you write that says attachments. click that tab then you can click "add files" and steer to where they are on your computer, or you can drag and drop them into the text window. some load pics in to a gallery and link to them , that's possible too.
phone pics sometimes turn sideways , It might be because people turn rotation off on their I phone or something.. the quick fix is to pick up your screen rotate it and set it down
Everyone will be interested in your project and your pics. Welcome in.
Isn't removing stinky old wall to wall carpet like pulling out a splinter? I was going to leave mine to protect the floors from drips and nicks, but a friend said something to the effect of, "Get that disgusting stuff out of there." It felt good to. Poor Subaru.
/\ Oh, it certainly is! I had the exact same idea, and the buddy with the Subaru said the same thing as your friend. That's why his Subaru got used; it was kind of a spur of the moment thing. The floors are in pretty good shape under the carpet, and interestingly, the floors aren't entirely finished. It looks like originally there were large area rugs/carpets in the center of the rooms, and only the exposed outer edge of the floors are stained.
Uploading pictures is easy when you know how to do it! Thanks Phil! This is a shot looking in from the dining room to the kitchen. The downstairs bathroom is through the doorway to the right (added late 30's when the house was electrified). You can see the patch work paint colors on the wall behind me from the various eras of cabinet additions. These were all poorly done and taken out. While taking then out, some of the boards had Perfection No. 1 stenciled on them. The cabinets were built in part from the kerosene stove crate. When the stairs were moved (you can see a support post to the right) they cut off the chimney from the kitchen, and they must've bought a Perfection No. 1 kerosene cook stove. Beings I'm moving the stairs back to where they belong (with proper head room) I'm putting a wood cookstove back in the kitchen.
The built-in to the left is original, and will be stripped and refinished. I'm obviously taking up the kitchen floor, and you can see there is tile-ish sort of flooring under the linoleum and particle board. These tiles were glued down, and had some sort of a heavy paper-ish maybe asbestos backing, and this remained when I took those tiles up. (This picture is probably a year old)
The glue seems to be some sort of tar-like substance. Is there any thing that will cut through this, or do I have to get out the old scraper and elbow grease? What should I used to refinish the wood floors? Also, on the left of the door frame you can see a brown fleck where the paint flaked off. The original finish underneath is showing through, and is in incredibly good shape. Most of the trim in the house was painted like this, and it all is very poorly adhered. Maybe a cheap modern latex paint? Will a heat gun take the paint off being it is so poorly adhered and leave the original finish underneath?
your floors are coming clear without a lot of problems. mine had tiles stuck down with a tar like substance. I had to use a clothes iron , I put some water then the iron to soften the stuff, only then could I get a putty knife under it. I had similar on another floor with a white compound. that stiff I dissolved with paint stripper, bought lots of towels to soak it up pitched them out the window as I went. It was gross but worked.
try first to dissolve it, try water, alcohol, paint thinner. If none of those affect it try paint stripper , acetone is getting stronger but experiment , see what will dissolve it. the objective will be to get most of it off so the sandpaper wont plug in 2 seconds.
be aware you are disturbing lots of dust and crap you dont want in your lungs, yes some of those flooring materials may be asbestos. the thing with asbestos is you dont want the airborn fibers to get in your lungs , it causes cancer. wetting it down may help, It isn't' absorbed through skin so you can touch it but try not to breathe it , mask up while you are doing this stuff. If you go further into regulations they will take it further separating zones with plastic white suits etc.. so just be aware of the materials you have you can take stuff to testing it's not too expensive. 50 bucks..
you'll probably want to sand floors but dont start there, I'd mostly work top down then all the crap isnt' damaging your new floor. I bought interlinking rubber mats about 18 inches square, I suggest that because then you can move them around and reconfigure the size as you go.
they may have glued paper down before the flooring , that's good. it could be asbestos too though I can't tell you that.
if you have a clear finish under paint it is probably shellac, that will help because shellac has a low melting temp so when you heatgun it it will pull most of the paint off without damaging the wood too much. forget about saving and finish in between but if the paint is driven into the grain of the wood it's much harder to get to clear wood. I usually just get most of the paint off then sand it to clear wood. you can try just washing with alcohol or mineral spirits it dissolves shellac.. you can get into situations where you are going crazy picking bits of paint out , I use a belt sander for that If you wanto to be fussy about original patina You can. you can't use a belt sander everywhere obviously I usually remove pieces strip them and put back.
use a long putty knife about 2 inches wide and a glove you can try to get under it once you get it warm. alternatively you can use pull scrapers. If you use a pull scraper with a sharp carbide blade it will cut down to fresh wood you want to avoid nicking and gouging the wood. go slow at first but if it starts burning the paint turn the gun away, there is technique you'll learn it. If your putty knife starts digging into the wood try going the other way , it depends how the grain runs in the wood. If you strip wood and want to paint it I'd put shellac first. one day you might want bare finished wood instead and it helps seal it anyway. when you get to finishing stages you can try using cabinet scraper, it's basically just a steel rectangle and you sharpen the edges put a bend in it and push that makes fine shavings and leaves it dead flat. If you plane stuff You can finish up with a scraper that's a different tool than with a handle that you pull.
I did all my floors, removed baseboards, drum sanded, filled any cracks and nail holes, rented the edger it sands the edges, then a big pad sanded levels things out ready for a finish. I use a few coats of danish oil then 3 coats of polyurathane, some prefer shellac it's softer more original , doesn't wear as well but you can wash it off and go again or put more. lacquer thinner will wash off shellac. It's dissolved in alcohol when applied originally. some like to do just oil floors, that's nice you can recoat the oil every once in a while and then you can always topcoat later.
I rented a giant dumpster and filled it when I bought it was nice to clear a lot of that crap out. I had rugs upon rugs upon layers of flooring..
Id try not to rip into every direction It can become overwhelming and these thigs take time so my suggestion is doing a quick cleanup even paint walls if it feels better then go room by room in some logical manor. the kitchen is the worst to be with out folllowed closely by the bathroom. You need heat a water system that works a sewer that isnt' plugging...drainage a roof that isn't leaking, safe electrical, heat.. the mechanical parts are not as fun but the most necessary.
you may be making decisions to rewire or drywall or insulate, some try to save lath and plaster walls. in some cases you can laminate drywall or if you are going for a museum then you may find more sensitive approaches. you can fish in wire or open walls. you might want a larger panel so you can use electric heat etc. there are many options.
you probably wan to clean things up and make a basic to do list and try to find a logical sequence that works for you and your budget and living circumstances. Hoping you find some neat things during the clean up stage ! you never know what you could find.
old drywall will likely contain asbestos in the mud. you can check locally about disposal if you need to. I had to do testing just to dump old drywall. plaster was not a problem your mileage could vary.
seriously consider all that old dust as poisonous, its dead bugs mouse poo who knows what else. I'd vacuum lots and put a hose from your shop vac outside so it isnt' stirring it up. after vacuuming You can mask up with a good mask put a fan in every window and blow the place out with a leaf blower, thats pretty extreme and could cause issues for your neighbors but you wont be sorry for getting rid of the dust that goes in every weird place on the sides of joist between every crack etc. you can't vacuum it all but try that too. my thought is that if you get it out in the first place you aren't living in it and stirring it up all the way through. once you get rid of a lot of the dust it will feel better.
If you want you can read up on proper cleanup procedures for asbestos contamination, there is lots of info on that and my advice likely flies against everything you should legally do. If you hire anyone think of their exposure and safety you dont want legal issues, or to make yourself sick. masks are cheap a full face respirator is good to have and you can get pretty good respirator masks, the ones that hook around your ears work but that's not for serious dust. to do it properly you'd need a face mask that fits and you'd do a fit test and use cartridges suited to your work.
dont feel that safety glasses are something that you wont need. You are in control. I know guy that tried to put down a threshold put a screw on it hit it with a hammer to try to get it to penetrate it flew up and basically blinded him in one eye. who would think that screwing on a threshold would require safety glasses but sh_t happens It was tragic for him.. so protect yourself whatever you do.. You're the boss..
Oh boy ! I bet your house smells a lot different with the bad old carpet gone !
I had the same problem with some type of latex paint over old oil paint on my trim. The areas that were the worst were the areas that previously had a lot of "patina" (aka years of skin oils) around areas like the doorknobs and light switches. The PO did not do any prep work resulting in very poor adhesion between the old paint and the new. I went after these areas with a green scrubber pad and TSP in water. I got as much of the bad latex paint off as I could, then I primed all the wood trim with an adhesion primer, then used a good quality water based alkyd paint (Benjamin Moore Advance. I loved it - others have reported unhappy results with it).
I moved into my house about three years ago. The first areas that were treated this way have remained solid, with no peeling paint or other problems. The PO had painted all the trim and doors with a dark charocoal grey paint, over an old creme colored paint, so all the new dings and scratches were very visible and unsightly.
A heat gun will typically soften ALL the paint layers, so do not use this unless you want to strip all the trim bare. I have seen YouTube videos of people using a clothing steamer to remove old paint layers, but I have not tried this myself.
T.J. It was common for floors to be only finished on the outside edges. You would have had a linoleum carpet installed. Save that thirties corner sink, although not overly rare. If you need one, the harder you look the rarer they become. Or so it would seem.


 [/image]


