
I am new here and just read your entire post. It gives me hope that we can handle the renovations on our newly purchased 1900's home.
Your home has come so far. It's amazing!! The woodwork makes me swoon. I know you are proud of all your work.
Tracey
JRC's Nightmare on Elm Street - Continued
-
Tracey (WavyGlass)

- Settling in
- Posts: 25
- Joined: Tue Dec 23, 2014 3:40 pm
-
Neighmond

- Moderator

- Posts: 1070
- Joined: Mon Aug 17, 2015 5:15 pm
- Location: Rural Emmet County Iowa
- Contact:
Re: JRC's Nightmare on Elm Street - Continued
Makes me feel like a piker is what it does! JRC got more done the first year since I have since I bought this place!
Re: JRC's Nightmare on Elm Street - Continued
Neighmond wrote:Makes me feel like a piker is what it does! JRC got more done the first year since I have since I bought this place!
Keep a close eye on my post dates. I've been working on the house since 2011, so it feels like it's been slow, to me.
Re: JRC's Nightmare on Elm Street - Continued
Wow, it's been a long time since I've posted an update. And, unfortunately, I don't have a lot of progress to report. I am happy to report that I finally sold my other/previous house to a nice couple, so I'm still getting used to not having that on my shoulders, and enjoying the freedom of having only one set of bills to pay.
I have done a little yard cleanup and planting this spring, though. The back yard has been cleaned up, and I removed the chain link fence that separated the "jungle" portion of the backyard (that is now cleaned out) from the normal part.
Here is a pic of the planting I did in the front yard:
Also, since my last update, I had to get a new phone, as the screen on my old phone started to fail. Here are a couple "artsy" pics from around the house:
-
mattswabb
- Shakes a cane at new house owners
- Posts: 544
- Joined: Sun Aug 16, 2015 8:33 pm
- Location: Elyria Ohio
- Contact:
Re: JRC's Nightmare on Elm Street - Continued
Congrats on selling your other house. When we sold ours after renting it out for a few years it was a huge load off us. I used to check on it twice a day and it took a while for it to sink in that it was over.
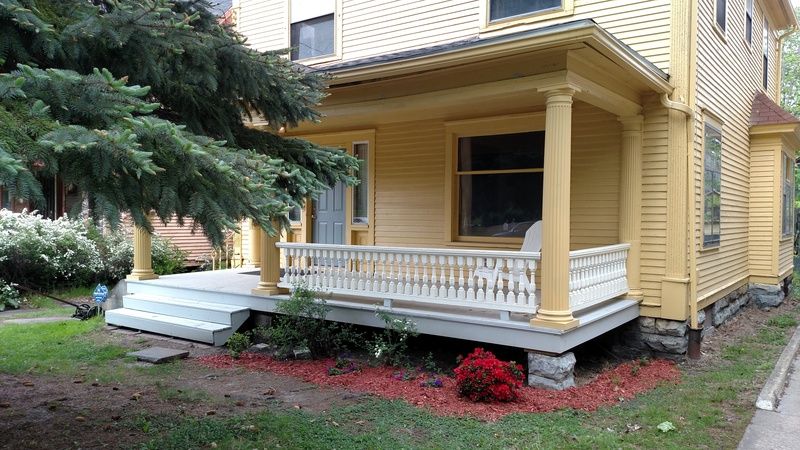
The porch is looking good.
The porch is looking good.
Re: JRC's Nightmare on Elm Street - Continued
I'm working on the front door, and surrounding trim. I removed the old doorbell plate and stripped the paint.
Before:

After:
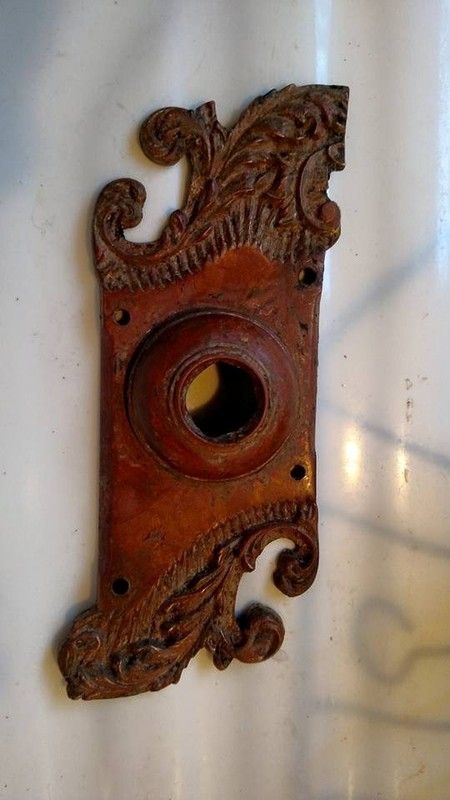
Under the paint, there were large areas with black crusty stuff. I'm guessing that's what was left of the original plating. This appears to be copper. There is still some corrosion buildup in the details, but I don't have a dental pick.
My neighbor, who sells restored hardware, says that I should polish it with a wire wheel, to take off the rest of the corrosion, and seal it with polyurethane. But I don't want bright and shiny, I kind of like the patina it has.
So, here are some questions: (I may start a new thread on this)
1. is there a better way to remove the rest of the corrosion buildup, without taking off the patina?
2. Would you seal this to preserve the patina, or leave it alone, and let it weather?
3. Maybe I should let my neighbor polish it up without sealing it, and let a new patina build up?
Before:
After:
Under the paint, there were large areas with black crusty stuff. I'm guessing that's what was left of the original plating. This appears to be copper. There is still some corrosion buildup in the details, but I don't have a dental pick.
My neighbor, who sells restored hardware, says that I should polish it with a wire wheel, to take off the rest of the corrosion, and seal it with polyurethane. But I don't want bright and shiny, I kind of like the patina it has.
So, here are some questions: (I may start a new thread on this)
1. is there a better way to remove the rest of the corrosion buildup, without taking off the patina?
2. Would you seal this to preserve the patina, or leave it alone, and let it weather?
3. Maybe I should let my neighbor polish it up without sealing it, and let a new patina build up?
-
Nicholas

- Shakes a cane at new house owners
- Posts: 578
- Joined: Mon Aug 17, 2015 10:23 am
- Location: The Winter Strawberry Capitol of the World
Re: JRC's Nightmare on Elm Street - Continued
I am so envious of some of you folks, with the great homes and the original stuff that goes with it. As I mentioned about what I am invested in, it went through a lot of changes and revamps. One of those, besides the crappy windows they installed, was the removal of the original doors, replacing them with Lowes store boughts, with DIY trimming that left large spaces under and over, of course the leveling didn't help that.
But this is what I found while raking the yard:
Yes, it is one of the doorknob placements for one of the original interior doors.
Jrc, I just wiped it clean, did nothing else, even left traces of the paint on one of the edges. On yours, that second pic, the after, looks great as it is, I would go no further. I don't see too much corrosion, in the pic so I could be wrong. Maybe seal as is?
As for my find, the only door I can put it on, would be the original "smurf" closet door in my daughter's bedroom, and I can actually see the outline of the keyhole, so that is where I am going to put it.
- Attachments
-
- SAM_3041.JPG (101.51 KiB) Viewed 2006 times
Last edited by Nicholas on Sun Jul 12, 2015 4:16 pm, edited 2 times in total.
1915 Frame Vernacular Bungalow
"If it ain't leanin' or a little crooked then it ain't got character" - local resident
The BumbleBee House
"If it ain't leanin' or a little crooked then it ain't got character" - local resident
The BumbleBee House
-
Gothichome

- Moderator
- Posts: 4184
- Joined: Sun Aug 16, 2015 8:34 pm
- Location: Chatham Ont
Re: JRC's Nightmare on Elm Street - Continued
Hello JRC, that's a great looking button plate. Your choice of finish I think depends on how original you want it to look. If it is copper, with out a covering or regular polishing it will turn a nice vertigrey green. The Victorians would never let it get that colour though. For the authentic look, I would get it polished up and then apply a clear matte coating. This would get you the look your after. Also, to my eye it looks like the top corner has been broken (or at least trimmed). If you trim off the corner to match the profile of the leaf edge it would round off that hard corner and no one would be the wiser.
Oh, by the way the home looks fantastic.
Oh, by the way the home looks fantastic.
Re: JRC's Nightmare on Elm Street - Continued
Thanks for the replies.
Nicholas, I'm sure you had other priorities when looking for your house. (e.g. location, schools, neighborhood, etc.) But, at least in my case, having original details was pretty high on my priority list. Some of us have these enviable houses because we were willing to compromise on other things that were probably more important to you. If you're on Facebook, and you want to see some REALLY enviable houses, look up the group "for the love of old houses."
And, by "corrosion" I mean the bits of crusty stuff that is still hiding in the details.
Gothichome, they trimmed the upper right corner to make room for the flange of the aluminum screen door. Wasn't that thoughtful of them? I like the idea of rounding it off to match the edge of the leaf, thanks!
I don't think I'd want it to turn green, (although I think that would look good, by itself) because it would eventually stain the trim around it. So, I think I'll probably try to clean it up a bit more, and seal it as-is, unless someone has an idea I like better.
Nicholas, I'm sure you had other priorities when looking for your house. (e.g. location, schools, neighborhood, etc.) But, at least in my case, having original details was pretty high on my priority list. Some of us have these enviable houses because we were willing to compromise on other things that were probably more important to you. If you're on Facebook, and you want to see some REALLY enviable houses, look up the group "for the love of old houses."
And, by "corrosion" I mean the bits of crusty stuff that is still hiding in the details.
Gothichome, they trimmed the upper right corner to make room for the flange of the aluminum screen door. Wasn't that thoughtful of them?
I don't think I'd want it to turn green, (although I think that would look good, by itself) because it would eventually stain the trim around it. So, I think I'll probably try to clean it up a bit more, and seal it as-is, unless someone has an idea I like better.
Re: JRC's Nightmare on Elm Street - Continued
What I would do (if you kind of like the patina), but want something that looks period is this:
1. Do not do as Gothichome suggests as this will destroy the patina on the top right. i.e. the reshaped area will be bright copper. If you are really set on doing this however, you could bring the whole thing back to bright copper (wire wheel or chemically), then re-add a fake patina with a darkening solution. This stuff works quite well on brass, I have personally never used it on copper. There may be other ways.
2. use metal polish, or a buffing wheel (sparingly). Thuis will have the effect of polishing through the high spots, but leaving the lower spots patina in tact. If done correctly it will look like the push has been lovingly polished and cared for all its life. Wash off compound or polish with soap and water and a scrub brush.
3. you could leave it as is, apply a bit of paste wax and re-polish from time to time, or coat with a laquer product such as Eastwood's diamond clear to preserve the shine without polishing.
Mick...