Using the Paintshaver Pro

Part of the former WavyGlass.org site. This was the place where most discussions occurred.
Locked
User avatar
Mick_VT
Moderator
Moderator
Posts: 2437
Joined: Sat Aug 15, 2015 2:39 am
Location: Central Vermont
Contact:

Using the Paintshaver Pro

Post by Mick_VT »

So yesterday I primed the last of the front facing walls of the house. So marks the end of an epic multi year battle with alligators.

Alligators you say? Well yes, their skin anyway. This is what I have been up against:
IMG_5853 copy.jpg
IMG_5853 copy.jpg (224.92 KiB) Viewed 746 times


That is 150 years of paint, coat on top of coat. One of the lower layers I can date to 1890 but there are at least a couple under that. The accumulation is around 1/16" thick and could in place be popped off with you fingernail, like you can see in this picture.

Alligatoring is what the NPS calls a "class III" situation - in other words "there aint no saving it" What happens is if you paint over this it just cracks again in one season and water gets in. When stripping I could see how more recent coats of paint had made it through the cracks and onto the wood underneath.

my chosen method of attack for this was a "paintshaver pro" (http://www.paintshaver.com):
Paintshaver-11-191x300.jpg
Paintshaver-11-191x300.jpg (18.63 KiB) Viewed 746 times


Not cheap, but certainly effective. This device has been discussed elsewhere here so I thought I'd share some experiences / pictures. It has its limitations, namely that you have to find and set every nail (imagine doing that under alligator skin. It also wont go to the very ends of clapboards. Personally i didn't care for using it on trim boards either. So my prep for using this device, actually took more time than the use itself. Here's the same bit of trim prepped (though nails are not yet set.) You can also see I have yet to remove and dispose of the aluminum storms on this window.

IMG_1525 copy.jpg
IMG_1525 copy.jpg (219.45 KiB) Viewed 746 times


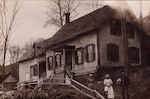
So this is the first strip - done with heat gun. It takes me back to 1890, you can make out the brown trim and warm gold color of the clapboard. Under that one layer of color is older white paint, though it is very thin and you really cant see it here. Every coat of paint since that 1890 coat has been white in true New England style. I was able to get good enough samples of this paint to replicate the colors and an old B&W photo of the house from 1910 helped with details of what should be painted light and which dark. That's the photo in my avatar by the way.
Last edited by Mick_VT on Fri Jul 17, 2015 4:17 pm, edited 1 time in total.
Mick...

User avatar
Mick_VT
Moderator
Moderator
Posts: 2437
Joined: Sat Aug 15, 2015 2:39 am
Location: Central Vermont
Contact:

Re: Using the Paintshaver Pro

Post by Mick_VT »

The paint shaver slices its way through the paint, "shaving" it off to be safely removed and contained in a shop vac (with hepa filter and bags). You adjust the depth so it doesnt take a bunch of wood with it, in fact you can adjust it so finely you can remove the paint pretty much layer by layer if you want.

This is what the clapboards look like post shaving:
IMG_1828 copy.jpg
IMG_1828 copy.jpg (187.32 KiB) Viewed 745 times


I have also scraped the trim boards and clapboard ends here and lightly sanded with a coarse disc. . But also you can see how little damage the paint shaver does. It will remove a little wood, but really it does no more damage than a sander.

Notice the old growth, totally clear clapboards - worth saving in their own right!

Once prepped I can paint shave a good sized wall in a day, its still messy, you still need to do some containment, but its fast and kind of fun! The nails MUST be set as hitting nails will sometimes rip them out of the board causing damage, but more often will shave off some of the nail dulling the carbide cutters which last fairly well, but die quickly if you shave iron with them! I have managed to do two sides of our house with less than three sets of cutters.

I follow with a random orbit sander through three grades, then prime (ben moore long oil penetrating primer), putty / caulk, re-prime then top coat with ben moore latex at least twice.

Well thats about it, I'd love to answer any questions you have on using this device. I have no interest in the company by the way, I just use their product. I like it, wish it were a little cheaper, but it does what they say it does!
Last edited by Mick_VT on Fri Jul 17, 2015 6:58 pm, edited 1 time in total.
Mick...

Mellydramatic
Settling in
Posts: 23
Joined: Sat Sep 05, 2015 5:51 pm

Re: Using the Paintshaver Pro

Post by Mellydramatic »

Amazing!! Thanks for sharing this.

User avatar
Sow's Ear Mal
Stalwart
Posts: 371
Joined: Mon Aug 17, 2015 4:43 pm
Location: Eastern Ontario, Canada

Re: Using the Paintshaver Pro

Post by Sow's Ear Mal »

Interesting tool. I'm a big fan of my heat gun, though. But the fact that this unit captures the debris and dust is pretty cool. Especially for those clients panicking about lead paint. I love Ben Moore oil primer too. Have fun, Mal

lovesickest
Forgotten more than most know
Posts: 436
Joined: Mon Aug 17, 2015 3:24 pm

Re: Using the Paintshaver Pro

Post by lovesickest »

Wow - that tool looks like it works great !

User avatar
Gothichome
Moderator
Moderator
Posts: 4188
Joined: Sun Aug 16, 2015 8:34 pm
Location: Chatham Ont

Re: Using the Paintshaver Pro

Post by Gothichome »

A great review Mick. It's some thing I've been thinking about. I have lots of large flat surface to de paint on our eaves. This just might be the best option. Thanks

bpapa
Just Arrived
Posts: 8
Joined: Wed Aug 19, 2015 12:38 am

Re: Using the Paintshaver Pro

Post by bpapa »

Thanks for sharing your experience. I've been looking into the PaintShaver Pro for a barn that I have. Are you using the 6, 8, or 13 Amp model? Do you use the PaintShaver for the bottom/underside of the clapboards?

User avatar
Mick_VT
Moderator
Moderator
Posts: 2437
Joined: Sat Aug 15, 2015 2:39 am
Location: Central Vermont
Contact:

Re: Using the Paintshaver Pro

Post by Mick_VT »

bpapa wrote:Thanks for sharing your experience. I've been looking into the PaintShaver Pro for a barn that I have. Are you using the 6, 8, or 13 Amp model? Do you use the PaintShaver for the bottom/underside of the clapboards?


I bought the 6 amp, seems plenty beefy enough even for what I have been tackling. If I recall correctly I got the kit that came with the extra cutters.

Yes I set it to do the underside of the clapboards, and usually hit that as I do the first pass. With the thickness of paint I have it doesnt do them 100% every time but a quick scrape with a hand scraper afterwards gets anything it missed. Easier to do that than to back of the main cutters and do multiple passes with the underside cutter.
Mick...

Locked