Page 1 of 3
Shellac Application
Posted: Thu Sep 03, 2015 5:39 pm
by Chadzeilenga
Does anyone know how a shellac finish would have been applied when my house was built in 1904? We are lucky in that most of the trim in our home is not painted. Some of it was stripped of shellac and a clear poly was applied. I'm in the process of correcting that and getting all the trim back to matching the garnet color. One of the areas I'm struggling with is applying shellac to our 5 panel doors. I'm using ~2-3 coats of 2lb cut of dewaxed Garnet flake from shellac.net. I always try to work from the wet edge of the finish, but still manage to get some drips or overlap area that turns out darker than the rest of the finish.
One area that was particularly difficult to finish was the stairway. I started out at the top step and worked my way down. I would finish the baseboard, then the tread and then the baseboard on the other side. By the time I started on next step, the coat from set above was already dry and I would get lap marks if my next finish went over the first.
When I look at the trim with the original finish on it, I can't seem to find any evidence of brush marks/overlaps, drips. Would there have been a retarder that slowed the cure-time? I'll try to take some pictures tonight to illustrate
Re: Shellac Application
Posted: Thu Sep 03, 2015 5:42 pm
by Mick_VT
you might want to experiment with padding / wiping it on, and using a lighter cut of shellac. I put garnet shellac on a bookself I made earlier this year absolutely zero issues with padding on a 1 pound cut. When I brush on a 2 pound amber (like zinsner sells) I sometimes get the same issues you do. There are a bunch of good articles on padding shellac around on the web.
Re: Shellac Application
Posted: Thu Sep 03, 2015 5:47 pm
by Chadzeilenga
Very interesting, guess I never thought of applying with something other than a brush. I'll have to do some reading on it. Of course I'm almost done with the project

It sure is great stuff IMO.
Re: Shellac Application
Posted: Thu Sep 03, 2015 10:42 pm
by Casey
1) try a better brush. Buy the largest watercolor "mop" brush you can find (1 1/2"). Practice getting the right amt. of shellac on the brush. Apply in one direction (don't over-work it)
2) 2lb. cut is about right, maybe a small amount more of fresh alcohol.
3) I have heard of a "shellac retarder" that is some kind of solvent/additive. Never tried it.
4) 3 coats of 2lb is not yet enough to build a finish, that happens (for me) at 4 and more coats.
Casey
Re: Shellac Application
Posted: Thu Sep 03, 2015 11:35 pm
by Mick_VT
I bought an expensive french shellac brush from Lee Valley, absolute waste of money IMO - it's now a dusting brush for my bench planes. when I do brush I use a Purdy and don't use a shellac with a darker tint. Casey's advice on the over working and number of coats is spot on. But at the end of the day for me padding with a thinner cut is what works for a furniture fine finish, but I guess YMMV.
Re: Shellac Application
Posted: Fri Sep 04, 2015 1:56 pm
by Casey
The mop brushes are super-soft (like a ladies makeup brush), and have no corners, so there is no heavy line of finish at the edge. I only found out about them last year, and for shellac and varnish it has been a godsend, it lays down the finish with no trace of a brush mark,I rarely use the pad on anything architectural, except doors which are flat (very little molding) because the pad favors flats, not moldings with ins and outs. The pad is fine once you are ready to do a final glaze coat, after all the ground coats have been laid and carefully leveled with steel wool or sandpaper. I can't build a decent finish on many molding shapes with just the pad.
Casey
Re: Shellac Application
Posted: Fri Sep 04, 2015 2:11 pm
by Mick_VT
Casey wrote:The mop brushes are super-soft (like a ladies makeup brush), and have no corners, so there is no heavy line of finish at the edge. I only found out about them last year, and for shellac and varnish it has been a godsend, it lays down the finish with no trace of a brush mark,I rarely use the pad on anything architectural, except doors which are flat (very little molding) because the pad favors flats, not moldings with ins and outs. The pad is fine once you are ready to do a final glaze coat, after all the ground coats have been laid and carefully leveled with steel wool or sandpaper. I can't build a decent finish on many molding shapes with just the pad.
Casey
Hmmm, yes I had not tried a pad on anything detailed. I'll have to look at the mop brush. The spendy french brush I got was rounded too, but wasnt super soft like you describe. The big thing I like about padding is that I can work much faster, which I guess is part of the reason why there are no lap marks.
Re: Shellac Application
Posted: Fri Sep 04, 2015 2:16 pm
by Mick_VT
Are these the shape you are referring to Casey?
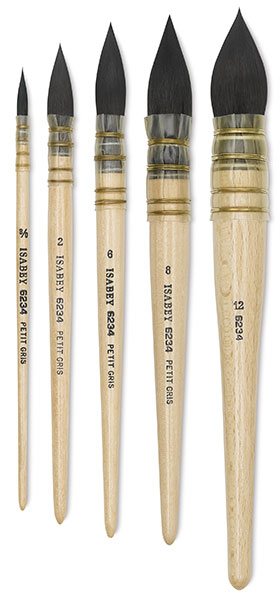
There is a more rounded (less pointy) brush too but they seem to call those a "wash" brush rather than a "mop"
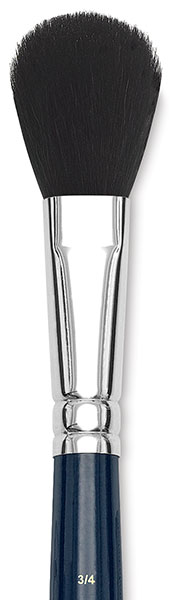
Re: Shellac Application
Posted: Fri Sep 04, 2015 7:34 pm
by Casey
Yes, the big oval "wash" brush.
Casey
Re: Shellac Application
Posted: Fri Sep 04, 2015 8:07 pm
by Chadzeilenga
~8yrs too late on this info... ha ha! At least Shellac is forgiving...
I used a decent natural bristle brush and followed the "one direction" application recommendations. I found that the finish would come out extra glossy and look a little "plasticky". One technique I found was that by "working" my last coat a little as it was drying I could create a more "satin" finish that wasnt so shiny.
I'll have to pick up one of those "wash" brushes and try it out. Can't wait! Thanks for all the valuable information.