I decided that I had better get all the baseboards and trim installed so I went about gluing strips to the back of each piece of baseboard. sanded them well to remove most of the paint bits, ran the edges over the jointer to even them up and cut a fresh roundover. I had a lot of fitting to do to follow the contours and corners especially near the bay window where It made for some odd angles.
I got it pretty much finished jut have to nail it all in place then I can do the same with the casings. I have them sanded and clear of paint, but picking the specs out is a bit tedious.
The weather warmed up and so I started trying to get the yard under control, my washer died again with an error, and then I increased the water pressure to see if the sensor just didn't like the low pressure and one of the sink hoses blew so I just installed new shutoffs and new taps and hoses. I changed to the single handle faucet since I had a new one on-hand and like it. My bathroom counter is very low so with the tap a bit taller it's better. fixed my washing machine last night, it had a water temperature sensor and the wires had pulled out of the connector. whew! now that fire is out..
I got distracted trying to pull an old car apart. I'm removing the engine and other bits I may use later for my other cars. still have little roofing to finish up.
I had tried splitting the fir strips on my tablesaw but the blade is 1.5 mm thick so I loose some to sawdust. I tried with my little bandsaw , it has a thin blade but it wasn't a rip blade. it was ok for tight corners and fretwork.. but I found two blades for free. the guy ordered the wrong length. one was a rip blade. Im going to try to silver solder the ends of the blade to make shorter to fit my saw and then try ripping with that. then the strips will be a little thicker since the blade is thinner.
I have a whole bunch of that flooring cut down to an even size about 3x 5/8. its hard to figure out how much I need with all the various lengths. I tried splitting it on the tablesaw so it's thin and then I get double , it worked but I didn't want a bunch of thin stuff sitting around or it might go curly.
I plan to put 1/4" plywood on top of the baseboard along one wall up to eye level and then start nailing and gluing the strips over the plywood, when I'm done that I can put a shelf on top. that one will just be a ledge maybe 4-6 inches wide.. like a wide plate rail. Higher up I pan to put a more solid shelf for radio display.
one either side of my fireplace I have room to do some built ins. I'm considering that. I have a neat art deco antique bar that fits well on one side though.
in my basement I have an old jelly cupboard , it was painted grey then blue overtop. and I started thinking I might like to make another like it but with reclaimed wood , maybe i could make one to fit the space beside the fireplace but not attach it permanently, that way its not part of the house and if I ever sell I could choose to keep it. I saw a free one like it come up on Craigslist that had not been painted. they must be quite rare. It was gone quickly.
I think it would be easier to recreate the thing than strip all that ugly paint.
I thought maybe I could make a jelly cupboard to put beside the fireplace and it could be designed so it fits in with the wainscot I'm planning.
I could see making a few of them to sell, it might not be profitable as it is a lot of fir but I like the idea of taking old flooring and making it into jelly cabinets. the one I have makes good use of its footprint and they are authentic to the age. Its basically made from the same material as wainscot, even the doors.
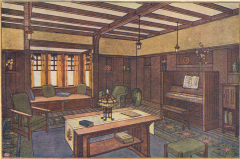
Thanks for that picture, it did inspire me a lot with this project. you can see right away how the wall coverings give the room the feeling of being dated and I think it helps to give the impression that people are in an old house. I also like the lights and Ive been thinking I could make some lights using brass and wood and maybe some mica. The lights also give that feeling of craftsman or maybe arts and crafts. I dont really care for fake wood stuck to the ceiling to resemble beams. lot of people did that for effect through the 70's and It always looked sort of tacky and fake to me.
My aim is to run out of materials. I expect I may run out but I have some various things like some fir 2x4 and some fir siding and fir planks, some may be flat grain but that would work ok when I get to shelving. If I can get to the point of using up what I have then I can look for other stuff. If I collect too much I just look like a hoarder

I'm sure glad I collected what I did though , now that lumber prices went all crazy there is less free stuff. people are looking for it.
bumping up the water pressure periodically by 10 PSI or so in the summer isn't a bad plan actually. I realized it's nice to do that as a pressure test in the summer and maybe cause a failure, rather than to wait and have catastrophe strike during christmas or at some time when its hard to spend the time to do repairs. If the hot water tank is going to blow it's guts then you can try to control when that is more likely to happen by increasing pressure for a week or so.