the corner joints appear tight, the wood has normalized to where it wants to be since the window was created. maybe if you steam it enough and clamp it there for a while, it might move back a little but the issue is you can't overclamp it and bend it the other way and it will probably spring back some. If you took it apart then you could clamp it to a heavy plank and force the bend then wet it down or apply steam it and let dry then when you remove the clamp it might spring back to straight. the thing is you may not really want to take it apart to do that because of the style of joinery.
I think rather than trying to bend it back , I'd glue some little pieces in to fill those gaps and strengthen the muntins, small pieces of wood and maybe a little epoxy for the joints. and then if the outside edge being bent is an issue , plane it flat and if needed build it back up by gluing a strip on there to make up what you had to remove. this is because the wood has moved to where it wants to be. It has worked out it's internal stresses and although it is bent it is stable as it is because that's where it wants to be and has been for a long time.
you want a good waterproof glue.
this is why it is important to season lumber before using it to build windows, when wood dries it always bends and twists somewhat as the stresses normalize.
I would also eyeball how flat it is or just set it on some flat particleboard and check if it rocks. If it's twisted out of plane, that might be another issue.
That's my take on it. If it's a little bent and not affecting anything then that's not an issue so I'd focus on the surfaces were flat is important. You can probably cut the glass to fit if it is too sloppy after it is stabilized a little.
you might drill little holes and insert dowels or glue in brass pins and bury them in the wood with epoxy if it helps add the strength of the joints. If you used screws that might help suck them together but holding the muntins wiht screws is probably looked upon as mickey mouse, there isn't a lot of meat there to hold screws. maybe if they were very thin screws , still kind of mickey mouse though.
I had a screen door that was badly twisted , like a pretzel. what I did was wrapped it in wet rags and applied some heavy pipe clamps, using the weight of the clamps to keep pressure on the wood in the direction I wanted , then every once in a while I removed the clamps and watched where it went. reapplied my wet rags and gave it time. with moisture and time and pressure from the weight of the clamps I was able to get it flat and true.
after that I wanted to add strength. it was 3/4 thick. I got some 1/4" steel rod and drilled in about 4 inch holes from the edge, then put epoxy in the holes and roughened the steel up with sandpaper, wet that with epoxy and pressed it into the blind holes. I hid them inside so that is invisible. It had 6 joints so I used a dozen of them and that added a lot of strength. The epoxy should protect the steel from getting wet but if you use steel and rust happens, then it can blacken the wood that's because the tannin in the wood combine with iron oxide and produce black marks. You could use wood or maybe brass rod instead to avoid rusting and blackening if the piece was to be a natural finish. If it's painted the paint will help to keep moisture out somewhat too. so one way to stabilize the muntin could be to drill from the outside edge of the frame into the muntin and youd need to hit it near center and the pin couldn't be a very big diameter , but maybe a 1/8th dowel could help there. this basically gives more surface area for the glue joint.
a little off topic but a good trick for flattening a plank is to just set it on the lawn with the curvature down, the grass will dampen the side that is down and it will expand and the sun will dry the top side and cause shrinkage and you will see the board bend a little the way you want it to. If you nail that board into place it might stay like that or if you let it normalize it will find where it wants to be again.
depending what conditions the window was exposed to it might be possible that the way it was installed and the moisture pattern near it over time could contribute to it's movement. the outside of the frame is sheltered. the inner side near the glass may have taken on water if it lost it's paint. over time it may have contributed to movement. if you think that through you will then realize that if the wet side was the side with the window and the dry side was the outside of the frame then it would have gone the other way. the wet side expands. the dry side shrinks.
anytime you saw strips from a larger plank and just let them sit you will see the strips bend and move to where they want. every plank has internal stresses and if you alter them by slicing it this happens. ALWAYS. quite often if a joiner wants flat and straight stock he will trim it a little larger, let it bend and twist and naturalize, then use a joiner or drum sander or plane or thickness planer and flatten it by removing some where needed. one could make a set of wood windows out of wet wood , paint them and sell them and then the user would install them and see the things move all over the place. If the boards are well seasoned and dry then it is more stable. a professional maker might season his wood a coule of years to minimize twisting and movement. someone in a hurry to make money may not.
if the wood is edge grain or quartersawn and cut from like big fir trees the grain will be long straight and uniform, the bending will be less. If the wood is cut from near branches and if it is somewhat knotty or if the grain is twisty ( trees sometimes twist as they grow) then you will see more movement. If you take steps to allow it to normalize then the wood will remain more stable. If you apply moisture and pressure and let dry you may find you can change it's behavior somewhat.
if you take a plank and just observe it by the endgrain. if it was cut through the center of the log then both sides are equal. if the log is flat sawn then they will get better yield. If it were sliced like a pie looking from the end then the slices would be wedge shaped. stable, but lots of wood wasted.
quite often when laying boards down say for a set of stairs then you can just look at the ends of the planks. the endgrain will usually look like a U shape on most of the planks. that U will try to flatten out ( thats a way to remember which way it will go)
the bark side reacts differently than the internal side of the plank. with stairs you don't want the treads to rock and pull the nails. as the board dries it will develop a cup shape. if the cup is up then the tread will rock so it is best if that cup ends up being down and the top of the tread will shed water rather than holding the water in the cup.
when you are down at the lumberyard picking through the stack for the best boards. look at the stack from the end. You will see the ones that have flatter grain that were cut from near the center of the log. those ones will remain more flat than the ones with a U shape to the endgrain. smaller trees, more U shape, big trees, more flat endgrain patterns. You can see from the arc how big the tree was. you can see all the boards in the stack from the end without moving them, now you know which ones are likely to be the most stable, dig for those and examine for cracks, knots etc. Your objective is to find the best ones you can , the price is the same for any of them. I usually get no complaints if I leave the stack tidy once I'm done picking out all the best ones. the other thing I will notice is if they are physically heavy or not, some are heavier, stronger usually. also if you bang them a little as you set the down you can feel how they "ring" sort of like a bell. If you find one with a big internal crack it will have sort of dead feeling so sometimes you can sense that. sometimes pitch lines can run the whole length of a baord and then you start cutting shorter lengths and the boards will fall to pieces along the pitch lines. Knots are obvious. the more bent ones are going to move more, pick the straighter ones if you can. If they aren't behaving themselves right off the stack, leave them there

wood isn't perfect and it acts somewhat unexpectedly but you can predict and understand why it normalizes and which way it will go, then use that to get the best yield and avoid making things that go all twisty after making them. this is important to get the best yield.
If you buy a stack of wet wood from a mill and sticker and stack it let it dry those boards will normalize. then before you use it for furniture or something you will plane it or joint it to flatten it, this looses some dimension. If they twist or if the board develops a bend over it's length like a banana then in order to get a flat plank you will end up loosing a lot of the wood. If your project requires 2 foot lengths then you can trim it to 2 foot lengths and lose less lumber. If you need 10 foot planks then you better look for the straighter ones otherwise you end up with a lot of sawdust and less yield. this is always somewhat a balancing act for a joiner or carpenter who wants to get the best value for his dollar.
for things like windows and doors they usually use more premium lumber but it isn't a perfect world and that plank just moved more than the maker anticipated.
you can adjust using steam or dampness and pressure. someone making boats of wood would be really familiar with these characteristics. there are some good videos on youtube that show how using steam to bend wood to the extreme can be fun. one way to do it is to put the piece of wood in a piece of steel pipe cap one end and eat the pipe up or keep pouring hot water or steam in. once its is saturated it will be more bendy, than you can hold it in the shape you like and when dry it will comply at least somewhat. it will always spring back a little so you allow for that to happen by overbending it.
Its surprising how far some wood varieties can be changed in shape. of course different species bend and twist more. with some things like hockey sticks or chairs they sometimes cut the wood into laminations and glue them together while held captive. you could slice that plank into 1/8th inch strips steam the strips let them dry bent and bend it into a circle and glue it up like that and make it into an O shape like a tennis racket as a more extreme example. one way to take the bend out might be to slice it but that's a bit more extreme and the kerf of the sawcut which is removed would need to be made up somehow. probably by adding another strip. I'm not actually suggesting you slice it up but I just used some extreme examples as a means of explanation. If you tried bending big beams you'd have a hard go of it but if the pieces are thinner it is easier. it is perfectly acceptable to slice a plank in half joint it so it fits perfectly and glue the two back together. as long as the glue doesnt' loose strength due to moisture and things that glued up board will be strong as it ever was.
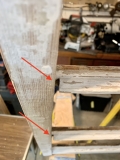
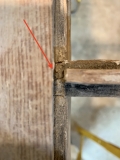
what you ave there is a fairly substantial bend and the piece isnt' that thin so you are up against a little battle to make it straight without removing it. overbending it is difficult because the muntins are in the way of that.
occasionally you may see the use of wiggle nails. You'll see them often used in mitered corners of picture frames. they aren't really a great way to join wood but I thought of using them to join the muntins. I dont think its that practical there. furniture makers frown on using any sort of metal parts other than things like screws to hold hinges. maybe combined wit epoxy they could be used but they may crack the old dried wood too. wiggle nails are sort of mickey mouse joinery but I guess they have their place.
at home I found a bunch of these really old unusual special nails. they are a sort of U shape. I looked into what they were and it turned out they were to draw pieces of wood together. if you hammer them in so the two legs penetrate the wood near a joint, the shape of them causes the two pieces to be pulled together. I thought they were interesting. I think they were used to shift the wood and then removed rather than as a fastener. maybe for making boats. never seen one before or since and I dont know what the things are called.
one other way to bend wood is to make sawcuts, relief cuts. thats probably not practical here, but Ill mention it. sometimes cement finishers want to bend 2x4's to make round shaped forms so they will make a series of relief cuts and then bend them as needed. they are removing strength but the forms are disposable after. it is possible to soak the wood in epoxy and fill the voids of the relief cuts but tha's too extreme for this application. it would weaken things too much. with some things like perhaps an uncooperative baseboard you might remove a little wood where you cant' see it in order to get the darned thing to bend and fit. perhaps you'd do that if you had a baseboard along a curved wall, for example. you might use a fine saw for that so the kerf of the cuts was thin and could be filled with epoxy to restore some strength.
phil