Chimney Flashing - Metal or Shingle Cricket? Does it matter?

Need advice, technical help or opinions, you will find plenty here! (Technical posts here)
Post Reply
historicalwork
Been here a good while
Posts: 229
Joined: Sat Aug 29, 2015 12:01 am

Chimney Flashing - Metal or Shingle Cricket? Does it matter?

Post by historicalwork »

Hi All,

I came back to the forum after what seems like a year because we started pulling wall paper down in another one of the bedrooms and I started in on the windows. I was feeling good about that work - rereading so many helpful threads from last time around. But along the way we've realized our chimney was leaking in the attic. We've had a couple chimney companies out and one roofer. One Chimney company said the flashing needs repair and recommended a roofer. Another chimney company talked about using FlashSeal. I had a roofer out and they felt the FlashSeal was not a good long term fix and that the flashing definitely needed replacement. The roof said he might talk to the one chimney company about the condition of the mortar as well. This chimney is not used - it served a kitchen stove in years gone by. I think replacement makes sense give condition.

But one thing I wanted to get thoughts on has to do with the cricket. If I understood the roofer, they would not use metal flashing like the current cricket. They would instead build up a cricket with wood and then shingle. The stupid part of me loves the look of the metal crickets. But I'm not all that hung up on it. But my question is more about wether one is better than the other. I just don't want a roofer to take the quick way out and later find out a metal one is a better approach.

We realized the leak was happening because the bedroom below started a leak where water was pooling and then come through the ceiling. I pulled out drywall in the knee wall of the finished attic space and then pulled off the foam board that was wrapped around the brick. I watched when it rained and water was trickling down the chimney on the upward side.

Does anything have any experience dealing with this? Does it matter about the type of cricket? Is it all about esthetics if otherwise done correctly?

Thank you.

Image

Image

User avatar
Gothichome
Moderator
Moderator
Posts: 4186
Joined: Sun Aug 16, 2015 8:34 pm
Location: Chatham Ont

Re: Chimney Flashing - Metal or Shingle Cricket? Does it matter?

Post by Gothichome »

Historicalwork, welcome back. I have only generalized thoughts on your issues. I believe the pitch of the cricked has a lot to do with the selection of a cricket. Shingles are for shallow pitches and metal for steeper. One of course is a lot cheaper than the other. I would suspect a copper cricket was chosen due to the pitch. You mentioned some of the copper has deteriorated that would suggest some incompatible fasteners like iron nails had been used, maybe for a repair long ago.
My thoughts for a proper repair would be a complete removal and replace with new copper with soldered seams. Finding some one with the proper skills to do that now might be an issue, and it won’t be cheap.

historicalwork
Been here a good while
Posts: 229
Joined: Sat Aug 29, 2015 12:01 am

Re: Chimney Flashing - Metal or Shingle Cricket? Does it matter?

Post by historicalwork »

I appreciate the feedback - that gives me something to asking about. I put in an email to another roofer that I think works with more old homes in our area. I'll update on what I find out or decided.

phil
Has many leather bound books
Posts: 4616
Joined: Tue Aug 18, 2015 6:11 pm
Location: Near Vancouver BC

Re: Chimney Flashing - Metal or Shingle Cricket? Does it matter?

Post by phil »

I'll be making one for my chimney in a month when I get holidays beacuse I have about half the roof done and I stopped near the chimney last year.

there is lots on Utube. so watchign a bunch of video will give you a variety of approaches.

since Im doing new roofing and the cricket is sort of hidden from view anyway it isnt about asthetics so much for me. I plan to just go up wiht some cardboard and cut it to the basic shape , then on the ground make basically a 3 sided pyramid out of probably 3/4 marine plywood. then Ill put roofing over it so it isn't' very noticeable. It just stops snow from piling up and leaking down the chimney hole. Ill put a membrane down first then the roofing in a similar way to the rest of the roof.

the step flashing is done in a certain way. you can take an angle grinder and cut a slot into the mortar and then the flashing goes into the brickwork and you can trap it by rolling up some lead and cramming it in the crack or by use of a sealant or mortar. you really arent' supposed to use concrete where soft mortar was used but i think they did that with mine.
the step flashing is arranged with the shingles in such way that it deflects any water that tries to run into the gap down onto the top of the next shingle. best to just see some video on that as it is easier to explain with the graphics.
I think its just creating a mess to slather the brickwork with a sealant. you cant' depend on the bond.
perhaps some roofs had copper or lead, most of the roofs near me have modern asphalt or fiberglass shingles. If you are going traditional with a cedar shake roof and creating a more authentic style roof you might consider the bling but it often is hidden behind the chimney, I guess that partly depends o the landscape near the house and if you ever look down upon it. you can get sheet copper if you like that for asthetics.

there are several ways, mush goop all over , Lets skip that.
You can make a diagonal cut and install a one piece flashing, I suppose. i dont much like cutting into the bricks diagonally but thats one way. one long straight cut.

I think the nicest way is to grout in individual pieces of tin that are stepped with the brick lines. and then you use some L shaped tin pieces that you lay along with the spacing of the shingles. so each protrudes the shingle by about 1/2" or so. they interleave the ones that are set into the grout. Its just a matter of directing the water so as you do it you just have to think about where the water might go and keep it on the roof, not under the shingles.

then if you want you can add a counterflashing after to tidy it up so you dont see the step flashing. maybe with a bead of sealant along the top edge. lots dont have counterflashing but it neatens things up.

if you watch a couple hours of U tube and try to skip the infomercials anything with annoying musak and the ones that are ads for some roofing company you will learn lots. some of the ones made by the roofing materials supply companies show off their products but have some good content. the best ones are where they are up on the roof doing stuff with an actual project and not just standing there beaking off.

there is one with an older gent, He's probably 65 or so and runs through the process with detail while he does it on the roof. I thought that was one of the better ones but I wasn't able to find it quickly. you will probably find a series of other roofing videos done by this mexican guy and he shares a lot of little secrets, they are fun to watch. he walks all over the roof with no harness and seems to cover a lot of roofing situations. you can learn from even some of the silly ones. If he's 18 and chalk full of knowledge and there is loud rap music, then maybe take it with a pinch of salt. If they are selling some product or their company a lot of those are just advertisements in disguise. If you watch lots you will gain opinions on what you like or don't. I often just click through the ads then skip to the middle and if they are actually explaining stuff then I watch it in full, if not I skip it. often the intros are so annoying. some go into so much detail on the obvious that it feels like a waste of time. the best ones are edited down. many aren't too professional but there are some experienced guys making good video and they aren't really experienced teachers or videographers but if you listen they share secrets of the trade.

keep location in mind. a house in arizona may have some different needs as to compared to a house in Alaska, but the same process may still be used. maybe you want that flashing to go a foot tall where there is more snow, the lower it is the less noticeable. I think it can look ugly if it's too tall.
If you are abandoning the old materials embedded in brick you might choose to increase the height up to the next brick line. mine is only about 6 inches from the roof deck to the top of the flashing on the chimney. we can get a foot or to of snow but it doesn't usually dwell too long here. in areas of strong winds then they may use more nails or more sealant to keep the shingles from flapping and flying off.

I think the most important thing is to get your head wrapped around how the step flashings work together to direct the water back on top of the shingles to prevent it creeping underneath. they are basically pieces of L shaped tin about 2x2 x 8 or 10 inches long or so. its best to lay them with a new roof but your roofer will sneak them under there.

I think doing it right separates the men from the boys, some roofers dont know what they are doing with it and you can see it from the ground. once you observe how it can be done nicely you will notice a lot of messy jobs on roofs near you. typically an area coated with some sort of goop. I don't think your roofer is giving you bad advice.

in mine the ones stuck into the mortar are thick enough but rusty. I think I'll just clean them and paint them with some good rust paint and replace the step flashing that is in with the shingles. If I'm concerned I will remove them and bed new ones but its a bit of work. even a lot of that was ok I just had to straighten them and paint them but they are cheap materials anyway. Its a bit like a carpenter straightening nails to use them over ;-) it's false economy unless it saves paying for the guy to run to town for a half dozen nails.

after you get your head around installing step flashing there will be others on installing an optional counterflashing. even if you hire it out getting a basic understanding of what you want to happen may help you communicate with your roofer.

a lot of old houses near me get the chimneys busted out and they use the space they gain for other things. real estate is so high here. I love having the option of heating with wood via my fireplace so I will keep mine going. in some areas they have banned wood burning which is a bit sad . I think if you don't use it the cap is all the more important as you dont want water collecting. with mine there is no damper so there is always some flow and heat loss up the chimney. one flu is used by my old gas furnace. If I get a new furnace I might use a pipe as they dont really need a chimney and the acidic nature of the burnt ( natural gas) gasses may attack the brickwork but I dont see it happening. It does look a little too clean though.. the flu used by the fire is sooted as normal and the other looks more like new brick inside. maybe that's a sign the acids are building up in there. I'm sure mine was like that a long long time. they used oil at some point, mine doesn't have clay flues it's just brickwork. I believe they could be added. with mine they did a no no and used some concrete instead of mortar to repoint and build a new chimney cap but I'll leave that be.

brick gives off and sucks up water like wood so it isn't really good for it to go slathering large areas with stuff that stops it from breathing but a bit of sealant correctly used isn't necessarily a bad thing. Its probably not unusual for a homeowner to go up there with a 4 inch brush and a can of goop and make a mess because he isn't looking for the cause but rather, a blanket solution.

phil

historicalwork
Been here a good while
Posts: 229
Joined: Sat Aug 29, 2015 12:01 am

Re: Chimney Flashing - Metal or Shingle Cricket? Does it matter?

Post by historicalwork »

phil - just a quick note to thank you for your helpful reply. I do in fact need to do some more google research. Your reply gives me some things to chew on. Our foursquare has two chimneys. One serves a boiler and our fireplace. We had both flues in that one chimney relined when we moved in about 5 years ago. This chimney doesn't have any easy internal access. Any hole where a cook stove might have been has been covered over by cabinets in the kitchen and i have not see anything obvious below in the basement - but that has panelling that I haven't had the energy to rip off (but am tempted to). I have to assume a chimney for a stove still had a clean up below? In any event, if the house wasn't a tall two stories with a tall chimney and a steep roof, curiosity would get me up there to look down it with a light.

Btw, i see i screwed up posting images. Corrected below:

2092

2091

2093

phil
Has many leather bound books
Posts: 4616
Joined: Tue Aug 18, 2015 6:11 pm
Location: Near Vancouver BC

Re: Chimney Flashing - Metal or Shingle Cricket? Does it matter?

Post by phil »

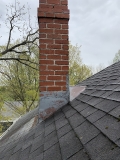
I can't see any stepflashing, but could be the perspective. My take is that the metal flashing was there when the roof was last done and looks like they just put roofing around it and some sealant to cope with the issue of water creeping under the roofing.

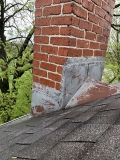
Ill make my cricket from plywood so I can nail into it. It looks like just surface rust on the tin and it it were painted with red primer it would hide into the brick.

I dont know if you'd want to tear into it if it isnt' leaking. I think when you see a video on how they do the step flashing it might help explain a little better than I can in words. basically the step flashing is in an L shape and the water cant go up, and when it is interleaved with the roofing with the bottom edge sticking out from under the shingle it directs any water back onto the roofing. what you don't want is water getting around and underneath the shingles or it will rot the plywood. if they are layed and interleaved correctly the shape and arrangement alone will prevent that and you shouldn't have to rely on sealant.

It looks like you have 3 tab flat roofing, maybe if you had a piece of rolled roofing you could cover the tin in one piece. or you can get black stuff with a sticky backing. if you were to redo your roofing maybe you'd want to tear into it and make it more "textbook correct" but I think given the condition if the roof at around it's half life you really just want to do any necessary repairs. Ideally any nails in the stepflashing get covered by shingles but if you put nails and sealant to protect them that might be ok for now.
Ill use plywood rather than tin for my cricket because you can't hold nails into tin reliably. since it is tin you might use sealant as glue so you arent' penetrating the tin with nails.

one trick to hide nails that are put on top of the roofing is to collect some of the grit from the shingles. put roofing tar on any nails that show then sprinkle the grit into the wet sealant to hide them. with a dark roof maybe it doesn't show much as on lighter colored ones. you can also use some roofing sealant to help stick things down and maybe use less nails. you might be able to lift a shingle and get a nail inot a position where the head is covered. they are a lot more bendy when they are warm, If they are cold they may crack easier. one nail in each piece of stepflashing may be enough , combined with some sticky roof sealant.

you might find there is some stepflashing and it is just tucked under the tin and hidden well. you really should see some L shaped pieces about 8 inches long each, with the bottom edge protruding out the bottom gap of each shingle. that can be hidden and dressed up by a counterflashing. similar is done in a circumstance, like if your roof met a wall that went up higher, it would then prevent the water from running into the wall area. you would use short pieces rather than one long L shape. one piece of stepflashing shingles over the next with some overlap.
It does look high. I'd install a proper hook for a safety harness if you work much up there. Im planning to leave my hook there for future use. you can remove it if you dont like the look but it requires some decent nails into the framing. roofers are brave but Im a big chicken so I try not to take chances. If I'm in a position where I could fall then I want someone to spot for me, to help or call the fire department if I should fall into the harness. along with the harness you need a snubber ( that might not be the right term) Its a decelleration device. , that breaks the shock of the fall by the stitching tearing apart in a predictable way. you need to allow room so it can open and do it's thing before you reach the ground. at work they have a thing that is the weight of a man and they do studies about how it opens up by dropping the weight. they they study how it opened up. If you do fall the harness and this part is always discarded. Its considered to have done it's job. there are also inspections and dating to make sure you aren't using old stuff. some were rejected because they used an ink stamp and it was a concern that the ink could affect the stitching ..
what I tend to do is use a rope grab that i can slide up and down the rope and I dont give myself enough rope that I can actually fall off the roof at all so at most if I trip Ill be lying on the roof deck without enough rope to even reach the edge. once I did trip up and fell and it wasnt' scary because I was tied off. I'm not comfortable walking near the edges so I try to do that with a ladder. Ill chuck the rope down near the ladder and tie up in case the ladder falls. The rule on a worksite is if you have your feet 10 feet off the ground you are harnessed. If you break that rule someone will get a cell phone pic and you get written up. every year a lot of roofers get charged for infractions, they make more money by not complying and going faster.
I try to adhere to that but I'm usually OK climbing a little higher if the ladder is tied up and I'm not carrying a lot of stuff. , I also tie up my ladders so they can't go sliding around. I try to use more precautions and that helps me with the fear of falling. over time you get more comfy , at first you might find you get the shaky knees feeling.
and if you do , come down to safety and analyze how you feel. no one is safe if they feel terrified and that burns up energy fast. sometimes people fall and if you fall in a weird way while fatigued it can be worse that if you have the energy in you to recover somehow. I spoke to a carpenter that slipped and he drove the claw of his hammer through the plywood as he was sliding and used that as a handle.

I had a friend that said he carried a full bundle up on his back , a roofer might be in the right physical condition to do that. he then went to throw the bundle on the roof and in doing so the action made his ladder tilt back and he almost fell. he dropped the shingles and grabbed the gutter preventing the ladder from tipping backwards. scared the crap out of himself.
the rule of thumb is that when you set a ladder if you stand and extend your arms your hands and toes can touch the ladder , that's a way to judge the slope of the ladder. Im only comfortable carrying about 1/3 bundle at a time , why make it a race. I have nothing to prove. I can't fire me ;-)

I got a piece of plywood, nailed a 2x4 onto it. I left lots of spikes protruding out the bottom. I set that down and put the ladder on it and against the 2x4. this way I can move it and I don't feel it will pull away or move or slide anywhere. Sometimes if you have a helper and it is temporary you'll get the helper to not climb the ladder but place his feet at the foot of the ladder and hold it to prevent it slipping. a good way is to tie a rope from the bottom rung to the house and prevent that slipping out on you. I use some eyelets and screw them into the framing to tie my ropes to. It helps me feel safer when I know that no matter what the ladder cant' move out from under me. when I know I'm safe then the fears decrease so it is a lot about me maintaining a comfort level and not becoming overwhelmed with fear. a healthy respect for gravity is a natural reaction and not something to be ashamed of. Experienced guys can do a lot more without fears so maybe they just have a better comfort level so they can push things more. It's easy to feel you can copy what they can do and really not have the experience to do it as safely.
the little roofing brackets are about 10 bucks apiece. I bought lots of them so I put lots of walking planks. usually I work near enough to at least one that I have something to hold onto. If I have one below where I am working I know if I fall and slide it isn't off the edge so I use more of them than necessary again to just to feel safe. each walking board is supported by 3 brackets. moving them can be tiring because then you find yourself on the slope with out one. It is possible to keep one and use the safety of that to get to the next and so on. If I'm far from the hook and in a position where a swing fall is possible Ill clip to the nearest one but maintain my rope securely tied to the hook at the top of the roof.


when I started using the brackets, they have a label that says use 4 inch ardox nails. those are big spiral nails. i decided they are the right thing but they can split the old framing. as I got into it I felt ok using smaller nails but I make sure they dont just grab the plywood. sometimes I have to make a few holes before I locate a good firm spot. screws tend to be hard, brittle and break easier than nails. perhaps how much you are relying on the brackets plays into doing things in a reasonable way. driving 4 inch Ardox nails into a 100 year old 2x4 that you know will split might have flaws too.

if you tie up a ladder you can keep a knife handy so just in case someone needed to use the ladder for a rescue then they could grab the knife and cut the ropes that tie the ladder down and set it where they need to. a guy hanging in a harness is an emergency situation. if you work as a team like a team or roofers, everyone would be capable of a rescue, if you just had a random neighbor watching, they may not have the skills. I'd tell them if they see something like a fall to call the fire department because something like moving a ladder could be difficult for the untrained. having a cell in your pocket to call 911 yourself might help or you might just drop the thing or conk your head during a fall.

I found for myself that I had to think a lot about the precautions and nothing wrong with doing a few extra steps to feel safe. I'm fine that I'm not fast. Ill pass the hardware I bought on to the next guy after I'm done with it. I was so terrified in the beginning now I'm getting more comfy, then I get more done because being scared burns up energy fast. looking down gives one an uncomfortable sort of dizzy feeling. so dont look down and amplify it. I spoke to someone that put two ladders up and a sheet of plywood tied between them above the roof deck, he said that blocked his view of the ground and gave him a feeling of safety, and some assurance that if all went wrong it was like a safety fence. I spoke to a carpenter that simply build staging and took it apart and reassembled it for the other side. It takes a little wood but can be reused later. when I began I was advised to not hire anyone that didn't have insurance. i never found a helper that I wanted so I just plugged away on my own. Many just hire a roofer but I didn't see that 10 - 15 K in the budget. I'd certainly rather pay that than have a fall. I opted to buy a little more safety equipment and go slowly and that's what worked for me. It dragged on partly because i only have so much time off with good weather, but I'll finish this year somehow, at least the important parts.

I lost a few things, knives, tape measures , my hammer , a square, , it happens.. once the nail gun unclipped from the hose, it made it all the way down to the gutter and stopped there luckily. its worth putting some yellow tape up so no one walks along under the eves as the potential is there to kill someone with a falling object. I tied a shoelace so if the nail gun does get unclipped it wont go free. what I did was picked it up by the collar on the quick disconnect and yea it unclipped..

the rope for the harness is a special approved rope. It really should reach the ground, then you find you need to move it a lot. at first I wired a ball of chain as a weight but found chucking that around it got caught up under the walking boards. I found a kids bowling ball , just a plastic ball and used that to put the chain inside so I can throw it without doing damage. if you buy a rope Id get the 100 foot one , enough so it can reach from the peak to the ground. I think the idea is that in a rescue you'd want the guy on the ground to be able to get the end of the rope. i made the mistake of thinking a 50 foot was ok but should be longer. In a fall maybe someone could assist to get you down with the harness, maybe in steps or something but if the rope is too short you'd have to be cut free.
you can get things like straps that extend. there is a great one that is like a spool of cable that locks if it is jerked. Its around $800 for the ones we have at work , a bit pricey for me. they would probably relieve a guy from messing with the rope grab thing all the time. The harnesses aren't all equal either. the steelworkers have nice ones with sort of a leather butt so they can hang in them. those guys are real experts. the cheap ones like I have are made as a one size fits all thing and I find I'm always needing to readjust it. Ideally a good one would be fitted to your size. the more you do the better equipment you might want to have. you can get a bucket with all the stuff you need to tie off quite cheaply but a real roofer would likely have better stuff. even things like ladders are rated so if you are 220 lbs and you will be carrying roofing, you need a ladder rated for that total weight. in industry the ladders get rejected if anything happens to them so they are often discarded because they dont pass inspection.

on yours you might be able to go up a ladder , using a harness. maybe you'd tie off to the ground on the opposite side of the house and fire a string over the roof to use to pull your harness rope right up and over the roof. once you can tie off then you can use your harness to get to the peak and attach a proper anchor.
then underneath the chimney or to the side of it or both, nail down three roofing brackets and a plank. then if you go up on the roof you are harnessed and if you go onto the roof deck near the chimney you are working off the plank and not trying to stand there holding a rope and working on a 45 degree slope.

in fact I wouldn't feel comfortable climbing from the top of the ladder onto the roof deck near your chimney because of the height, So I'd probably look for an easier way up there. on mine I can go from the back porch and its not that high. a real roofer would have no issue transferring from the ladder to the roof deck but that is something that gives me a scary feeling so I find ways to avoid it. I'd set the ladder in place but attempt to scale down from the top wearing a harness. some ladders have sort of like handlebars that go into the gutter and make it a bit safer. I think if the ladder was tied up and I was too then I'd climb the ladder and work from the ladder. Its that climbing on and off the ladder I find scares me. It would at that height. I found that with my house I don't need to do that, Ill work from the ladder or if I wan to be on the roof Ill get there from a shorter ladder on my porch..

walking on any roof isn't good for the roofing. its really best if you can work in such a way that you are not walking on top of your finished roofing if you can, at least not more than necessary.. when they get old and crumbly then its likes standing on ball bearings. If they have the nail gun and hose up there they can use a little blower attachment to blow the roof down and remove that loose stuff. or use a electric leaf blower.

for shoes I dont wear my steel toed workboots. I have some shoes that have appropriate soles. its hard on shoes and you dont want slippery soles. If you work from the ladder you want stiff soles help or you can get fatigued feet. with the nails around it is easy to step on one. I try to pick them up as soon as I can. the ones I'm using for the membrane have big plastic caps and they can fall point up without being through anything. stepping on one of those would ruin your day.

phil
Has many leather bound books
Posts: 4616
Joined: Tue Aug 18, 2015 6:11 pm
Location: Near Vancouver BC

Re: Chimney Flashing - Metal or Shingle Cricket? Does it matter?

Post by phil »

I didnt' make my cricket yet. what I did do was climbed up there and made a simple form just out of stiff wire. I now have basically the same shape as you have shown but it is just a form made from wire and duct tape. I thought that might be easier than trying to work out dimensions and calculations. I plan to make it out of 3/4 marine grade ply next. I figure I can cover it in the same membrane and shingles as the roof. i guess there will be a little gap between the chimney and the side that mrets the chimney. Im not sure what to do with that exactly. It has some tin there now at the base of the chimney. I think I'll just lightly sand and throw some rust paint on that and the flashing that is cemented in to the brick and call it a day. In a perfect world maybe it would be worth cutting out the grout to replace it and that would be more thorough. maybe later I can do a counterflashing to hide the stepflashing. most of the old houses near me dont even have the counterflashing.

a lot of the newer houses near me have removed their chimneys for the sake of the square footage. Ill keep mine but some areas have already banned wood burning. I'd consider whether such a ban could be to come if you plan to spend a lot on the chimney in case chimneys become obsolete through local bylaws.
mine has a cleanout in the basement, I never use it I just dig it out from the firebox.

i cleaned my chimney myself last year. I used a brush attached to a pole and did it from the roof. I didn't find it plugged but I got at least a couple of 5 gallon buckets of crap by sticking my vacuum hose up on top of the smokeshelf (through the slot near the top front edge of the firebox) I never knew all that flammable creosote could exist there. it probably accumulated for a long time. Its good to clear that out in case it catches fire.
I even had it cleaned before that but he never told me about the smokeshelf and it's sort of hidden if you dont know it's there. you can see the walls of the chimney somewhat and get an idea if you stick a drop light up there and lie on your back looking up. if you do that wear safety glasses or you'll get soot in your eye. if you stuck a mirror on a piece of bendy wire you might see more. I fashioned a sort of one time use rake from a bit of metal and a bendable scrap of iron. that got the big stuff and the vacuum did the rest.

with mine they built it out a bit. maybe it was intended for coal, they ran another row of brick toward the inside of the house. Its not perfect, they used cement briock but Ill leave it be. I want to do some rock laminate to make it look better. at one time they had the cement bricks painted red to fake real brick. then some PO put 70's tile. I removed the tile and now its just ugly, but it works.

Post Reply