
Jamie it looks like the water is creeping around the edge of the roofing then getting on that white strip as it is green. I cant' tell if the white strip is drip flashing or a strip of wood. I thought maybe since the rain falls about a foot nd a half or so it might hen splash up and keep the windows damp. You could add a gutter and downspout onto the main roof but I know it might look a bit dorky.
I had a place where the rain from my gutters was overrunning and splashing onto a sidewalk beside the house. I delayed and the splashing water was hitting the sidewalk and bouncing back up, wetting the bottom 4 feet or so of shingles and causing damage. It wasn't wetting the shingles directly but the water was splashing up further than i was anticipating. It just sort of misted the siding in my case but over time it wasnt' good.
Someone bought that finger jointed pine rather than springing for good fir. low rot resistance but you fixed it and of course it isn't your choice what you started with. the paint will help. I wonder if that rain were to just run off the edge but land on a bevel , maybe that could direct any splashing away from the windows if you see them getting misted by it. If you sliced a 2x4 diagonally and put roofing on that so the angle right below the drip edge was a steeper slope it might splash away down on top of your roof rather than bouncing back and dampening the area.. Perhaps? if that white strip isnt' a drip flashing you could stick one under the edge of the roofing so it didn't creep under the edge of the plywood.
Ive seen where roofers sometimes put a strip on top of the roofing near the edges on the gable ends. Its a bit of a kluge I guess but see it now and then. maybe they do that if the roof starts peeling from wind at the edges. often there is a 3/4 x 2" strip just under the edges of the plywood , it rots because of where it is. I'm changing a lot of mine because it's punky. I started putting a dab of roofing tar under each shingle right at the edge to prevent them lifting from wind. probably with steeper roofs they lift less but if the roof is flatter they can lift with a good wind especially if that nail near the edge as nothing to grab into due to rot.
the specs on my roofing say the overlap should be about 1/4 to 3/4, I cut a wood strip 1/2 x 1/2 and the length is the same as the setback of the shingles, about 4" roughly. I keep that little stick in my pouch and use it to measure sometimes as an aid in placing the shingles to keep the rows straight. they have a little cut in them that is used as a placement guide so I usually refer to that. when I do the rows at the edge I lay the strip over against the wood strip to help position them so I dont have some poking out more than others. if you allow a wider overlap then the shingles curve downward so the dimension matters but it is somewhat ambiguous. I think if there is too much you can start to see a curvature of the shingles on top of the roof deck in effect that causes a gap. if they are short then the wind has less to catch , if it is more it might keep the water away further. some lay them way over and trim the whole bunch as a last step. Im adding a 2x2 drip edge flashing on the gable ends. in one way t looks better as it helps stop the rot, from another perspective maybe it looks more modern. I can live with the look of it. I think when people go to like 4" tin flashing it becomes a bit obvious as its not an original feature. mine overlaps that wood strip by about 1/4 so you don't see the wood strip. its sheltered under the drip edge. the drip edge flashing on the gable ends detracts from the vintage appearance but also serves a purpose. If roofers are trying to cut costs they don't use a drip edge. the bottom 1/8th or so angles outward and leaves a place for it to drip from , so it doesn't creep back under the wood strip.
The argument for retaining historic windows
-
vtattebury
- Just Arrived
- Posts: 11
- Joined: Sat Apr 25, 2020 5:19 am
Re: The argument for retaining historic windows
Just wanted to add my evidence for keeping historic windows... you’ll never see this beauty with vinyl replacements, that’s for sure.
- Attachments
-
- 90FA64AE-E189-4756-97B4-A78F0C3DF378.jpeg (678.51 KiB) Viewed 4068 times
-
- 40CF5EB4-864A-4CFC-AB8D-0B042C78F910.jpeg (37.59 KiB) Viewed 4068 times
-
- DC5E0FEE-D363-4E7C-91BF-6A8BE028E83A.jpeg (36.66 KiB) Viewed 4068 times
-
- E87B8E8F-0931-4C3F-8408-8686AF18C25A.jpeg (646.61 KiB) Viewed 4068 times
-
- 0BC4744E-B622-43A3-95D4-C23C0A24099E.jpeg (419.62 KiB) Viewed 4068 times
-
vtattebury
- Just Arrived
- Posts: 11
- Joined: Sat Apr 25, 2020 5:19 am
Re: The argument for retaining historic windows
And for my next question, I’m reglazing my old storm windows. What’s the best way to protect the hardware after I’ve scrubbed through all the decades of paint? Just a little spray on lacquer? It’s not brass because it’s magnetic.
- Attachments
-
- 86323D9C-59B0-492F-8D0C-B9FCFF2B612F.jpeg (865.88 KiB) Viewed 4068 times
-
Gothichome

- Moderator

- Posts: 4184
- Joined: Sun Aug 16, 2015 8:34 pm
- Location: Chatham Ont
Re: The argument for retaining historic windows
Yes, there is something calming and rustic about how the light shines through wavy glass. I think I would be painting the hangers the colour used were they are mounted. It would be nice to get a colour match with a good rust paint but any good quality paint should protect them. It you paint the back side before mounting it will help stop any rust from creeping around to the front side.
-
phil
- Has many leather bound books
- Posts: 4616
- Joined: Tue Aug 18, 2015 6:11 pm
- Location: Near Vancouver BC
Re: The argument for retaining historic windows
as usual my answer is a little long but..
the one I use is rustoleum, comes in spray bombs. you can pick the color. I'd only use lacquer if it's brass or copper plate and you want a bit of protection.
You can apply primer first if you like but usually I dont have issues without using it, I like to give about 3 thin coats an hour or so apart. there are others like por15 , epoxy paints where you mix in a hardener. they are better paints but then you need to brush on or use a spray gun and that's a little much for the latches.
If you want a certain color like gun metal grey or something, the touch up spray cans in the auto centers are pretty much the same thing. you can usually buy smaller cans.
it doesn't hurt to degrease them, you can give them a wash in alcohol or mineral spirits or other strong solvents, or use an acid wash for paint prep if you have it on hand or even just use some soap and water to make sure they aren't greasy.
I usually take them outside when they are still warm from being in the house and if you bring them in its ok but the paint stinks for a day so you may not want to be closed in with it. I dont think it sticks as well if the parts are too cold. if they are in a warm place like on top of your hot water tank then they cure up a bit faster. they harden to the touch in a few hours but in a few days it gets harder.
if you want a nice finish you can build the paint up and wet or dry sand as each coat dries, or at least take a bit of paper and knock off any bumps. You can fill the pitting with paint if you like. Auto bodymen use a glazing putty or a primer with filling properties and you can apply that and sand it to speed things up a little if you want to fill in the pitted areas.
lacquer paints will work ok too I'd use up what you have if you can.
If you want to get fancy you might do copper plating with a home recipe, or you could heat them up with a blowtorch until they turn blue and drop them in oil, that's called bluing, and that wont protect against rust so well but it leaves a blue finish and a little protection. Yet another way is to use bluing or blackening , it comes as a chemical solution and you can look into things gun owners would put on parts like that. It usually sort of dyes the finish rather than being thick like paint. you might still want a clear coat. with gun parts they dont want paint on them, it would cause issues, but they still need some protection if they go in the rain for a short period of time. It's also about the cosmetics. things like hinges and latches are similar in the way that they get scratched and that's life.
another way , if you have rusty things is to make a solution of washing soda and water. put it in a plastic container. use a car battery or a charger and hook one end to the part and the other to a chunk of stainless steel. the part you clean should give off bubbles. if you get the polarity wrong just switch the cables. that will electrically remove rust without pitting like acids would and it seems to leave a black finish. You can scrub it off but it looks a lot like the black coating you see on a lot of new drill buts and things like that. I did some big drill bits that were rusty sizes like 1 inch or so, I use them seldom but didn't want them all rusty. I removed and scrubbed them a little and left it a couple days. they looked new after.
If you do that be careful you don't get the cables shorted , I once melted a car battery doing this and that's dangerous so make sure the parts dont touch.
a lot of people here just boil their hardware in hot water and maybe some soap and that's a easy way to get old paint off. dont use abrasives if they are brass or copper plated, You can use paint stripper. It looks like you wire brushed them or something similar, thats often the quickest. I sometimes put a wire wheel in my drill press or on my angle grinder but it's a little dangerous. use a face shield and be aware of the maximum speed if you do that. the wires fro the wheel tend to fly all over and parts can grab and fly out of your hands, but its fast. you can get the little sandpaper discs for angle grinders, they leave a pretty nice finish and work quickly but only suitable for bigger, flatter things like sheet metal parts.
-
vtattebury
- Just Arrived
- Posts: 11
- Joined: Sat Apr 25, 2020 5:19 am
Re: The argument for retaining historic windows
Thanks. It’s only the first set of hangers, so I’ll stick with what I already started, which was lacquer. Can’t see that window from the street, so it’s a good test bed. I should probably just end up painting, like you both said, but I kind of liked the thought of a little bare metal detail. We’ll see!

Re: The argument for retaining historic windows
I agree that the unpainted (lacquered) hardware looks good. (My house had ALL the hardware painted - including the door knobs!) I also like Phil suggestion of Rust-Oleum in a dark color. This may be obvious, but don't use water-based paint on metal.
-
1918ColonialRevival
- Knows where blueprints are hidden
- Posts: 907
- Joined: Tue Jan 26, 2016 8:58 pm
- Location: Baltimore, MD
- Contact:
Re: The argument for retaining historic windows
Before using a rust-inhibiting paint, be sure to hit both sides with a coat of good oil based primer.
Lacquered steel usually doesn't do too well outside. Rust-Oleum makes a line of hammer finish paint that may look good on the hardware.
Lacquered steel usually doesn't do too well outside. Rust-Oleum makes a line of hammer finish paint that may look good on the hardware.
Re: The argument for retaining historic windows
1918ColonialRevival wrote:Rust-Oleum makes a line of hammer finish paint that may look good on the hardware.
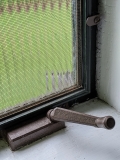
Here's an example of the hammered-finish paint from Rust-Oleum that I used on my bathroom window hardware. From what I could see of the original finish it's a dead ringer, both in color and texture.
-
phil
- Has many leather bound books
- Posts: 4616
- Joined: Tue Aug 18, 2015 6:11 pm
- Location: Near Vancouver BC
Re: The argument for retaining historic windows
I got a bunch of office dividers. I recycled the square pipe and built a rack to hold those plastic bins. one for plumbing , electrical etc. I used a silver hammertone paint. Just a spray can. I really liked it.
another neat one is wrinkle paint or crinkle paint. You can google it. the stuff crinkles up as it dries. its perfect for things like castings that have an irregular surface. You dont see it too often in new stuff and it's been around a long time, It reminds me of old scientific equipment, a lot of things like sturdy old lab equipment used it often. rather than working to get a perfect surface, you just use that and since the finish is wrinkled it hides a lot of "sins"
black is the most common bu ttere are colors. You can use the black as a first coat and change the color by applying your choice in a thin coat overtop nd retain the crinkle pattern. people use it on car valve covers and things of that nature.
another neat one is stainless steel paint. with that you have to sandblast or do an acid etch to get it super clean, then you apply the stuff and cook it. It stinks for a while as it cooks on. its made for things like exhaust pipes so you can put them on and let them heat up and cook on. I did some parts like the ashtray in a vintage car for example, and a valve cover and cast iron manifold. and it left a really neat original looking surface. the drawback is if you look at the MSDS sheet, it has some poisonous ingredients so if you fire it in the oven you might get into trouble its not shiny, more grey, looks like its galvanized.
you can also get spray on galvanized paint. Its used for things like electrical masts. a dull grey.
most silver and gold paints dont look like silver or gold, the worst I tried was called "similichrome" or similar. it came with a cap that looked shiny like chrome. the paint itself was nothing similar to the cap. it looked ugly , like most of those aluminum look paints do. They sure don't resemble chrome.
the hammertone stuff as a weird effect. I think they make it by combining some ingredients that repel sort of like water and oil and that creates a disturbed effect that looks quite nice. Its easy to use too.
another neat one is wrinkle paint or crinkle paint. You can google it. the stuff crinkles up as it dries. its perfect for things like castings that have an irregular surface. You dont see it too often in new stuff and it's been around a long time, It reminds me of old scientific equipment, a lot of things like sturdy old lab equipment used it often. rather than working to get a perfect surface, you just use that and since the finish is wrinkled it hides a lot of "sins"
black is the most common bu ttere are colors. You can use the black as a first coat and change the color by applying your choice in a thin coat overtop nd retain the crinkle pattern. people use it on car valve covers and things of that nature.
another neat one is stainless steel paint. with that you have to sandblast or do an acid etch to get it super clean, then you apply the stuff and cook it. It stinks for a while as it cooks on. its made for things like exhaust pipes so you can put them on and let them heat up and cook on. I did some parts like the ashtray in a vintage car for example, and a valve cover and cast iron manifold. and it left a really neat original looking surface. the drawback is if you look at the MSDS sheet, it has some poisonous ingredients so if you fire it in the oven you might get into trouble
you can also get spray on galvanized paint. Its used for things like electrical masts. a dull grey.
most silver and gold paints dont look like silver or gold, the worst I tried was called "similichrome" or similar. it came with a cap that looked shiny like chrome. the paint itself was nothing similar to the cap. it looked ugly , like most of those aluminum look paints do. They sure don't resemble chrome.
the hammertone stuff as a weird effect. I think they make it by combining some ingredients that repel sort of like water and oil and that creates a disturbed effect that looks quite nice. Its easy to use too.