
a lot of the how to videos on youtube are very unprofessional in that they do tend to devote tons of time to the simplest of tasks. some need to edit them shorter and cut the show about how to take out 46 screws.. But then there are some real pros doing them so if you watch a bunch and use fast forward as needed you can get a good healthy selection of opinions.
I wouldn't use stain on this, I'd use a barrier, that could be shellac laquer or linseed oil. then use marker pens on top of that. the reason is that later if you do wish to do a full strip you don't have stain soaked into the wood. the only way to get stain out of wood is to sand the crap out of it. If you instead trap the pigments you use ot touch up between layers it will accomplish the same but not be so irreversible and damaging.
Reply for Gina , boiled linseed oil is a furniture finish. a very good one. and it has been used for centuries and performs really well. It is easy to renew by repeating the treatment. It is not fast drying. I usually use clear danish oil instead but its close to the same. the danish oil hardens up a biut faster and it has some other ingredients so it is somewhat like a varnish in ways, but acts very similar.
If you put it on wood , let it dwell 15 minutes then rub every bit off with dry towels it will just soak into the pores. If you add turpentine it helps thin it and drives it in more. when you rub it off it removes all that didn't penetrate. it takes time to dry but it does dry really hard so dont; confuse it with other oils such as engine oil or the unboiled stuff that you put on your salad. if you look at the cap you'll usually see how it hardened up around the cap.
where there are porous finishes like cracking it may fill some voids but in general shellac and laquer are non porous so it does really nothing but hide scratches since it wipes off the non porous surfaces.
try taking a piece of scrap wood , use linseed oil and turpentine and 320 wet or dry sandpaper. try to sort of scour it in, dry down , wipe off , keep repeating. it will drive the finish right into the pores. the fine dust sands off and re-imbeds itself. this makes a really fine finish.
The shine will build but since it is in and not just on top of the piece it doesn't prevent light from reaching the piece and reflecting back so it looks very nice. you see the wood details like the rimbbon more brilliantly without a layer on top. commercially it isn't used so much because such applications take time. its a bit laborous but very satisfying and it really does not take a lot of experience, dust won't bother you like with spraying lacquer. french polishing works similar but it is a little trickier because it redissolves itself so you need to have the right wetness on the pad that you put it on with , the right amount of alcohol and if you dwell too long it softens the underlying layers you put down previous and screws things up... so it takes experience. many coats. produces a beautiful shine like a piano. not too hard on flat surfaces but near corners and in detailed areas it might take more skill. the linseed oil is easy anyone can rub that stuff on wood and rub it off. blopentine is just a made up name that originated here in this forum, slang for the combination of linseed oil and turpentine. If you go asking for that in a store you'll just confuse people.
I like using the oils on stuff I use outside, hammer handles, the axe shovel handles etc. Put it on lots it will help them last and things like an axe will build a lovely weather resistant finish. the more you handle it, the better. it prevents splinters and water penetration but it won't last out in the rain forever.
Restoring Darkened Cracked Shellac Finish on Wood
-
1918ColonialRevival
- Knows where blueprints are hidden
- Posts: 907
- Joined: Tue Jan 26, 2016 8:58 pm
- Location: Baltimore, MD
- Contact:
Re: Restoring Darkened Cracked Shellac Finish on Wood
If it were me, I'd start with a good cleaning with naphtha and #0000 steel wool to get all of the old wax and buildup from the surfaces, then follow up with a wash with Murphy's oil soap. That way you can see just how bad it is without looking through layers of grime.
I wouldn't use stain on this piece. If the shellac can be saved, I would attempt to re-amalgamate the finish; however, if the original finish is more than 40-50% gone, you do better refinishing. The stains that are commercially available today have only been around since about the 1940s/50s or so. This piece looks more 1920-ish.
For a new finish, I would use a 1-pound cut shellac with a Trans-tint dye added to make it the color I was going for. A little Trans-tint goes a long way, so I would start off adding maybe 5 drops to a quart of shellac and testing on some scrap wood of the same type. If you want the color deeper, add a couple more drops and test again.
-
phil
- Has many leather bound books
- Posts: 4616
- Joined: Tue Aug 18, 2015 6:11 pm
- Location: Near Vancouver BC
Re: Restoring Darkened Cracked Shellac Finish on Wood
that makes sense. I'd avoid anything with silicone but I don't think murphy's has silicone.
the dye could be used but also the flakes come in a variety of shades.
I don't know if you are near a Mohawk dealer but I like their products. heres an example of a cleaner
https://www.mohawk-finishing.com/produc ... -restorer/
also I see there is a shellac spray. I would normally wipe on shellac not spray it but maybe you can.
https://www.mohawk-finishing.com/produc ... y-shellac/
If the tint is in the shellac at least if you screw up you can wash it off. Using stain right on wood is permanent and not so easy to work your way out of.
the amalgamator might help, if you try to blend in a new finish overtop of the old yes cleaning is important, You don't want dirt in the finish. If you screw it up at least you haven't caused damage because you can still strip if you don't like the way things are going.
https://mohawk-finishing.com/products/w ... r-solvent/
the thing Id be careful of is any heavy stain in the shellac. because if it isn't a super even film you might see streaks. you might have success building the darkness rather than trying to change it abruptly because then the colorant can be lighter and done in more layers. I've found the lacquer toners work well but you really have to be super careful to get just a fine mist and stop! do more later. load it on and get a run then you can get obvious defects near the run. only way to fix that is to start over.
with lacquer I usually do this between clear coats. not sure how successful it is with wiping involved because then you are not only wiping on layers you are also combining those layers. with sprays this is a bit different than with wiping or padding techniques. the spray is more even in ways, but padding pushes the liquid into the voids. both produce an even film if all goes well but problems may arise because of surface unevenness. in other words when you wipe more is deposited on flats and more in recesses and it is removed from bumps, corners etc. There is a lot of technique to padding and keeping the film thickness even. with spray lacquer I find I can sort of make it like coffee and build the layers and they meld together. I think that is easier.. wiping is another thing though. there is a reason why french polishing is a trade in itself. It seems simple and easy when described, but then there are some subtle techniques.
as long as you stick with lacquer or shellac you can always wash it off with a rag soaked with lacquer thinners and start over. I'd be prepared to do that if you start and don't like how it went. You won't loose the table that way. experience is the best teacher in some ways but you might also try a few videos and gather a range of ideas. compare techniques. try. you might even try doing it on some old radio first since there are so many that need refinishing and you can find them without breaking the bank. . That might be a slippery slope for you as it was for me
I like the table. It has a beautiful style.
-
phil
- Has many leather bound books
- Posts: 4616
- Joined: Tue Aug 18, 2015 6:11 pm
- Location: Near Vancouver BC
Re: Restoring Darkened Cracked Shellac Finish on Wood
that above comment makes sense. I'd avoid anything with silicone but I don't think murphy's has silicone.
the dye could be used but also the flakes come in a variety of shades.
I don't know if you are near a Mohawk dealer but I like their products. heres an example of a cleaner
https://www.mohawk-finishing.com/produc ... -restorer/
also I see there is a shellac spray. I would normally wipe on shellac not spray it but maybe you can.
https://www.mohawk-finishing.com/produc ... y-shellac/
If the tint is in the shellac at least if you screw up you can wash it off. Using stain right on wood is permanent and not so easy to work your way out of.
the amalgamator might help, if you try to blend in a new finish overtop of the old yes cleaning is important, You don't want dirt in the finish. If you screw it up at least you haven't caused damage because you can still strip if you don't like the way things are going.
https://mohawk-finishing.com/products/w ... r-solvent/
the thing Id be careful of is any heavy stain in the shellac. because if it isn't a super even film you might see streaks. you might have success building the darkness rather than trying to change it abruptly because then the colorant can be lighter and done in more layers. I've found the lacquer toners work well but you really have to be super careful to get just a fine mist and stop! do more later. load it on and get a run then you can get obvious defects near the run. only way to fix that is to start over.
with lacquer I usually do this between clear coats. not sure how successful it is with wiping involved because then you are not only wiping on layers you are also combining those layers. with sprays this is a bit different than with wiping or padding techniques. the spray is more even in ways, but padding pushes the liquid into the voids. both produce an even film if all goes well but problems may arise because of surface unevenness. in other words when you wipe more is deposited on flats and more in recesses and it is removed from bumps, corners etc. There is a lot of technique to padding and keeping the film thickness even. with spray lacquer I find I can sort of make it like coffee and build the layers and they meld together. I think that is easier.. wiping is another thing though. there is a reason why french polishing is a trade in itself. It seems simple and easy when described, but then there are some subtle techniques.
as long as you stick with lacquer or shellac you can always wash it off with a rag soaked with lacquer thinners and start over. I'd be prepared to do that if you start and don't like how it went. You won't loose the table that way. experience is the best teacher in some ways but you might also try a few videos and gather a range of ideas. compare techniques. try. you might even try doing it on some old radio first since there are so many that need refinishing and you can find them without breaking the bank. . That might be a slippery slope for you as it was for me
I like the table. It has a beautiful style.
-
Casey
- Wizened and wise in the old ways
- Posts: 722
- Joined: Thu Aug 20, 2015 5:34 pm
- Location: Eastern WV
- Contact:
Re: Restoring Darkened Cracked Shellac Finish on Wood
If I were to determine that the original finish was a light one, I wouldn't hesitate to remove all the dark stuff. From the snapshots I have seen, I think the original finish was light.
Very often, art nouveau pieces were in light wood, especially the small-framed pieces that are sprightly.
Casey
Very often, art nouveau pieces were in light wood, especially the small-framed pieces that are sprightly.
Casey
The artist formerly known as Sombreuil
-
phil
- Has many leather bound books
- Posts: 4616
- Joined: Tue Aug 18, 2015 6:11 pm
- Location: Near Vancouver BC
Re: Restoring Darkened Cracked Shellac Finish on Wood
the carved portions might be carved or they might be repwood that is stuck to wood.
I see it often on radios from the era. they pressed the wood dust and glue into molds and then glued that to the wood. I have one with a nice stand and the stand has what appears to be carved knobby things on the legs. .. and those are repwood. Often I see it in fancy bits that look carved. If you strip it and see the wood really doesn't have grain that's probably why. I have samples of radio knobs that were turned and had a repwood piece glued in the center to mimic carving. If it's that then they used the stains to darken the repwood almost to the point where all the grain was hidden because the reprood doesn't have grain and it would look funny with a light finish.
and then they did use dark stains or toners on what I've seen but of course it has darkened more. they were usually trying to imitate walnut and a lot of walnut veneer was used as well. older veneer is usually thinner than the stuff used int he 40's and after.
but it's hard to say and maybe a matter of preference how the owner want's it . to get the carved portions cleaned you could use a plastic scrubbie brush and stripper. Amalgamating that might be a challenge unless you wanted the inset parts really dark and the rest light. my gut instinct says it looks right for its age being dark wood gets darker with age, soot accumulations etc. but hard to say for sure. I think you would have still been able to see the grain through whatever was put on top , even if only faintly and by this point it is almost hiding its grain.
I had a 1920's art nouveau phono that looked of a similar age it was dark too and it was darkened inside to match. that was not a light colored piece. I dont think that was too fashionable then. they were trying to mimic old European pieces that had been brought over and relished and passed along. I also think this table was made in a shop with machinery not a one off by a craftsman. the carving could be done by a machine that could replicate the carving patterns probably by following a prepared jig but by use of a specialized machine, it could have been carved but then you'd see the problem in a factory with that being too time consuming. they want it to look similar to older walnut pieces made in furniture shops. in a similar way the factories did things like delicately cut fretwork, but done by machines in a mass production way.
in some pieces carving was done on a mass production scale so they had carvers doing the same patterns over and over they were good at it.
by comparison to a lot of the old radios I own they are all dark like that in the 20's some older ones were more like scientific equipment and on those they used a lot of rosewood that was a medium darkness and not stained. oak was fumed. the Bakelite parts were black usually , some were dark brown. often the panels and knobs were an early bakelite that was not molded but used in sheets. most of the old ones have big black rubber or bakelite knobs made by a machine process. I think light woods were looked upon as cheap unless they were things like where the contrast was used, for example with ebony and inlays and things. maybe some of that is just my perception but you dont see too many lightly colored and untouched antiques. maybe things like butter churns were done in lighter woods and now appear a medium brown due to age. even ivory might look light brown by this stage.
one thing to do if you look at old furniture flip it over. if its been touched and stained etc they will probably have left tell tale signs and often you will see things like it being stained underneath or fingerprints and dribbles might be noticed. most antiques do not have finish on the backs, undersides or drawer parts other than the fronts and edges of the fronts. re-finishers often get carried away and finish those areas as well. if it's repro you might see wood that is unnaturally light. a sure give away that it's a repro.
on really close inspection look for wood shrinkage and it should shrink across the grain r maybe even along the grain a little. antiques will show these details but repros dont usually go to that extent to make them look authentic. Its surprising how close some pieces come.
I remember being at auction and watching some poor dude bidding up a nueveau looking statue that looked like bronze. It looked too perfect and in the preview I flipped it over and it said made in china.. its sad when that happens.
this table isnt' repro but there is some stuff out there that can fool people easily because they are getting better at it.
Re: Restoring Darkened Cracked Shellac Finish on Wood
I have been trying my luck to re-amalgamate 100 year old shellac that is on all of our interior trim. My first attempt I thought was going great, until I realized I basically just wiped all of the shellac off.
I have been using alcohol and a brush. It takes a while for this old shellac to liquify. For my most recent attempt in the last few days I just wanted to get the old dried dirtycrackled stuff off and try my luck at applying new shellac. It looks like I will have to go with the darkest garnet shellac to match the darkness of the rest of the trim that hasn’t been touched.
After watching the video link earlier in this thread, and a few on YouTube, I am going to try using something gently abrasive like 0000 steel wool or a gentle scotch pad to work the alcohol in, instead of a brush.
It would be great if I could just liquify the existing old shellac and redistribute it, but so far it looks like stripping and putting new shellac on is what it will be.
-
phil
- Has many leather bound books
- Posts: 4616
- Joined: Tue Aug 18, 2015 6:11 pm
- Location: Near Vancouver BC
Re: Restoring Darkened Cracked Shellac Finish on Wood
with french polishing , one thing that is important is the wetness of the pad. If it is drenched with alcohol it will remove finish, too dry and it gets sticky. focus on one area too long and it will pull finish off. I think its a delicate balance. building the finish takes some practice to avoid either situation. you can paint on layers of shellac but that's different. some videos on french polishing might help with tips on the padding techniques, and practice of course.
-
GinaC

- Forgotten more than most know
- Posts: 437
- Joined: Sat Jan 26, 2019 8:19 pm
- Location: Newport, VT
Re: Restoring Darkened Cracked Shellac Finish on Wood
KenN wrote:I have been trying my luck to re-amalgamate 100 year old shellac that is on all of our interior trim. My first attempt I thought was going great, until I realized I basically just wiped all of the shellac off.
I have been using alcohol and a brush. It takes a while for this old shellac to liquify. For my most recent attempt in the last few days I just wanted to get the old dried dirtycrackled stuff off and try my luck at applying new shellac. It looks like I will have to go with the darkest garnet shellac to match the darkness of the rest of the trim that hasn’t been touched.
I remember watching a video where one person wanted to strip their wood trim and used rubbing alcohol instead of stripper. It took longer, but it did take everything off.
I don't think the turpentine does the same thing. Like you, I have old shellacked trim that I want to freshen up, and perhaps make a little darker. I was given a gallon of shellac by the owner of the B&B in town who restored the Victorian building and had it left over, and I'm hoping I can just add another coat after I rub the dirt out with turpentine?
1939 Minimal Traditional
Re: Restoring Darkened Cracked Shellac Finish on Wood
I am using denatured alcohol. If I could get pure ethanol I would like to try that.
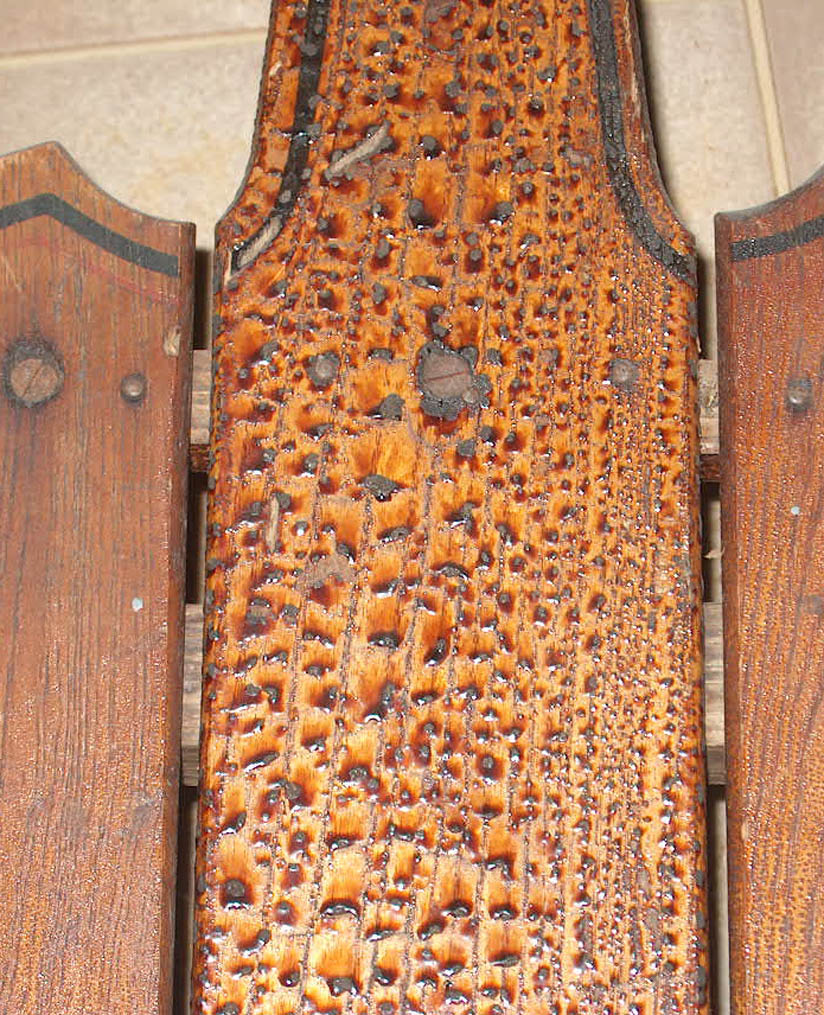
I haven’t tried any other solvents like turpentine or mineral spirits to clean it first. I should probably do that, the old shellac is very dark and dirty/muddy. I was surprised by how light the actual wood was when I ended up removing it all. All of the trim and windows (and I think the floors) seem to be some kind of Fir wood.
I have been mixing my shellac up from flakes, I haven’t tried pre-made shellac.
This isn’t my photo, but this is what a lot of the shellac in the house looks like:
http://www.sledhill.com/images/5CpreRest.jpg