
Hi all,
I am (still) in the process of saving my wooden windows, and something I am not clear about is which surfaces do not get painted?
Is it every wood-to-wood contact?
The sides of the stiles that rub against the jamb?
The jamb itself, including the parting bead? (sides of the parting bead only without paint?)
The inside of the stops that can rub against the sash?
The small strip of the front and back of the sash that will rub against the stop or the parting bead? I have read both to leave this unpainted and to paint it
The bottom of the bottom sash? The top of the top sash?
All of the sill is painted? conversely where the top sash meets the head?
The two surfaces that touch at the meeting rail when the window is closed?
My windows are in the style of paint for the outside surfaces and then shellac for the inside surfaces, I will continue that style.
Another random question I have is about single hung windows with top sashes that don't open. I have not removed enough paint yet to tell if my top sashes are set up to move. I assume the do, but in the case that they do not, what mechanism is usually used to hold them in place? I will definitely have to remove some of the top sashes to repair weakness and replace glass, so if I do not find a sash weight compartment for the top sash, and I want to remove the top sash, what is usually holding the top sash in place?
Thanks for any help, I did not find the topic of what not to paint easy to search for.
Window repair - which surfaces do not get painted? (plus top sash question)
Re: Window repair - which surfaces do not get painted? (plus top sash question)
Hi Ken - great question!! That one has many answers, depending on whom you ask.
What I do is PRIME everything that is bare when you take the window out...typically that will be the top of the top sash that goes into the slot, in your single-hung case....the sides that ride against the jamb....bottom of the bottom sash. The rest gets painted as it was.
They just usually did not prime the top, bottom and sides back then. Some say this lets the window "breathe", or that not doing the bottom of the bottom sash "lets any water that soaks into the sash escape"...but I am doubtful. Other window restorers on here have also voiced this opinion, so I'm with them...just prime those spots w/oil prime, and re-do the painted areas. The bare areas may show that the window was simply painted after it was installed rather than before, and has no significance to any 'plan'.
Top sash on windows like yours (called "single hung") usually just have 2 strips of wood applied vertically under them to 'prop' them up. You remove them both with a small pry bar being careful not to dent anything, then must work that top, painted in place sash loose. Careful you don't 'dump' that sash, by causing it to fall out and break glass! Remove lower sash first, of course.
Sometimes it takes me a couple of artfully-placed blows with a rubber mallett to free it!! Generally you must score around where it is painted in place before you do anything else (true for all window parts)...look closely for any wrongly-inserted screws or nails holding that sash in, which should not be there! You should feel it give a little, tho it will be tight. After 1 or 2, you'll get the hang of it. A very close inspection by eye should tell you what's going on...do nothing fast, always assure yourself that something unexpected isn't happening (like a nail isn't driven thru the sash into the jamb or something, which would damage it if you forced it).
After removal, I sand those bare wood areas a little, to smooth them and ensure they will go back together properly after refinishing....just enough to know there's no build-up there or texture that will bind. Paint forms layers that make things tight. Remember to never caulk that upper sash in place; it doesn't need it. Sometimes ppl did this, making it rough to get them back out!
Let us know if you have other questions!

Re: Window repair - which surfaces do not get painted? (plus top sash question)
Gibson, I did as you commanded except where you suggested primer but no paint, I used blopentine (a mixture of roughly 50% boiled linseed oil and 50% turpentine). Do you think that's adequate? I'm also planning to scrape, sand and apply blopentine to the tracks where the sashes travel.
Re: Window repair - which surfaces do not get painted? (plus top sash question)
Honestly, James, since it wasn't painted to begin with, I think you are just FINE with blop. It would take a LONG time for the oil to dry up since those parts of the sashes aren't exposed to weather.
What I related is conventional wisdom; wise words I've picked up here and elsewhere. To be entirely honest, I don't put anything on the sash sides other than blop, either! Jambs too. I just find that paint layers, even primer, builds up....or just wears off anyway, and looks horrible while doing nothing after wearing.
I do prime or blop the top of top sash and bottom of bottom sash (if I don't actually paint it). In my mind it sort of 'seals' them, helping them resist swelling from humidity changes...just my opinion!
Re: Window repair - which surfaces do not get painted? (plus top sash question)
Thanks Gibson that's helpful. I'm pretty sure the top sashes in my windows should be movable but I started to wonder how they would be held in place if they weren't movable. The top sashes now have the usual years of paint cementing them in place, and the channel in the jamb thickly coated, so it will be interesting to see all that gone and what's under there.
The bottom sashes now are not painted on the sides or bottom, and the jamb for the bottom is unfinished also. I will try staying with that style but supplementing with blop as you mentioned, thanks.
The bottom sashes now are not painted on the sides or bottom, and the jamb for the bottom is unfinished also. I will try staying with that style but supplementing with blop as you mentioned, thanks.
Re: Window repair - which surfaces do not get painted? (plus top sash question)
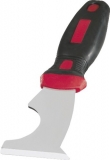
Ken, you probably already have one, but just in case you don't - I found this painter's 5-in-1 tool indispensable for freeing up windows. Look for one with a metal cap on the handle so you can tap it with a hammer.
Re: Window repair - which surfaces do not get painted? (plus top sash question)
Sounds like a plan, Ken. Maybe come back with some pix, always nice to see what people are working on!
A painter's 5-in-1 tool is almost mandatory for this stuff, yes! It is the go-to for breaking the paint seal around those top sashes...for scraping out loose glazing before heating, and esp. after the heat gun, and more. I use one most every day at work. That's also what I use to drive points.
Werner makes a really nice one. The metal cap IS a hammer, LOL...you can use it for one in a pinch! Watch that sharp, curved, inner edge...it can bite you. I got myself good one time, almost took my fingertip off.
Re: Window repair - which surfaces do not get painted? (plus top sash question)
Manalto wrote:Ken, you probably already have one, but just in case you don't - I found this painter's 5-in-1 tool indispensable for freeing up windows. Look for one with a metal cap on the handle so you can tap it with a hammer.
I've got a couple of these on my tool bench and only ever used them to squeeze the extra paint off my rollers. I do learn new things here all the time from you good people. Thx.
-
Casey
- Wizened and wise in the old ways
- Posts: 722
- Joined: Thu Aug 20, 2015 5:34 pm
- Location: Eastern WV
- Contact:
Re: Window repair - which surfaces do not get painted? (plus top sash question)
Places I don't paint or anything: sides and top of top sash. Sides of bottom sash. Top half of the parting bead. Top half of the upper sash race/channel (unless it was primed originally).
Use oil paint. If you can manage it, finish-paint the sash and jamb before re-installing the sash. Paint carefully as you can onto the glass by 1/16", this seals the putty so water can't get between it and the glass. If you go over too far, use a taping knife as a guide for the razor blade and leave a perfect margin of paint on the glass.
A "window zipper" is also a very handy tool for freeing painted-shut windows.
The artist formerly known as Sombreuil

Re: Window repair - which surfaces do not get painted? (plus top sash question)
as a professional, I do not paint the top of the top sash or the sides of the sash....the meeting rail of the top sash and the bottom rail of the bottom sash is painted with the exterior color...the meeting rail of the bottom sash is painted with the interior color...if the jambs are currently unpainted, leave them as such--apply a coat of blopentine...if they are painted, you can do your best to remove all the paint and apply blop or scrape and sand and paint...paint build-up over time inhibits proper operation of the sash.
for the area of the stop that faces the exterior, I suggest you scrape and sand and apply blop...when the bottom sash is open, that stop is open to the elements...same for the blind stop (the exterior stop/trim) where the top sash slides--scrape, sand and apply blop...meeting rails should be painted the same as the rest of the sash...
we use only oil products--latex tends to remain rubbery and stick to surfaces making operation difficult especially in the warmer months.
if you have a rope and pulley balance system, the top sash will most likely be balanced the same as the bottom...once you lower the top sash, that will become apparent...if your sash are quite old and do not have a balance system, it's possible that your top sash are 'fixed' and are not meant to operate...in this case, the sash sets into a relief at the top then sit on 'jacks' set into the jamb at either side of the sash....if the sash is meant to operate without a balance system, you may have mechanical hardware that allows the sash to be open at different intervals...
and there you have it from me.....good luck!
...jade