
I had to look up window zipper.
https://thecraftsmanblog.com/wp-content ... zipper.png
Window repair - which surfaces do not get painted? (plus top sash question)

Re: Window repair - which surfaces do not get painted? (plus top sash question)
phil wrote:I had to look up window zipper.
You can also serve pie with it.
-
phil
- Has many leather bound books
- Posts: 4616
- Joined: Tue Aug 18, 2015 6:11 pm
- Location: Near Vancouver BC
Re: Window repair - which surfaces do not get painted? (plus top sash question)
funny I saw another make that reminded me of something to scale fish with, but it was embedded in pintarest or amazon.china or some other malicious page that wanted to throw ads at me. You can't really see it in that link but these things are very thin springy hard steel. speaking of nasty cuts..
Re: Window repair - which surfaces do not get painted? (plus top sash question)
Looks like it would work, though! Probably better than a steak knife 
-
phil
- Has many leather bound books
- Posts: 4616
- Joined: Tue Aug 18, 2015 6:11 pm
- Location: Near Vancouver BC
Re: Window repair - which surfaces do not get painted? (plus top sash question)
I'd just use a thin flat putty knife trying carefully not to mark up the wood but maybe if you do a lot of them it would be faster. on the ones I've unstuck , I swear they just caked the paint on and then closed them, so I got what paint was visible near the gaps off and then started working in paint stripper until they finally let go when it dissolved enough.. so I was sort of gently stabbing the cracks and trying to work the stuff in there until finally they succumbed to my persistance. on some I had to attack from the outside at the same time. Im sure the pros do it faster though.
I picked up a little saw at the thrift for a dollar that I thought was interesting. It has a wire handle , a bit lke a coping saw but with a very fine hard steel wire , I think it's coated with diamond grit. I bet you could cut through all sorts of places with some of that kind of wire. It leaves a very fine kerf so you could do very fine fretwork with it too.
also there are car window removal tools that could prove useful I guess, maybe the power pie server is a bit extreme but they need to cut through a layer of glue the way they are put in these days.
- Attachments
-
- getImage.jpg (72.96 KiB) Viewed 1248 times
-
- s-l300.jpg (3.15 KiB) Viewed 1248 times
-
- .jpg (61.54 KiB) Viewed 1248 times
Re: Window repair - which surfaces do not get painted? (plus top sash question)
Thanks everyone again for your help and sharing your knowledge. Rereading everything now more sinks in and it is all very helpful.
I ran into something while working on the first window, I thought it was a fluke on the first window but now I see the same on the second window so it seems like this is how these windows were put together in 1915, and possibly explains why none of the broken sash weight cords have ever been fixed.
My problem is with opening the sash weight access panel. It seems that the access panels were only partially cut when the windows were built. The long vertical sides of the access panel are cut all the way through but the top and bottom horizontal cuts only go half way through the material. There is a matching half-way-through cut about an inch above/below in the sour rounding material, from the other side.
It looks like to open the access panel for the first time you have to split the panel off or complete the cuts yourself.
Has anyone run across this?
Re: Window repair - which surfaces do not get painted? (plus top sash question)
Sounds lovely, Ken!
You can get in there with an oscillating multi-tool. I recommend everyone own one.
The blade in the pic would do a fine job for you, it is about 1 1/2" wide. You can re-sharpen them with a triangular file. Barring that, you can get in with a utility knife to score the cuts almost all the way, then popping them open. I'd rather use the saw so they are cut neatly...you will then find a billion and one uses for that multi-tool, like cutting under thresholds etc.
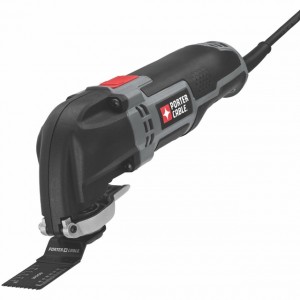
-
phil
- Has many leather bound books
- Posts: 4616
- Joined: Tue Aug 18, 2015 6:11 pm
- Location: Near Vancouver BC
Re: Window repair - which surfaces do not get painted? (plus top sash question)
on all of mine you just need to remove the side casings on either side of the window. Just a few casing nails. If the heads of the nails pull through the casings then let them. It does less chipping near the nail holes than pulling them back the way they went in. Later I just use long thin nails, the ones from the auto-nailers are very thin. I don't feel the casings need huge nails to stay in place and then its easier if you need to pull them in the future. Some windows have an access panel. I'd pull a casing to have a closer look, just cut the paint first and be gentle with the prying. If you want to reuse the nail holes you can. I putty them up during my wood finishing with them removed. some do it differently. I use a bit of metal rod with a small hole drilled part way through to start the nails so they don't bend when I drive them by hand. ( because I use the very thin nails.) You can use an air nailer if you like. If you do use casing nails and start new holes just drill pilot holes first or you may crack the casings. If you do crack one just get a little glue in the crack and wrap it tight together with masking tape and the crack will disappear.
with the casings off you can see if you have holes through to the outside. I was able to do a bit of insulating in the pockets without it blocking the weights from moving freely. the weights only can go as high as the pulley so I stuck foam blocks up above the pulley with a little spray foam. With mine I need to remove them to un-paint them anyway. Some previous owner went crazy and painted all my casings and trim white and sealed the windows up solid with thick paint. I had clear shellac under the paint , that was the original finish. Yours could be painted originally. Do what pleases you with that aspect. some windows have access panels but maybe they just never needed to be opened... Like if the installers got in there by just removing the casings or tied the weights on prior to installation of the casings. You can cut holes into the sides and install covers but I never saw the point in doing all that, its just more work.. your approach might differ if pulling the casings seems difficult. I don't understand why, but some fear breaking the casings I guess. I've never lost one.
I think what might happen is tha tthe windows came with most of the wood routered out so it was easy for an installer to finish the hole if he wanted to use them and otherwise the holes that were cut part way through from the backside and not broken right through wouldn't show at all if they were not used.
If I had to cut them myself I'd use a router or laminate trimmer with a guide so the edges of the new hole were smooth and square. then cut the access door to fit tightly into the new hole. you might use a straight bit. You could use a tapered bit in the router so the panel could also be tapered to make the fit less visible if you are so fussy. the router template is just a board with a square hole cut in it and then the router bit would have a guide bearing so you could then plunge it and run it around the circumference of your template. I'd probably hog out to within 1/8th or so with a saw so you didn't need to do so much work with the router bit. You could do the same with hand tools if you prefer. the tool pictured above vibrates the blade, they are good for some things. I haven't found enough need to buy one for myself yet but they can be the cat's meow if you need to cut in some confined places.
Ive got several different routers and a laminate trimmer , which is the same thing but it's smaller so I can get closer to things.
Last edited by phil on Mon Nov 26, 2018 9:05 pm, edited 1 time in total.
Re: Window repair - which surfaces do not get painted? (plus top sash question)
I don’t think I have to go to the point of opening the casings, the access doors are there, they have two screws, and looking at them they look all cut and ready to be opened.
The problem is the top and bottom horizontal cuts are not cut all the way through. These half cuts are also straight in, not angled. There is a matching half through cut on the backside of the channel, offset about an inch below the top of the door, and inch above the bottom.
It seems like it is up to me to connect these two half cuts to get the access door off?
-
phil
- Has many leather bound books
- Posts: 4616
- Joined: Tue Aug 18, 2015 6:11 pm
- Location: Near Vancouver BC
Re: Window repair - which surfaces do not get painted? (plus top sash question)
It sounds like you could finish the cuts. maybe just drill a few tiny holes to get started then use one of these hacksaw blade holders? later just cut a little wood wedge to shove in the crack to hide the sawcut, or just putty it up if you are painting.
I see why the multitool was suggested, You could use one of those but running out to buy one for just that job might depend who's on your Christmas list
https://i.ebayimg.com/00/s/MTAzMVgxMzAx ... 880000500F
I see why the multitool was suggested, You could use one of those but running out to buy one for just that job might depend who's on your Christmas list
https://i.ebayimg.com/00/s/MTAzMVgxMzAx ... 880000500F