
Space between wood flooring and threshold and door molding
-
historicalwork
- Been here a good while
- Posts: 229
- Joined: Sat Aug 29, 2015 12:01 am
Space between wood flooring and threshold and door molding
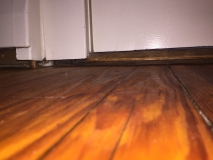
One of our upstairs rooms has an exterior door that leads to an outside porch (second story). We removed the carpet some time ago and, as I recently posted, we finished the floors. But I'm curious why there might be such a large gap between the flooring and the door threshold and door molding. I believe this door would have been original. I can't imagine any adjustments were made (undercutting) when the carpet was added. It is a brick house, not sure if that might have anything to do with it. But I'm trying to figure out the best way to deal with this. I was thinking about just cutting a piece of wood (sanding, finishing, etc) that would fit underneath the threshold and molding. It's not a big deal but it's a big enough gap that it's a bit annoying to look at.
Re: Space between wood flooring and threshold and door molding
I'm thinking about weather and pests.
Could you put foam backer road and then quarter-round on the molding and weather stripping on the bottom of the door?
Could you put foam backer road and then quarter-round on the molding and weather stripping on the bottom of the door?
-
phil
- Has many leather bound books
- Posts: 4616
- Joined: Tue Aug 18, 2015 6:11 pm
- Location: Near Vancouver BC
Re: Space between wood flooring and threshold and door molding
I'd cut a new plinth block from a piece of a fir 2x6. use a part from another old house. If there is no plinth block then you can add one or change the casing to a longer one. the casing over the door can olly be lowered so far, yes they probably cut it when installing flooring and when you sand the floor that gap grows too.
-
historicalwork
- Been here a good while
- Posts: 229
- Joined: Sat Aug 29, 2015 12:01 am
Re: Space between wood flooring and threshold and door molding
Sorry for the late reply and thank you for the thoughts on this. Cutting new blocks that extend a little lower didn't occur to me at first. I might add some backer rod, extend those down and then cut a small strip of wood for right below the threshold. Thank you again.
-
Gothichome

- Moderator

- Posts: 4184
- Joined: Sun Aug 16, 2015 8:34 pm
- Location: Chatham Ont
Re: Space between wood flooring and threshold and door molding
Historicalwork, any chance the threshold actually projected further into the room, filling that gap when new. What does the other side look like, similar gap?
But as others have mentioned, just filling the gap with some spacer blocking would the most practical and easiest solution. Personally I cring at the potential damage removing old well fixed wood from the walls. If it doesn’t go well you could have two unacceptable plinth blocks.
But as others have mentioned, just filling the gap with some spacer blocking would the most practical and easiest solution. Personally I cring at the potential damage removing old well fixed wood from the walls. If it doesn’t go well you could have two unacceptable plinth blocks.
-
phil
- Has many leather bound books
- Posts: 4616
- Joined: Tue Aug 18, 2015 6:11 pm
- Location: Near Vancouver BC
Re: Space between wood flooring and threshold and door molding
the plinth block is just a block of wood with rounded corners. Its no harder to cut a new block of wood than to try to make a joint, or even to cut a piece to make the joint with. If it's a new block then there won't be a repair to show and that will look more professional. If you can find an old door, that's probably a good source of wood that would be a good match. If it's going to remain painted then I guess the wood species doesn't even matter. yea you could fill it with epoxy putty and call it a day. I'd replace it to be thorough. If it were a big piece like a baseboard that was an inch short, then I would do a splice but you aren't saving enough wood there to make it worthwhile.
if you attempt to make mitered butt joints it helps to make both cuts on the same saw, that way if the saw is actually cutting at 44.5 or 45.5 degrees it won;t matter. the pieces will still fit since they are exactly the same angle. It wouldn't' matter if it was 40 degrees as long as they fit each other. you'll still see the joint if you look for it as the grain won't run right through but it's still nicer than putty.
if you consider it like gold and not wood you could sacifice one and use parts of that to splice. to make a good joint I'd remove the plinth block and cut both to a 45, then glue the two fresh cut edges together. after dry, trim to length. Or you can go to an old house parts place and see if they have longer ones you can use, but by the time you run around looking you can have it done. You can do the roundover with a router and 3/8" roundover bit. or if you don't have tools you can just use a hand plane and sandpaper, its so little. the plinth block should be a little wider and a little thicker than the casing. I'd put a little less roundover on the top edges, probably a 1/4" roundover bit. or just sand the corners off to match what it has now. if you want to extend the door I'd glue a strip to the bottom. make the strip a tad oversize then after glue up plane it flush. You can put glue on the joint and nail it to the bottom of the door if you dont have long pipe clamps for the glueup. I'd trim or plane the bottom of the door so you have a good square clean fresh edge to fit to.
where the plinth block meets the floor, cut that edge to 89 degrees, just very slightly off square so that when it fits against the floor the edge you see fits tight. keep in mind that gap under the door could be your cold air return if there isn't one in the room it might have that big gap for a reason.
I wouldn't be worried about pulling the piece off. Just break the paint with a knife then use flat screwdrivers or a thin flat pry bar and slowly work it off prying near the nails. If it did split ( unlikely) then it's a simple matter of grabbing the glue bottle and putting glue on the two pieces and fitting them back together, you can just use masking tape as a clamp. You won;t see that crack again nor will it be any weaker there. Ive pulled all mine off for refinishing and all the casings and trim. never broke one piece, just pull them evenly, do it slowly, dont; be in a huge panicky rush. once you get a little gap and you can locate the nails, pull near them. work your way around pulling a little here and a little there. when you remove the nails instead of knocking them back out , pull them right through the backside. it won't chip the wood near the nail holes. Ive done lots of this. the only way you break stuff is if you get one end lose and start yarding on the end that's loose and bending and stressing the part. Don't do that and it will almost never split. if it does split you won;t lose the part just glue it back and don't leave the two pieces kicking around so no splinters are lost.
if a board is cracked and not split, run a bead of glue along the crack and wiggle them, this will draw the glue into the crack, then wipe the excess glue off and clamp it up. it'll be good as new.
lots of mine were missing and I had to reclaim a lot of it. first thing I do when I get the old parts home is pull the nails and glue any cracks. Ive never lost a board due to a crack or split. if fragments are missing then you can use a little matching putty, but use as little putty as needed. i putty any nail holes while the baord is off, when I return each board I use the same locations for the new nails. Just predrill a little hole and drive the new nails through the same holes. If needed you can add a few extra nails. some use a pneumatic nailer and the thin nails. i just use that type of nails and break them off thestrip with plyers. they are very long and thin nails. I predrill a tiny hole and use a little tool I made. It's a bit of 1/4" rod or 1/4" bolt with a little hole drilled in iit about an inch deep, put hat over the end of the nail when you start driving and the nail won't bend when you drive it in. once the tool is near the casing, then take it off the nail and finish driving it in. try to hit studs not just lath or drywall. if you dont; know where the studs are then just guess. I just use a tiny bit ad drill deeper than the lath or drywall if you miss it breaks through then move over. once you hit a stud then you can measure 16" over and try there for the next one taking an educated guess that that's where your next stud is. You might make a few tiny exploratory holes searching for wood, that's ok the casing will cover that. once you locate the studs, mark them with a pencil and then put the casing on.
-
historicalwork
- Been here a good while
- Posts: 229
- Joined: Sat Aug 29, 2015 12:01 am
Re: Space between wood flooring and threshold and door molding
Phil - I wanted to acknowledge your very helpful response - need to read in more detail as time permits but very much appreciate the advice / thoughts on this. I'm going to try and tackle this over the Christmas break.
-
phil
- Has many leather bound books
- Posts: 4616
- Joined: Tue Aug 18, 2015 6:11 pm
- Location: Near Vancouver BC
Re: Space between wood flooring and threshold and door molding
If you can't get other plinth blocks locally try searching craigslist free for old doors.
Last weekend I got one. it's a huge fir door with pebbled glass panels. the one I got is new, nbut no matter it's nice fine grain, vertical grain fir.
the thing about door parts is they used nice fir so it matches , it is also thick enough and wide enough. You can use a 2x6 but the challenge is finding one with nice grain. If it's painted and you never plan to have stripped paint it won't matter, use anything.
if you want to split 2x material so it's thinner , the pieces you need are probably 1 inch thick, a 2x6 is 1.5 inches thick. If you have a tablesaw make one cut then flip it keeping the same side to the fence cut again. If your blade won't lift high enough to complete the split then use a handsaw and it will follow the two slots you have cut and with relative ease you can finish the cut. the problem you will run into if you just go buy lumber is you can get it but 1" isn't' a common dimension and like all finished lumber it's undersize. they always rip us off
If you were doing a lot you can go get rough cut 5/4 lumber n( 1.25") from a cabinetmakers supplier and then plane it to 1"
If you want to use modern lumber you can go with 3/4" then glue strips to the edges to build it thicker. that will work too. it won't matter if it's hollow behind. If you use a piece of 3/4 x 10 inch wide then you can cut these two strips from the same board and you won't see your glue line .
Re: Space between wood flooring and threshold and door molding
historicalwork wrote:...But I'm curious why there might be such a large gap between the flooring and the door threshold and door molding. I believe this door would have been original. I can't imagine any adjustments were made (undercutting) when the carpet was added. It is a brick house, not sure if that might have anything to do with it....
Looking at the atypical space between the bottom of the wood behind the radiator and the floor, traditional trimwork practices of placing baseboards, plinth blocks, and thresholds against the floor it would be my guess the floor joists have shrunk lowering the floor with it.
I would also suspect the existing threshold is not the original given its different colour of the wood and because it extends slightly lower than the plinth block. But I would suspect it was installed flat against the floor when there was a much thinner gap between the plinth block and floor.
For the threshold, I would rip a strip of beveled wood (ie. another threshold) that would fit under the existing and continue it to the current floor level. This would extend the threshold farther into the room but better avoid a trip hazard.
For all other areas, incl. the plinth block, I would install quarter-round molding of a radius great enough to cover the gap with a little overlap (to allow for some, continued gap development).
Quarter-round is always appropriate because the floor = stereobate; the quarter-round = stylobate; the plinth block/baseboard = the plinth of a column.
Quarter-round is also useful for when the thickness of baseboard moulding doesn't conceal the gap between the floorboards and the wall. Less than 0.75" quarter-round might seem a bit too small for baseboard applications but, I guess, that's personal preference. It's just that 0.75" is a good floor board thickness and the stylobate is usually the same thickness as the stereobate.
~James
Fourth generation in a family of artists, engineers, architects, woodworkers, and metalworkers. Mine is a family of Viking craftsmen. What we can't create, we pillage, and there's nothing we can't create. But, sometimes, we pillage anyway.
Fourth generation in a family of artists, engineers, architects, woodworkers, and metalworkers. Mine is a family of Viking craftsmen. What we can't create, we pillage, and there's nothing we can't create. But, sometimes, we pillage anyway.
-
phil
- Has many leather bound books
- Posts: 4616
- Joined: Tue Aug 18, 2015 6:11 pm
- Location: Near Vancouver BC
Re: Space between wood flooring and threshold and door molding
"For all other areas, incl. the plinth block, I would install quarter-round molding of a radius great enough to cover the gap with a little overlap (to allow for some, continued gap development)."
- in my house the 1/4 round follows the baseboard but it doesn't cover the plinth blocks, the plinth blocks stick out further than the baseboards and the 1/4 round cant' cover the plinth blocks, it ends up against them. so from my experiences the plinth blocks need to fit against the floor to be right , but the 1/4 round can hide any gaps between the baseboards and the floor. maybe some houses are done differently.
when I sand floors I pull all the baseboards and casings out , then the floor is a little lower. the baseboards can be reinstalled with new 1/4 round but the plinth blocks get too short because the floor is a little lower after sanding. In some cases it's still ok but what i have found is that if I position the plinth block against the floor then pu tthe casing up on top of that, well the top casing then sits lower and so then to fix that I need either a longer plinth block or a longer casing. in some cases I have extra reclaimed casings so I just cut another one a tad longer rather than trying to do anything with the plinth block. - the two just have to add up so that the top casing isn't too low.
In other words. instead of trying to fill the gap or extend the plinth block you can remove it, fit it to the floor, nail it back and then instead of playing with the plinth block , steal a casing from somewhere else that is a tad longer than the one sitting on top of the existing plinth bock.