Wallpaper borders - following a curve (the hard way)

Need advice, technical help or opinions, you will find plenty here! (Technical posts here)
User avatar
Mick_VT
Moderator
Moderator
Posts: 2437
Joined: Sat Aug 15, 2015 2:39 am
Location: Central Vermont
Contact:

Wallpaper borders - following a curve (the hard way)

Post by Mick_VT »

Hey all,
I have a 6-8" wallpaper boarder that I intend to hang near and follow the ceiling in the dining room project, but I have a conundrum. A lot of you will know my house is very twisted, everything slopes or swoops where it once was straight and plumb. this is not the normal amount of out of plumb you find in an old house, it is extreme - like the children's nursery rhyme.

Normally when hanging a border near a ceiling that is out of plumb in some way you have the border plumb and either trim it to meet the ceiling where the ceiling dips, or you hang it a little ways away and have a varying gap. Due to the above mentioned issues in this house that will likely look terrible as this ceiling drops by around 1 3/4" in the middle on a gentle curve. To make it worse the wall below (13' long) it has three doorways in it which also conform to said ceiling dip, as does the floor - it is all consistent. The net effect of all this is that the whole does not immediately appear wildly out of plumb... that is until you strike a straight line across it! I really need the border to have the same graceful swoop as everything else. Here is the wall in question, what looks like perspective distortion in the picture is actually there in real life (excuse the junk etc!)...

IMG_6617.JPG
IMG_6617.JPG (696.67 KiB) Viewed 535 times


I am thinking of cutting the border into 2-3' sections so that I can follow the curvature better. This would allow for a very slight change in angle every few feet. Small enough that it should not be too obvious. A fraction of a degree. Of course this means I will lose a minuscule piece of the design at each join, but I think that should not show.

What are your thoughts, has anybody here had to do a similar thing before? Is there a better way? Am I going to regret trying this? My wallpapering skills are ok - a little rusty but I have done a lot, and done it well in the past.
Mick...

Olson185
Been here a good while
Posts: 251
Joined: Mon Oct 17, 2016 12:36 am

Re: Wallpaper borders - following a curve (the hard way)

Post by Olson185 »

While I have several ideas, including the one you suggest of cutting the border into sections, would you be able to post a pic of the border you want to hang? It's pattern might be subject to a particular idea.
~James

Fourth generation in a family of artists, engineers, architects, woodworkers, and metalworkers. Mine is a family of Viking craftsmen. What we can't create, we pillage, and there's nothing we can't create. But, sometimes, we pillage anyway.

User avatar
Mick_VT
Moderator
Moderator
Posts: 2437
Joined: Sat Aug 15, 2015 2:39 am
Location: Central Vermont
Contact:

Re: Wallpaper borders - following a curve (the hard way)

Post by Mick_VT »

Absolutely, It is a trimmed down version of this...

for_arcadia_400.jpg
for_arcadia_400.jpg (57.81 KiB) Viewed 526 times


I am removing the olive stripe and green field at the bottom, and likely the gold stripe and olive field from the top. For scale the total height of this border is around the same as the distance between the cornice and the top of the doorway. However in this area, because I am not going hard against the cornice I intend to cut the doorways into the border - imagine the top of the crown on the door coming around 50% of the way into the red. Hope that makes sense? You can actually see a little bit of my sample in the top left of the first picture
Mick...

User avatar
Lily left the valley
Inventor of Knob and Tube
Posts: 2170
Joined: Sun Aug 14, 2016 2:07 pm
Location: Gardner, MA, USA
Contact:

Re: Wallpaper borders - following a curve (the hard way)

Post by Lily left the valley »

Mick, did you cut off the base cross piece as well? It's hard to tell from the little bit that shows in that image. I think you might be able to have some wiggle room with the base open as you seem to have cut it out. Yet you know the worst of the changes better, so piecing each section may be for the best.
--Proud member of the Industrious Cheapskate Club
--Currently pondering ways to encourage thoughtful restovation and discourage mindless renovation.

User avatar
Mick_VT
Moderator
Moderator
Posts: 2437
Joined: Sat Aug 15, 2015 2:39 am
Location: Central Vermont
Contact:

Re: Wallpaper borders - following a curve (the hard way)

Post by Mick_VT »

Lily left the valley wrote:Mick, did you cut off the base cross piece as well? It's hard to tell from the little bit that shows in that image. I think you might be able to have some wiggle room with the base open as you seem to have cut it out. Yet you know the worst of the changes better, so piecing each section may be for the best.

yes, it is trimmed to a T-shape, basically it is just the main design. The curve is pretty even (it's a graceful sag) so there are no dramatic changes across the length. I think the design gives at least two clear places where I might slice and splice as it were. Right in the middle of the "T" or at it's extremities where the pattern repeats
Mick...

User avatar
Mick_VT
Moderator
Moderator
Posts: 2437
Joined: Sat Aug 15, 2015 2:39 am
Location: Central Vermont
Contact:

Re: Wallpaper borders - following a curve (the hard way)

Post by Mick_VT »

Played with this a little more this morning....

I used a laser level to better quantify the sag, it is around 1.5-1.75 inches in the middle, with the room itself being around 1" off level across it's width. The distance I need from the cornice to the top of the border is 2-3/4" or thereabouts so that I will not be cutting round the windows, but will terminate nicely against their casings. That means if I just put it straight (even if not level) the gap above will vary in height over the run by about 50%. It will also highlight how far the trim and ceiling are out of plumb. To my eye that is all too noticeable, hence the desire to follow the curve.

On a related note, the 2-3/4" measurement gives me two options on trimming the border...

With the top band
With the top band
IMG_6620.JPG (711.86 KiB) Viewed 500 times


and

Without the top band
IMG_6621.JPG (764.02 KiB) Viewed 500 times


I am leaning towards the first of these two - what do you guys think... I hate to lose that stripe as it's in nice metallic gold ink, but I lose so much of the design with that top stripe. :think:
Mick...

User avatar
Lily left the valley
Inventor of Knob and Tube
Posts: 2170
Joined: Sun Aug 14, 2016 2:07 pm
Location: Gardner, MA, USA
Contact:

Re: Wallpaper borders - following a curve (the hard way)

Post by Lily left the valley »

This may sound odd, but is there any reason why you can't keep the gold upper, and just cut the ones that won't be on top of door/window/built-in trim to include the upper gold plus the lovely central detail?

I know it would "chop" the visual to an extent that way, but I think of it as a valance dip that peeks out when it's not tucked behind trim.

I did a quick mock up to give you an idea. The perspective isn't perfect on the right hand side (scale's off), but we have to run errands. I can clean it up later if that helps you visualize what I'm meaning.
Image
--Proud member of the Industrious Cheapskate Club
--Currently pondering ways to encourage thoughtful restovation and discourage mindless renovation.

User avatar
Mick_VT
Moderator
Moderator
Posts: 2437
Joined: Sat Aug 15, 2015 2:39 am
Location: Central Vermont
Contact:

Re: Wallpaper borders - following a curve (the hard way)

Post by Mick_VT »

thanks for the mock up - that's helpful. The reason not to keep the top gold band is largely just the loss of the red flower. It looks a little plain without. If I try to keep both then the border sits too high... I am also thinking it looks a little cleaner without... hmmmm
Mick...

User avatar
Jeepnstein
Been here a good while
Posts: 228
Joined: Mon Sep 28, 2015 4:01 pm
Location: Sciotoville, OH

Re: Wallpaper borders - following a curve (the hard way)

Post by Jeepnstein »

If you're bent on using the border then I'd consider lowering it so the top is more or less flush with the tops of the doors. Any closer to the ceiling and you're asking for trouble. Out plate rail is run that way and it looks good. You don't have enough space over the doors to hang a border.

phil
Has many leather bound books
Posts: 4616
Joined: Tue Aug 18, 2015 6:11 pm
Location: Near Vancouver BC

Re: Wallpaper borders - following a curve (the hard way)

Post by phil »

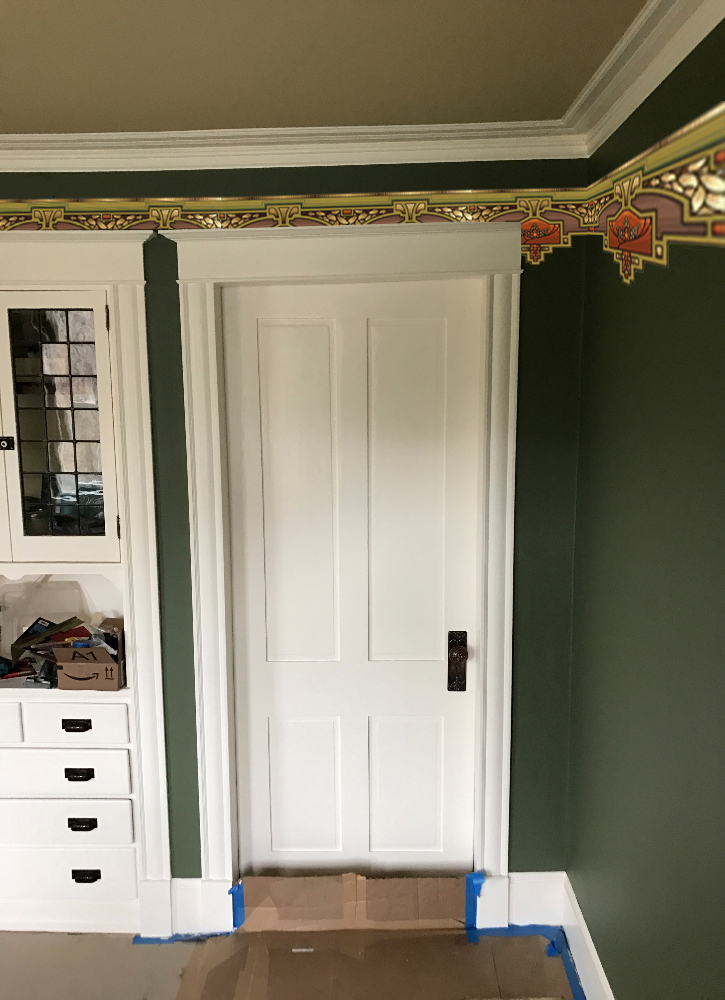
I think I'd try to keep the space between the crown and your border consistent. throw the level aside. You could mark a pencil line parallel to it. maybe slide a block of wood along the crown marking the pencil line under the block to result in a line that's parallel where the top of the border fits.

then I'd pin it in place or use masking tape if you think you can peel it without wrecking the border. affix it in place, see how it looks to you. the top will be loose and it'll want to hang away from the wall a little.

if it looks ok just glue the bottom edge, then smooth it upwards. it will want to crinkle along the top as it bends in sort of a U shape

take a razor blade and make relief cuts about 3/4 the way down and either tuck it under or relieve V shaped slivers everywhere you need to.

I was wondering if you might have success dampening the paper to try to get it easy to bend but you might rip it trying. if it were dampened you might get the paper to stretch a little on one side but you can't really shrink paper and if it stretches too much it'll tear or distort the gold printing especially if it is gold leaf and not printing.

If it looks really shiny like real gold ( think greeting cards) that is actually gold leaf that is applied under heat and pressure usually using dies. sometimes the dies also emboss, you'll see that done on greeting cards a lot. Gold ink is only so shiny, it won't have the same metallic look as real gold foil. the gold is very very thin. it has a glue on it that is activated by heat and pressure. I think it's the same stuff that you might see on an older glass door..

you can print with gold ink on a printing press but to get that real shiny gold one needs do that by letterpress operation. Letterpress is impact printing, think of john boy walton's press.. it would use lead type that is raised.
since it's a long continuous piece of paper. it probably isn't' printed on an offset sheet fed press. you can imagine how big the sheets would need to be! they probably have some special equipment that prints from a roll.. that's called a web press even though the web might only be narrow. newspapers and magazines and high production work uses web printing because it is very fast. The most common type of printing is sheet fed offset but they dont' go much over 80" in width so you wouldn't be able to order 10 foot pieces.

another press that prints like that is the ones they use to print on packing tape. it has to unroll and print the tape and roll it back up. you can imagine the noise that makes ;-)

if you wet paper it will want to stretch where it takes on water and stay that way. If you don't want to make relief cuts you could have success carefully dampening it and maybe use pins to hold it in place while it dries.

an example if you have a sheet of flat paper on your desk and you wet some part of it , you will see it want to stretch where it's wet. so that might work or you might wreck it , obviously it will tear easily if it's wet but you might be able to use a damp sponge and wipe along the paper to cause some controlled stretch then pin it in place until dry, then glue it on..

you could perhaps try this on some other long strips of paper to see how dampening it will make one edge grow and how well you can control that without tearing it.

Its probably expensive stuff. the place that prints it has specialized equipment, so other printers won't touch that which increases the price.

I used to fix machinery in places that do some specialty things such as greeting cards, wedding invitations and printing on weird things like matchbooks or napkins. old machinery is often used and sometimes it is customized to fit this sort of specialized printing. gold leaf and embossing is common in those places but not in most commercial print shops. It's very specialized work. gold is shiny but gold ink is only as shiny as the paper it is printed on. I doubt they'd use coated paper for the border. coated paper is the shiny stuff , like a magazine. when you see shiny printing on uncoated paper it is usually only on fancy things like greeting cards, maybe some packaging etc..

there is another process called thermography. in that process a powder is applied to the wet ink and vacuumed off. the powder is plastic granules and it is then sent through an oven to melt. You can get gold powders and this can simulate gold foil , it will be raised and if you look at the backside you will see the paper isn't embossed. the raise comes from the ground up plasic that is melted. You might see business cards with raised gold printing like that but I doubt if they'd use that on the border..

Ive seen other types of printing and you can immagine the equiment. one place that does bingo sheets ( each is different) had a specialized machien to randomize the numbering that used belts of numbers and it was a huge complicated affair. you'd see other types like the tickets that come in a roll for your door prize raffle, again somewhere there is a specialized machine to print that from a roll and it would have a numbering machine that advances the number and prints each time a different number..

anyway the gold leaf might not want to stretch at the same rate as paper.. that's sort of where I was going with it.

Post Reply