Well the work to reshingle the side walls was done by our contractor, and my wife and I just replaced the clapboards on the front of the house. The painters come tomorrow.
My job now is to tackle two windows that have rotted trim. (Trim is probably the wrong word - more like exterior casing). This is the first and worst. I spent the day Monday chiseling out the rot to get to solid wood. The good news is there is more than a toothpick left. Our belief is that these are the originals. You can see where the dowels hold the tenons. I debated whether to replace or repair. My contractor who I trust implicitly said, “repair”.
It will be a journey. I will try and post pics as I go.
0F85D8E7-7485-4F0E-84CB-B0A3D06F8B5F.jpeg (710.49 KiB) Viewed 840 times
5DBD2C02-3F44-4B64-81C5-EF9780942D8D.jpeg (927.16 KiB) Viewed 840 times
542647B7-2D00-4DCB-8308-39CA6EB6890C.jpeg (785.66 KiB) Viewed 840 times
43BA9A4D-3946-4F68-95E6-F0D03F808E20.jpeg (956.66 KiB) Viewed 840 times
E9A84795-7B06-4D86-9097-9F8F9A9DB395.jpeg (777.15 KiB) Viewed 840 times
566DCFA8-DEB0-4E0C-9BB3-D88E5DAF8A5B.jpeg (957.88 KiB) Viewed 840 times
That seems beyond a simple repair to me. We had to deal with windows in the back side of an old colonial that were in bad shape like yours. I cut a new sill out of rough sawn hemlock and did the same with the trim. I went as far as hand planing the wood as well. It all got a coat of preservative before installation. You must have a lot of water hitting this window to cause rot like that. It could also be a flashing issue, but I see you have lead flashing over the window.
when you say 'repair' do you mean splicing in new wood or use of epoxy? I would stay away from epoxy on this one...it will be a challenge to fit the pieces perfectly but it can be done... good luck! ....jade
while I respect trying to save old house parts I feel you should step back and look at the larger picture. You are going to great lengths to save some wood pieces that are basically just planks. the outer casings are just nailed in lace you can just pull them off even to work on them. If the nails want ot pull through the board just let them pull through then putty up the holes when they are off. If you pull the nails back through the front side they will inevitably chip near the nails and then you need a larger area of putty to cover it. "casing nails" usually have small heads so they usually want o just pull through. just pry near the nails that hold them to minimize any damage to the plank.
I realize the dimensions are not common and you would need to slice them down from larger pieces but really they are only pieces of wood. If you have a tablesaw or access to one this is very simple. your casings are probably a full one inch but you can slice that from a piece of 2x6 or 2x8 if you dont mind the wood waste.
The sill is a bit harder to remove. You might opt to leave some of that in place but I would definitely be replacing those boards, not try to mend them.
some of my windows had interior sills missing, they were cut flush with interior walls. I was able to join on pieces then put screws through the new sill into what was left of the old sill to pull them up tight while the glue set then plug the holes with wood plugs. You can get cutters to cut your own wood plugs so they match if you care, I did on the inside since they show and I dont paint my woodwork but on the outside it's painted anyway. after the glue up I hand planed them so there was no step between where they mate up and the repair is almost invisible.
the roundover can be easily accomplished with a router or a molding head on the tablesaw. If you have a router just mount a roundover bit in and it will do that very quickly. i keep a router mounted under the side table of my tablesaw so I just lift it up so the cutter protrudes through the top then I can just run any piece of wood against the bit and it cuts the roundover very easily. when not in use I just lower it below the table. but you can just do it freehand with a hand held router if you prefer. its probably about a 3/8 roundover bit that you need.
you can fill the joints with epoxy filler but water may get between and then frost gets involved in separating the chunks. the wood can absorb and release moisture but epoxy can not. you can drive in a bunch of screws so your epoxy and captivate the heads, they then get lost under the repair. that can help. I wouldn't' resort to this technique myself in this case. much easier to just cut some new planks and replace. fir is not that hard to get. if you were set on filling voids that big with epoxy I'd get some fiberglass cloth soaked with epoxy and stuff that in there to reinforce it and to stop the epoxy from just running away down the side of the house. later if it looks rough you can use a sander or angle grinder to shape and fill until you get the profile right.
Ive tried mixing wood dust and epoxy , you can go about 50 50 without weakening the result and then pack it in there but in this case I'd just replace the rotten boards so I dont recommend this really. Ill do it in cases like where I have a nice big plank with a knot hole in the middle but that I still wish to use. you can drive some screws into a knot hole and leave the heads in the space that the knot filled then when you put your plug of filler in there the head holds it from ever popping out again.
you can drill holes or even use vacuum bagging to get epoxy to impregnate the wood and get a better bond, but I'd save that for wood that is hard to replace like a fancy cornice or something like that.
I like to recycle so I look for old house parts and often will reuse materials, old doors or decent sized planks pulled from old houses can provide old growth lumber if you want to look around a bit. you can still get fir that is of good quality old growth , you have to pay a bit more for premium stuff. to save money I sometimes search Craigslist in free for "fir" that way with a bit of searching and a run to pick stuff up occasionally. Its a bit of running around but Ive met nice people and even if I buy it from the lumberyard its still a trip out.
I find firewood as well as stuff I can use for things like this and since I do that fairly often I never actually need to buy wood very often. I'm on a budget so I save where I can and there are many nice wood piles I haven't gone after. what happens is people that are into woodwork collect big piles then if they move of downgrade to condos and such in retirement. they just want to see it go to use rather than to the dump. It helps the environment and your pocketbook to recycle.
If you have enough to do, one thing I did was ordered some fir planks from a small mill and they delivered it rough cut and to a larger dimension like real 2 inch material. then I plane it as needed. the result is a hair under 2" since I dont take more of than needed. I did my 7 foot wide front steps like that as I wanted the appearance of that thicker old lumber. most of the 2x stuff at the lumberyard is 1.5" I did a 2" roundover. i wanted 1 inch fir for the risers so I bought some 1 inch rough cut for that. I have a little thickness planer so that helps to flatten out the rough sides and make them more uniform. the lunchbox planers aren't too expensive new and they are loud but they do work pretty well and don't take a lot of shop space.
anyway my take on it would be to cut and replace those pieces and not repair them, they aren't made of unobtanium but you do need a saw to trim new pieces to that size.
if you are working with old dry lumber and it wants to split then drill holes to prevent splitting. if it does split then put glue on it and clamp it up straight away. since this is outdoor lumber you need to use waterproof glue , epoxy is fine. often just wrapping it with masking tape will be enough to close the gap while the glue sets if you dont want to use wood clamps. just make sure it's a good fit and remove any splinters that interfere wit the fit.. so if you crack a board dont worry , that's easy to fix. often if it isn't completely separated you can just work the glue in and clamp without separating the pieces and that helps hold it in exact position. use the glue to bond the wood not to fill the gaps and it will be just as strong as before you cracked it.
If you happen to be near an old house parts place they could have exterior casings that you can just take and reuse and that would save you needing to make them yourself. Id check into that first if you happen to have a place like that nearby. the dimensions are pretty standard for old houses so you are likely to find just what you want.
also I wanted to point out the upper casings on your windows. If you study old houses in your area you will find many were monkied with. the reason contractors do this is because of the wood dimensions that are common.
there has been a trend to use "craftsman style" in new homes in a chepened way.
the top casing is often actually thicker. there is reason for this.
on top of the top casing some have a molding that looks like shelf above it. some have it some don't. on many houses near me that top casing extends past the upper casings and it is cut angular on the ends.
thi sis to shed water. because that top casing is thicker , water that runs donw its fase doesnt' get under the top of the side casings. since all the casings have a roundover a gap would be created where the side casing meets the top casing but since the top casing is usually thicker this roundover does not fall between the end of the side casing and the bottom side of the top casing since the top casing is thicker.
contractors often use 3/4 thick casings, and since the roundover becomes an issue at the top they do't do as much roundover and they cheap out by making all three casings of the same thickness.
Id study this carefully. If you r house as lost this detail you may be able to see form other nearby houses how it was origionally done. If your house is craftsman style, keeping the style might improve the old style look.
often underneath the sill there is another casing and it is usually the same length as the upper casing, th same length as the side casings are wide. the board in installed below the sill.
If you delve in a bit you may take this time to decide how yours should look as many have been changed. the differences in this subtle dimension change do show in the final look of the house. you'll probably see what I mean just by driving around and comparing old untouched houses to the way they contractors all do the new casings. you'll see what i mean by using the 3/4 material all around rather than taking the time to re create the original dimensions. originally the top casing was 1 inch and the sides were 3/4 or something close to that. im wondering if someone previously installed the siding and trimmed the top casing down a little at the ends. I think it should run over on top of the siding.
I also noticed that on my house they thickened up the siding a bit in this area. the siding is built up a bit above the windows ( by adding more pieces of siding behind) to get any water that runs down the siding up on top of the top casing instead of it being able to run down behind it. its subtle but I can see why they did it like that originally.
those dimensions evolved over many years and they were one a certain way with thought of shedding the water and also in how that roundover of the top casing meets the top side of the side casings. there were many different subtle changes from one house to another. most of the original ones near me follow a certain style but the ones here could have a west coast style In your area there could be variations. Its one of those details that define the style that was intended and it is so often ignored and changed to fit the newer materials to save cost. Its so common here that it has become a cheapened down version of modern craftsman style. This is so common most people that dont know old houses dont even notice its wrong.
in the case of your windows the top casing is trimmed down so it is flush with the side casings. it has a top shelf thing but it did not perform the intention it was designed for because it was cut too short. If that top casing were longer then it would have deflected a lot of the water running down from above away from the side casings where you now have rot. the sill should also slope, about 4 degrees. this is so it sheds the water.
If it were me I'd replace that top casing with one that is thicker and longer and I'd try to find out if it should be cut squarely or if it might have been actually cut on an angle at the ends. Id either replace the sill or you could join into what is there if you didn't wan to take too much apart, but I'd want he sill to have a slope so the water drips from there to the ground.
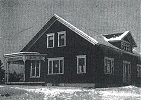
Some stats on the house and windows. Built circa 1750 Casings are a full 3 5/8’ wide by 2 1/2’ deep. Stiles have tenons that fit into the rails and are held by dowels. The tenons edges are rounded - not square edges Top of the window has a water shed that is similar in shape to interior windows stools. The round over extends approx. 7/8” Lead flashing is across the tops.
Phil’s comment about the top molding being cut back makes sense to me. What makes me question the thought is that the same cut back would have had to be done on 12 windows and two attic vents. Not inconceivable. I question if they are all original because of the nails. It is very possible that they were fabricated at some point over the years to try and match what was there. The more I consider this the more I believe it to be true. Which then would further validate Phil’s observation and comments. I may poke around at the other windows to investigate the fasteners used to mount them.
With all this in mind, the groups comments, and the advice of my contractor (experienced with antiques) I am in the mental debate of repair or replace. I have the shop to mimic the design, having the talent and time is another issue. Our contractor made a new attic vent to match one that was rotted and falling apart. He made it from mahogany. If I make one I would do the same. This is the only window that is in such disrepair - south facing.
I will welcome everyone’s thoughts as I continue the debate.
not many 1790 buildings here. The wheel was a new invention even here yet at that time! I can just imagine what the original people thought when they first saw one.
on my house I can see how the original shingles were built out with layers sort of the way you start the bottom course. some were modified and I noted that they just installed them flat above the windows. something I'd try to correct if I get into patching up siding. i looked at a bunch of images showing this but couldn't see many. on my house I can see where a door used to be because of the shingles and how they were built out.
nowadays they tuck a flashing behind the shingles to deflect water so it doesn't get behind the casings. they also use house wrap. My house is only 1924 but still it had no calking and no tin flashing. I wouldn't feel bad about using modern techniques. you can add a flashing where it can't really be noticed.
Its unlikely the casings you have are original, the window components and frames might be. I found a lot of examples of different ways builders used design techniques with the objective of sheltering the windows, some have a fancy bit on top or a little thin "roof" mine has the casings that define craftsman characteristics. on mine they build the shingles out a little. some are installed near the roof where it isn't an issue. you can see how the architectural design changed in different methods. some of the Victorian ones had a lot of fancy detail. It can look nice from the street to see some shelter over top of the windows. You can probably cheat a bit and alter the design to your liking without many noticing it.
I think that studying your house a bit and others like it you may find that the casings were changed and how ornate they were is open to question. putting them to whatever original was may help the house look in period.
the problem is in finding houses that are that old and not messed with. almost any house that old has new updates. perhaps some old books would be a way of eliminating the newer ideas to reveal how it used to be , that might be a good reference.
most of the siding and shingle installers do it the way they are trained, with modern techniques.
Its an area where you could go more fancy , add bling or maybe they were not so fancy and you may want to keep the style correct to what you find with more research. Maybe others have ideas or more accurate points of reference.
not saying you need to take your shingles apart but some good info was posted a while back with a tool that looked like a flat thin bar that you can hit with a hammer. one end was bulked up to hit with the hammer , the other end was sharpened. It would probably be easy enough to fashion something if you didn't have the tool. Its so you can stick it up under shingles and cut the nails. normally the shingles are put on from the bottom up but the point was made that by cutting the nails this way you can replace one or two in the middle of a wall without taking it all apart.
I couldn't find many other pics showing this detail of the shingles being built out so maybe it isn't so common, I'm not sure. maybe others have seen examples like that? mahogany might have good rot resistance, also there are different species of it. the older stuff was more red and had more character and it was harvested in some places where lumber is now banned from being imported. the cheaper mahogany is lighter color. Fir isn't bad. cedar lasts but it isn't very hard. Its painted anyway so the wood wont show you just want good rot resistance so dont use spruce, pine etc ( building lumber from the box store)
Ive found that if you look in the lumberyard for larger dimension like 4x6 etc then you may find pretty good fir without breaking the bank.
if you cut them yourself then the more you can run off the shorter your labor for each. If you are slicing lumber to size you have to look at how high your tablesaw blade can go. You can flip and cut twice but how much that is depends on blade size. If you have access to a decent bandsaw they are very good for ripping to size (called resawing) because a band saw cuts a thin kerf you have less waste. Its nice if you have access to a thickens planer or a jointer to smooth out your lumber and square it up but most of this can be done wit a just a tablesaw and a hand plane too. the roundover will be dead easy. Id rough cut it all close to dimension then use a jointer or thickness planer to get it smooth, then round corner.
to cut thick stuff on your tablesaw. If you cut flip and cut from the other side sometimes there is a bit of a step to remove in the middle. If your blade doesn't reach the middle that's ok you can then finish this easily with a hand saw to join the two cuts. the two sawcuts guide the blade and the material between is then easy to remove. If you have access to more machinery its faster but you dont need much. If you buy new lumber for this look at the humidity. If the wood is green you can rough trim but if you cut it all perfectly sometimes you will see some warpage and twisting happen as it normalizes to the humidity it lives in. when i bought lumber from a little mill it was wet so I stacked it and put a fan on for a month or two to get the humidity down. If you check places that sell hardwoods for cabinetry you can likely get dimensions like 5/4 (or 1.25") rough , and you can trim that to finished 1 inch. likely their wood is humidity controlled more than a lumberyard may be.
If you wanted to save time you could perhaps buy all you need and have a shop trim it to the dimensions then just handle the finishing and round cornering yourself. depending on your setup you may or not be comfortable making lots of sawdust. If the saw is powerful then you can cut faster of course.
you could check the lumberyards for decking , it might come in a usable thickness for this.
also Ill note it is sometimes possible to cheat like with baseboards If I want a 1 inch thick one I can buy 3/4 then build up the appearance of thickness by gluing a couple of 1/4" strips behind, then trim to final size and you cant' really see its been built out. if those strips come from the same plank the grain can match perfectly so you can't notice it.
saves lumber cost. lots of times baseboards and casings are hogged out on the backside anyway , I think it helps with the warpage somehow. I wanted big casings for my kitchen and found one beautiful 1x8 plank so I sliced it to 1/4 thick pieces then built the casings like a hollow box. You cant' tell and strength of indoor casings is not an issue. so out of 1 plank I made 4 in inch thick casings the length of the plank simply because I liked the grain pattern and didn't really want to source more. outdoors you want thick stuff but if you wanted to make 3/4 lumber appear like 1 inch you might be able to do that.
the thickness of a piece of wood really doesn't make it last longer when it rots. the trick is to get the water to shed or evaporate and not sit around and be drawn into places through capillary action. Yes they are bulky, mine are about 3/4 x 7 inches or so and they are only trim pieces. maybe that's an original dimension, I'm not sure. It sort of looks like the window might be sliding against that piece at the sides. If so it's not just trim but has a function of forming the channel for the double hung window to slide in. the house is so old it would have square nails so unless they were re-using the square nails it might indeed prove something. maybe if the upper story windows were near the roofing they could be sheltered and preserved better? I think at the time of my house the windows were bought as a pre made package likely with the frames, but with this one maybe it's more custom? Maybe even then they came pre- assembled from a joinery shop where they would have the equipment to cut mortise and tenons and such? I'm thinking if that is a dowel joining the sill and the rotted piece at the side , that was likely done in a shop where the windows were fitted then sold as a package. The carpenters of the day did have the skills and back then the building of a house was done without a million separate sub trades, but it just seems more likely to me that this was done off site. the dowels may have provided dimensional stability , so they wouldn't rack and get stuck or twist out of plane with one another.