Our Philly Money Pit
Posted: Fri Jun 09, 2017 1:20 am
Surprise! Our 165 year old brick rowhouse has structural problems. Ugh, where to begin!? This is a long post (a story really) with LOTS of images, so sit back and let the insanity settle in.
Before you start, I want to be clear that in spite of all of this and the $$$ spent to fix it, we still love our old house and can't wait to make it our home.
Backstory: When we had our inspection in January, the inspector missed a few things which were obvious issues. But he also passed a few things off as being not that out of the ordinary. This included some cracks in the plaster walls on the rear of the house he said looked like settlement cracks. When pressed about the cracks, he did say, “You could bring in a structural engineer” and left it at that. His response didn’t seem alarming or of real concern, so we didn’t do that.
Instead, we allowed our hearts to make our decision and moved forward with the purchase hoping that the cracks were not a big deal. The day we took title of the house and I had the opportunity to examine the cracks much closer, my concerns about the cracks began to grow more serious. During the initial tour of the home in January, and even during the almost two hour inspection, I was not able to see what was before my very eyes. Cracks, cracks, cracks, everywhere on the rear wall of the main house. Mostly hairline which are generally of no real concern, but a few looked like they had been patched and painted.
Keeping in mind that we are still living two hours away (and will be for the next six months or so), I contacted two structural engineers, both of them very highly credentialed and well respected in the Philadelphia area. I went with the lower priced one, but she was slow to respond and when I was finally able to meet with her, she said the issues could be solved with a few star anchors. But then things got really crazy....
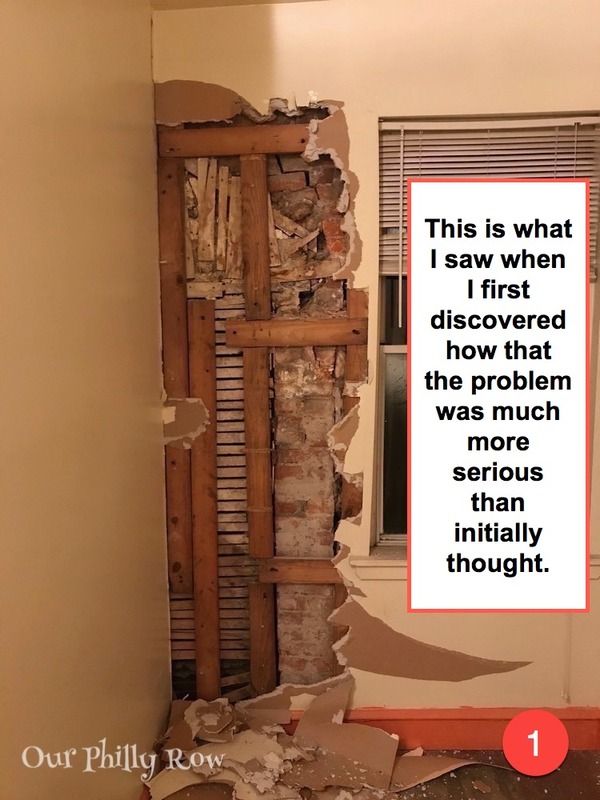
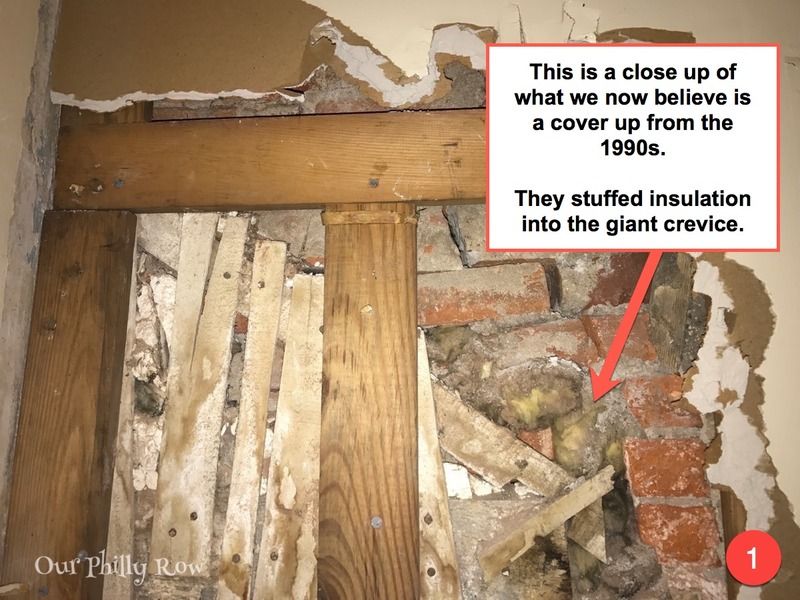
Fast forward a few weeks, and I was back at the house on a Sunday night as we had electricians coming to replace all of our knob and tube. I was chatting with my best buddy on the phone and enjoying some wine. After a few glasses of wine, and conversation, I got curious about one specific area on the second floor of the main house where I knew there was drywall. So I took my phone, my glass of wine, and a hammer and went upstairs and started hacking away at the drywall (we were planning on renovating this area, so I wasn’t concerned about doing a bit of demo). As I broke through the wall, I began to see scary things. First, I could see that someone in the past had haphazardly covered the area with 1x4 firing strips to build out the wall enough to add the drywall. Then I saw the cracks and crevasses! Big cracks and big crevasses! The crevasses were mostly stuffed with insulation.
...Houston, we have a problem.
It was at that moment that I knew that star anchors were not going to resolve this problem. My heart began to sink, dollar signs began to flash in front of my eyes.... The wine did it’s best to comfort me in my sudden terror, but nothing prepared me for the sense of “Oh Sh*t, Oh Sh*t, Oh Sh*t” that took over my thoughts. What do we do now? It was time to bite the bullet and call in the other engineer.
I was not able to go to Philly on the day the second engineer came because of work , so my partner went for me. He met with the engineer, and a contractor whom the engineer brought along with him to put together an estimate. Thankfully, my partner was able to video record the hour long inspection, so I got to see (mostly listen) to the entire top to bottom inspection of our house.
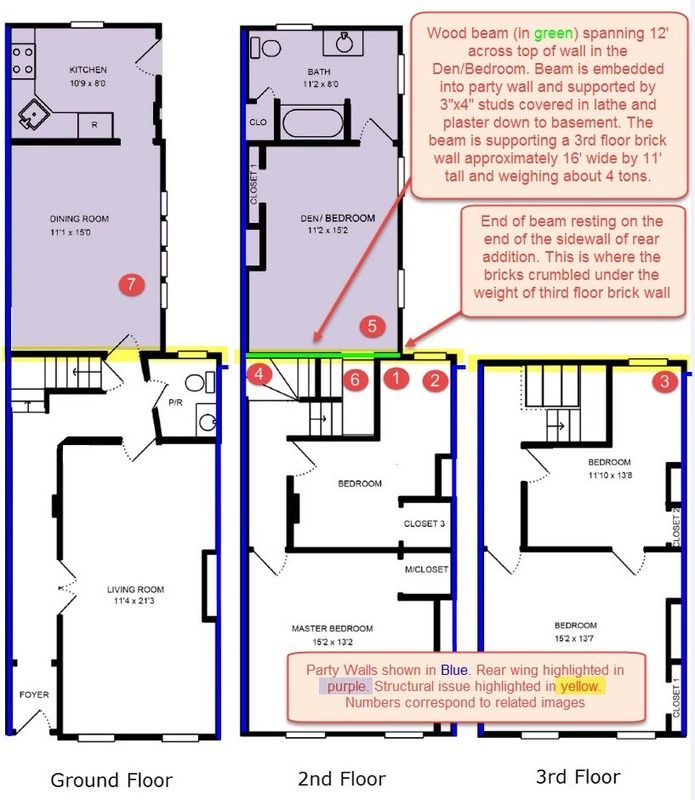
There is a long laundry list of items the engineer suggested we needed to fix, but for this post I will stick to the big one... The cracks. I put together a couple of nifty visual diagrams to help all this make sense. The first one shows the floor plans with the highlighted yellow area being the wall which is the problem. This wall is the rear wall of the three story main house where it connects to the two story rear wing (highlighted in purple). The rear wing has low 7' 9" ceilings on both floors and was used as the kitchen on the first floor and living quarters for the servants on the second. The numbers on the diagram correspond to the images which follow to indicate what area the image is showing. Some areas have several images with the same number because they are either different angles or were taken at different stages in the process.
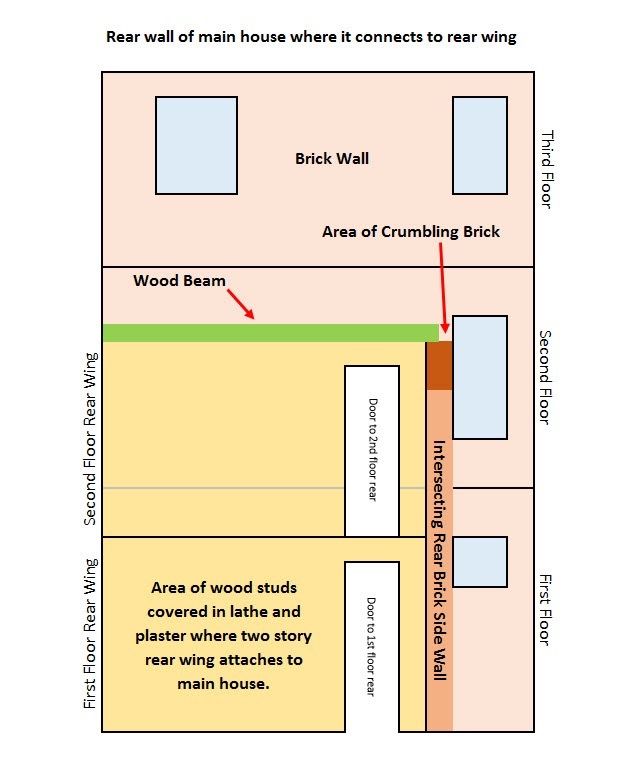
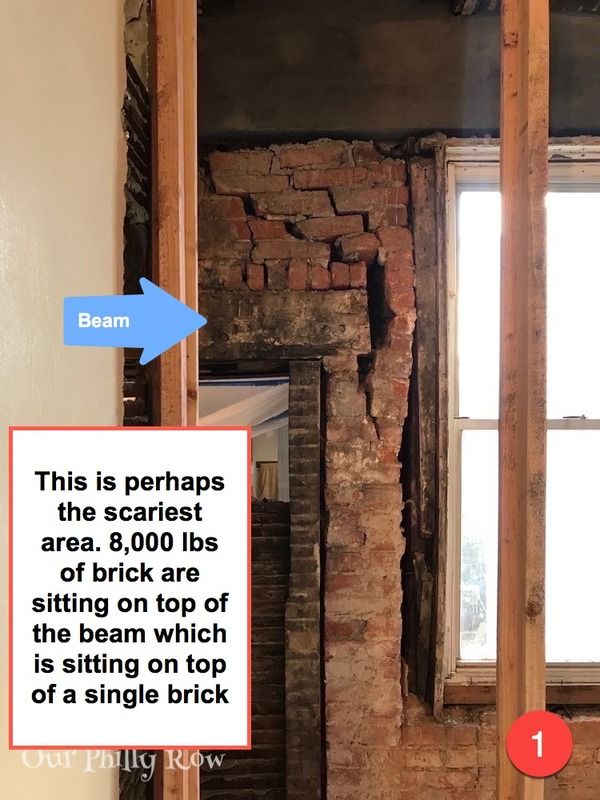
The second diagram is of the rear wall itself. This is to clarify where the wood beam is located and to show where the wood structure and the brick structure combine for the rear wall. You can see the area where the beam rests and how the weight of the entire third floor brick wall (about 8,000 lbs) was dependent on this one small area.
The repairs are mostly completed now, and I have included images of the repairs as of last weekend. Also, I am posting more detailed information about all of this on my blog over the next few days. Link is in my profile.
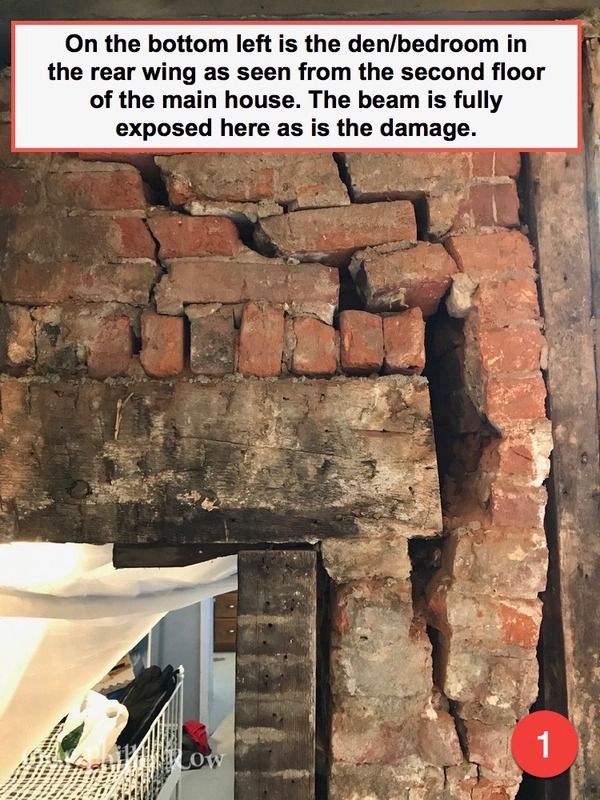
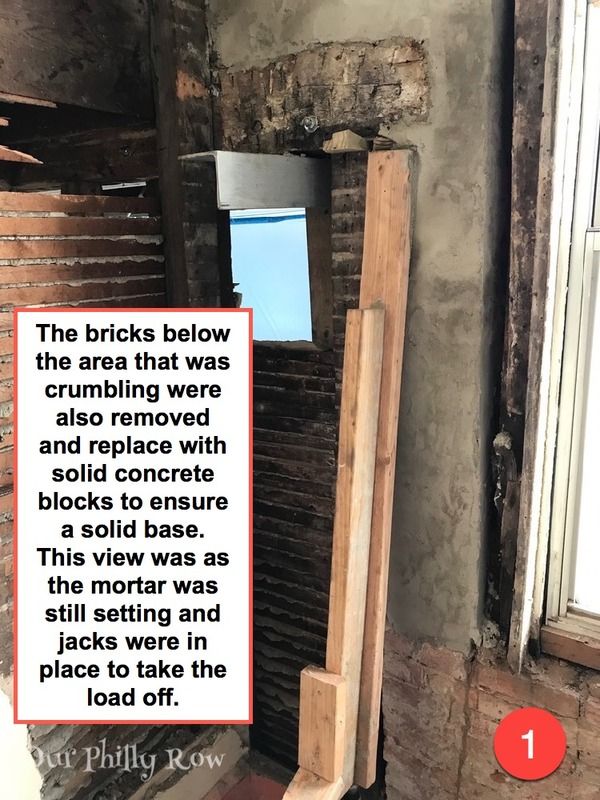
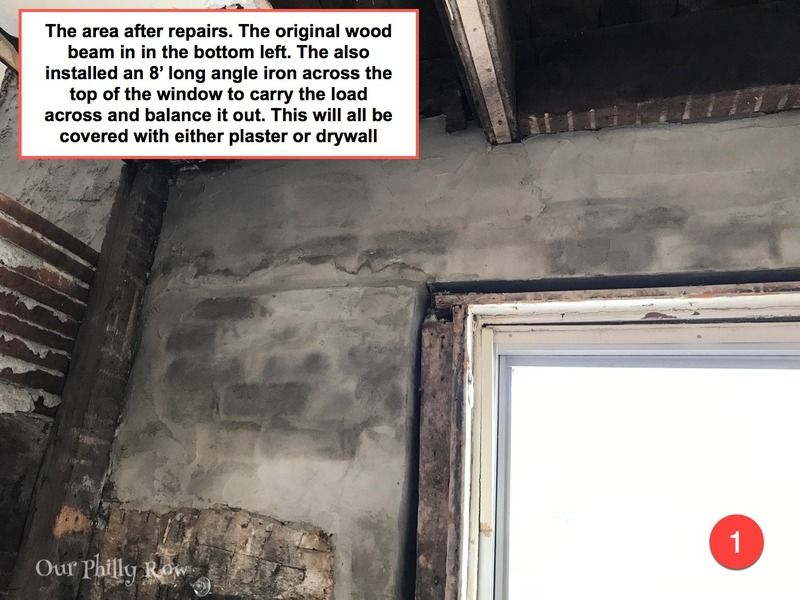
Area 1 - The main source of the problem was the crumbling brick caused by water infiltration and probably freeze thaw events.
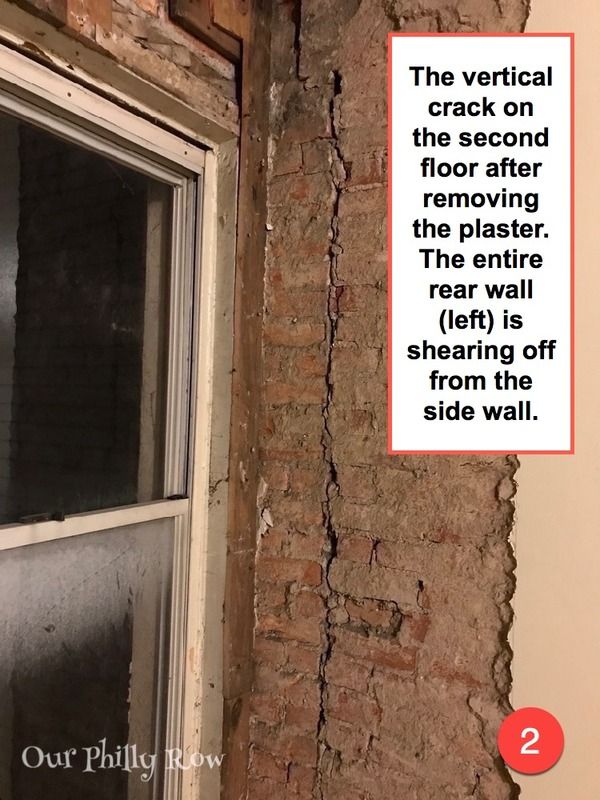
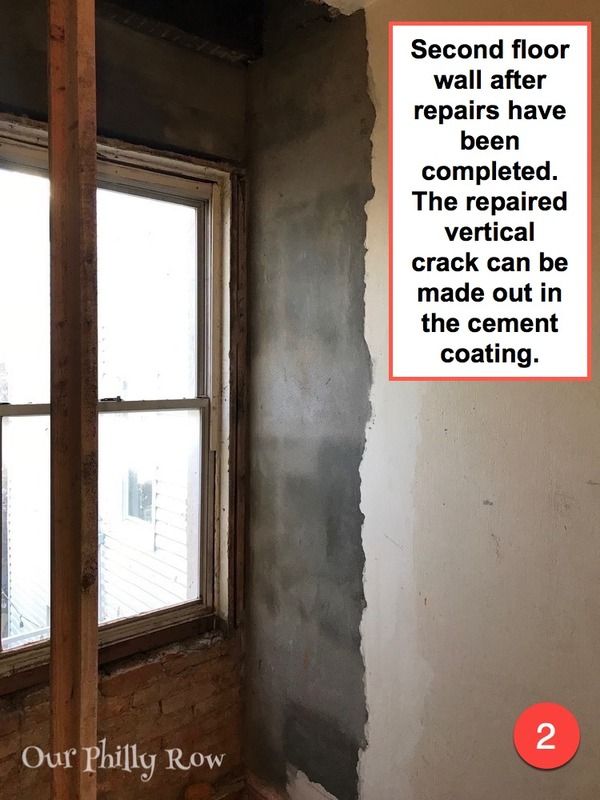
Area 2 - This is the corner to the right of the source. The vertical crack extends up through the third floor.
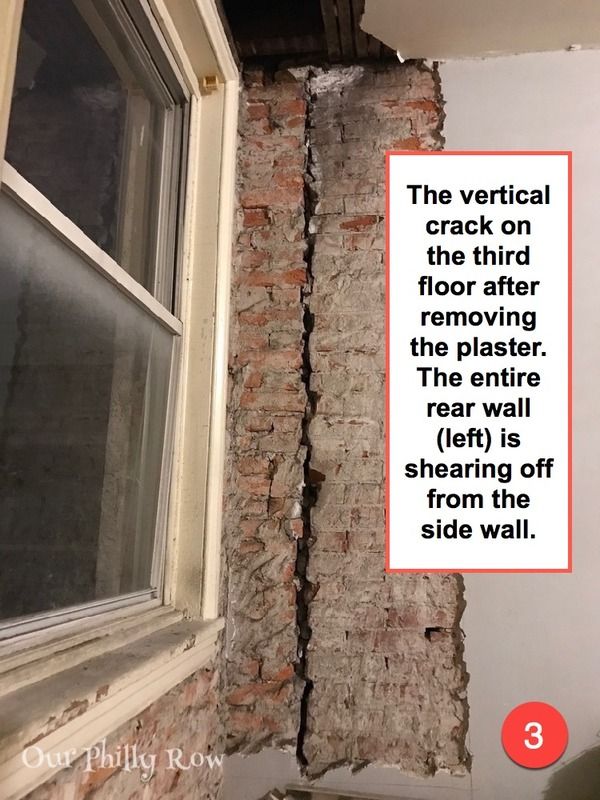
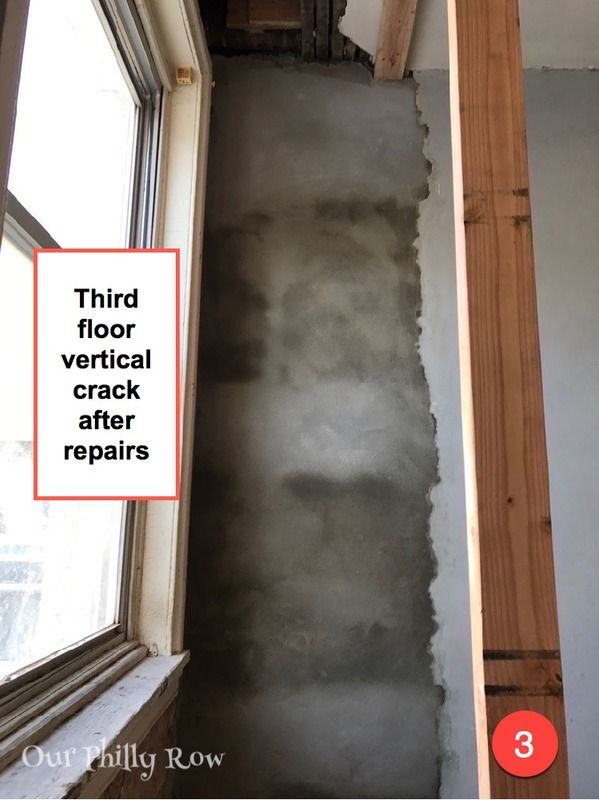
Area 3 - This is the vertical crack on the third floor. The wall looks as though it is ready to shear right off.
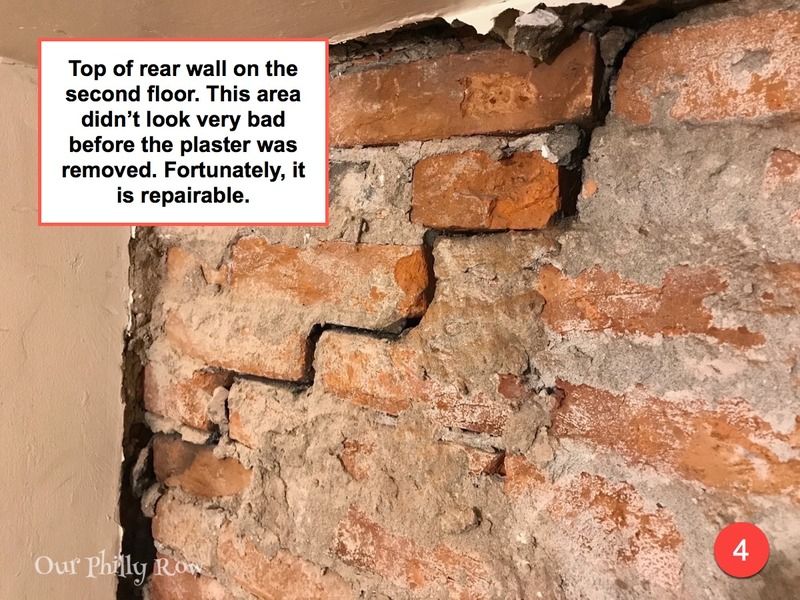
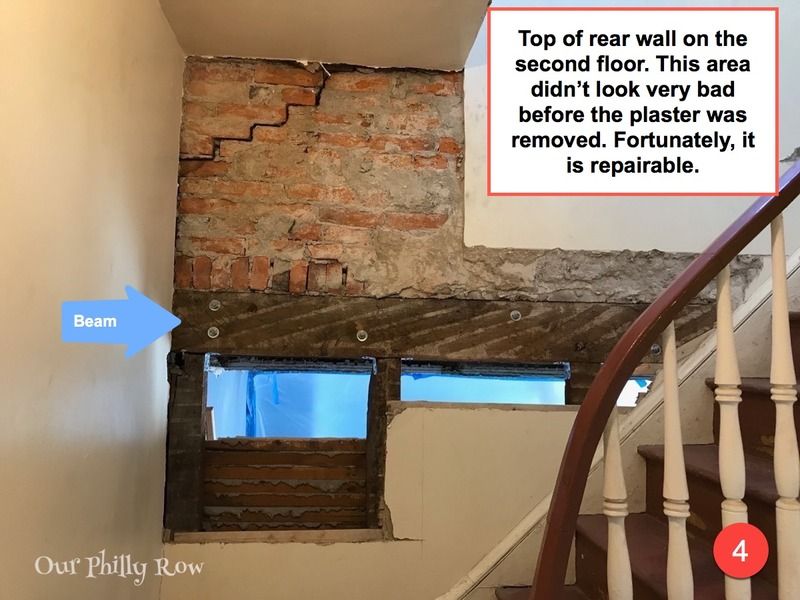
Area 4 - This area is at the ceiling level of the second floor rear left. You can see the wooden beam on studs holding up the brick wall above. This area wasn't repaired until this week.
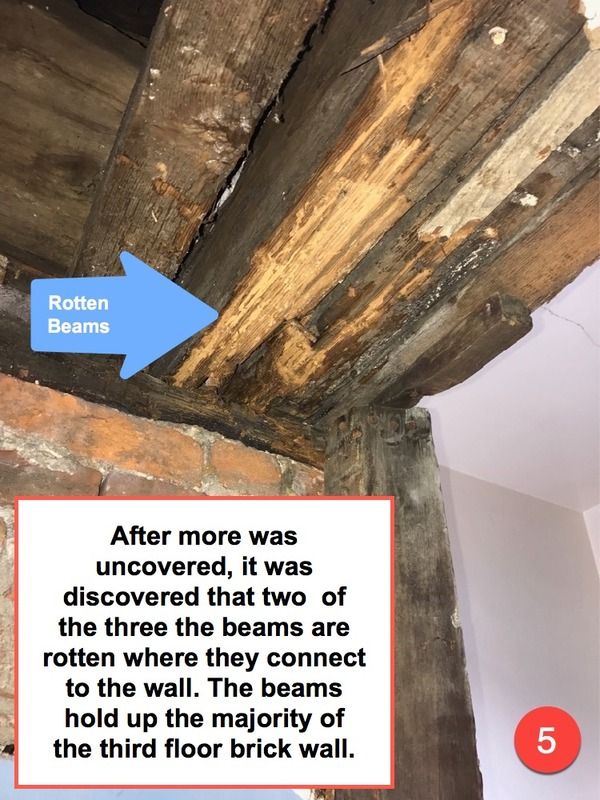
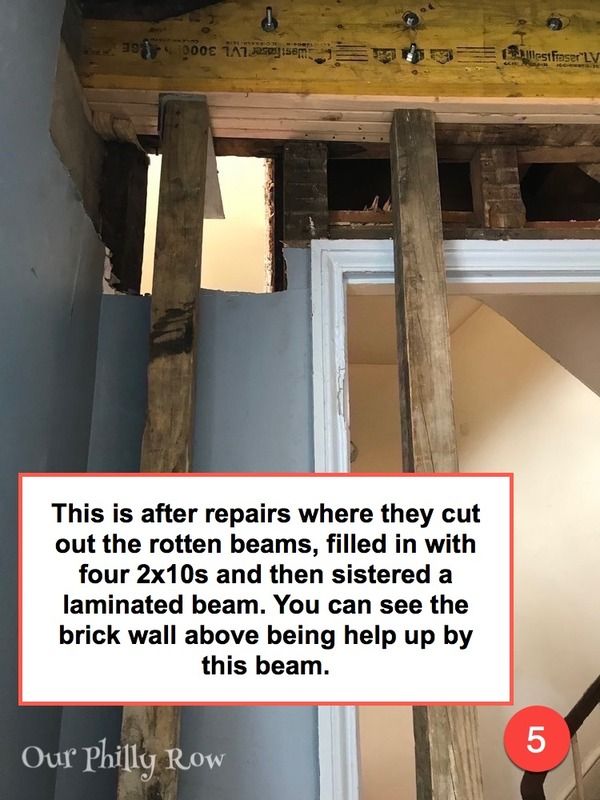
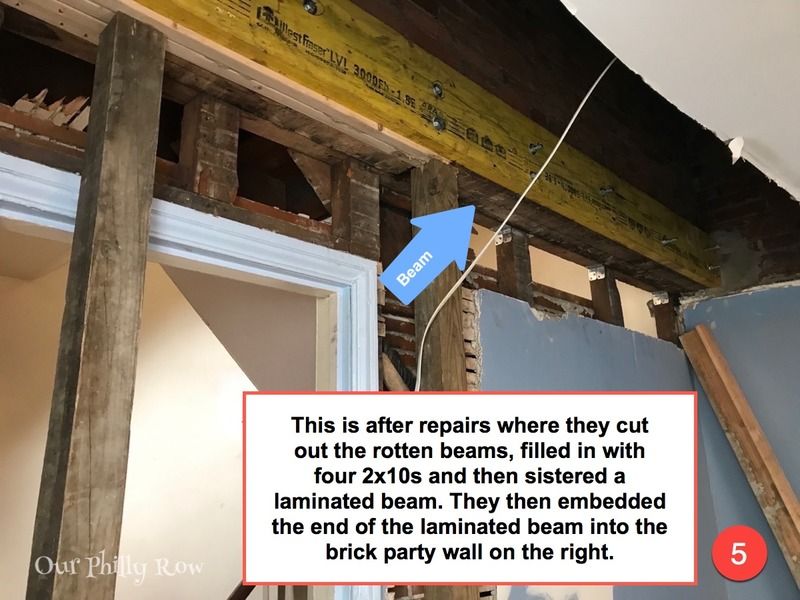
Area 5 - This is the scene from the other side in the second floor rear wing. The ends of two of the three beams were completely rotten. They cut them out, filled them in with new pressure lumber and then sistered a LVL beam to the side with carriage bolts. This will all be hidden once the repairs are complete.

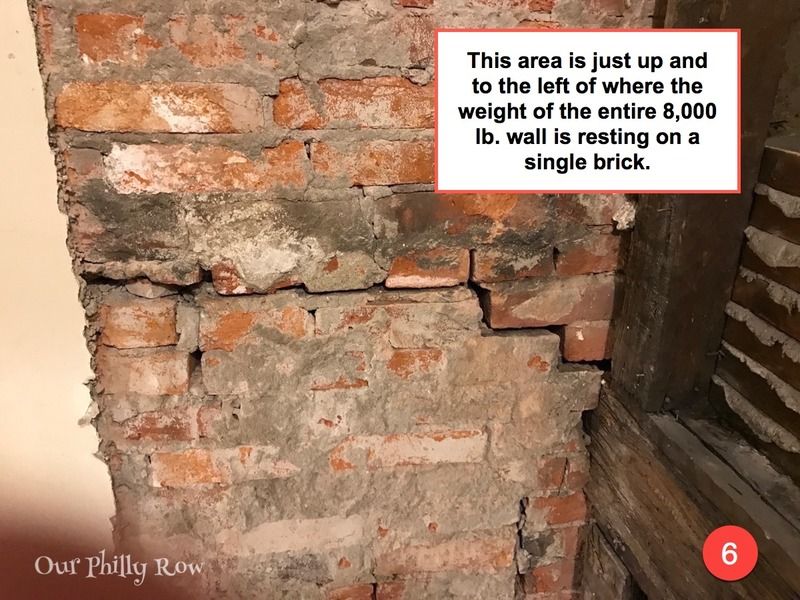
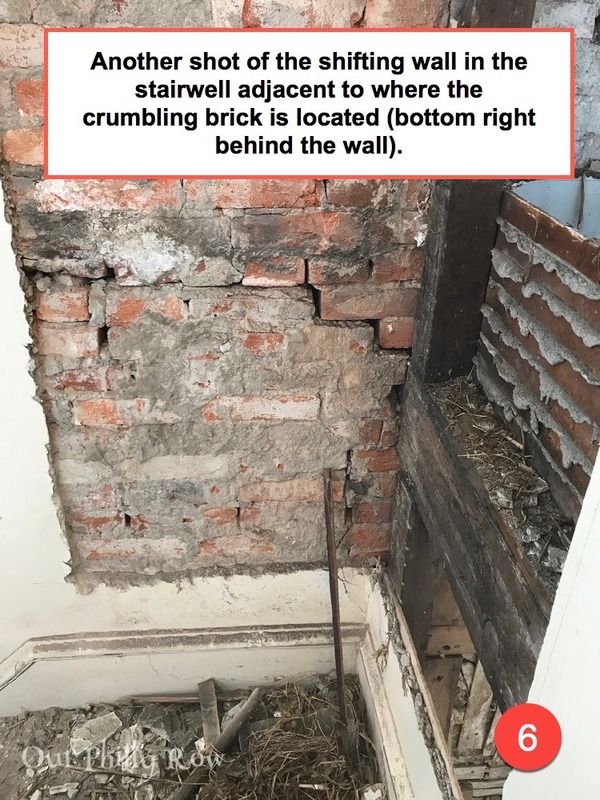
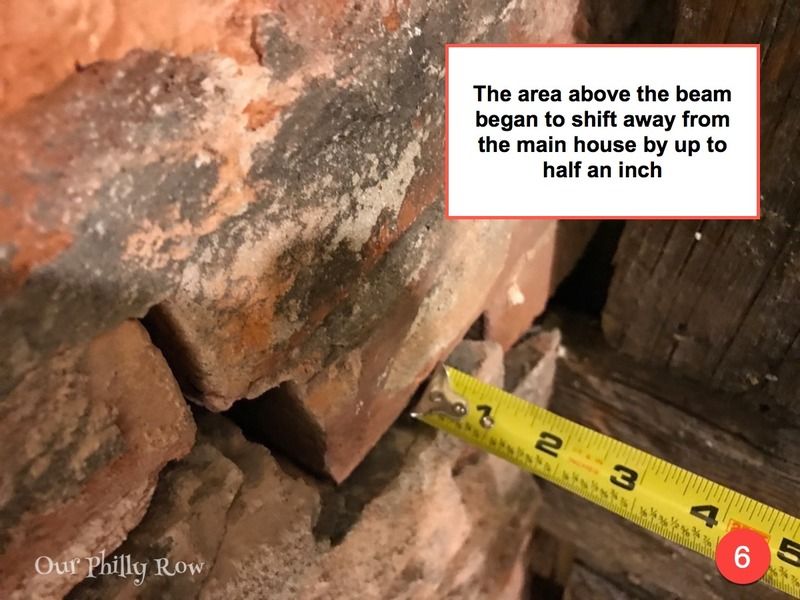
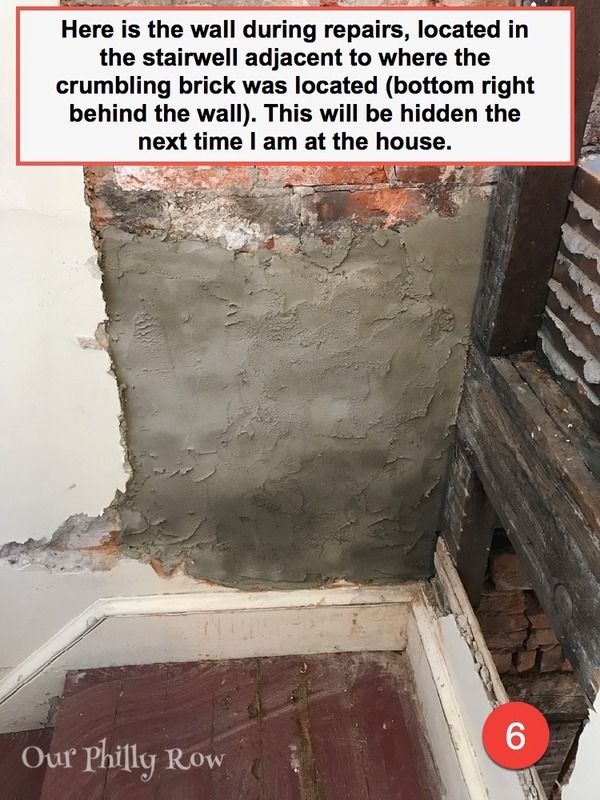
Area 6 is in the stairwell halfway between the second and third floor. It is just to the left of where the beams rested atop the end of the intersecting rear side wall.
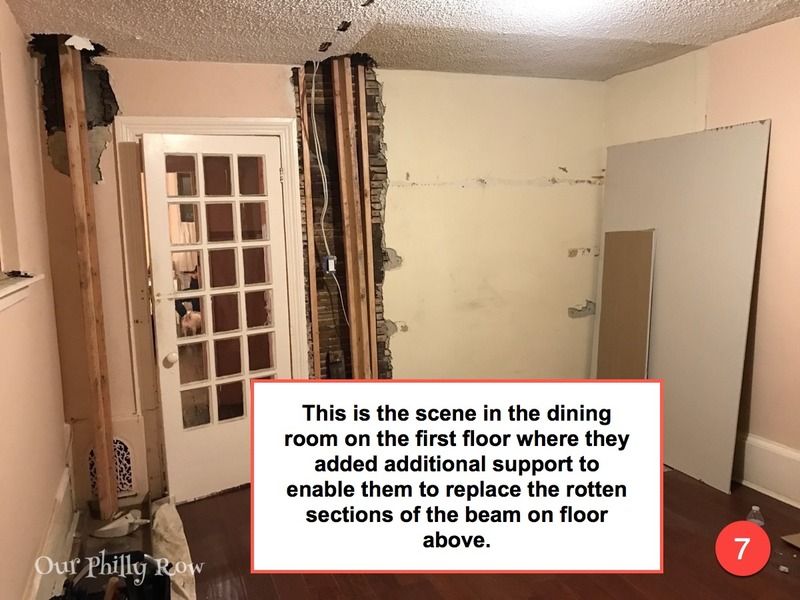
Area 7 - This is the view from the first floor dining room in the rear wing. They had to support from the basement level up through the first floor to the second floor to work on the beam repairs.
Before you start, I want to be clear that in spite of all of this and the $$$ spent to fix it, we still love our old house and can't wait to make it our home.
Backstory: When we had our inspection in January, the inspector missed a few things which were obvious issues. But he also passed a few things off as being not that out of the ordinary. This included some cracks in the plaster walls on the rear of the house he said looked like settlement cracks. When pressed about the cracks, he did say, “You could bring in a structural engineer” and left it at that. His response didn’t seem alarming or of real concern, so we didn’t do that.
Instead, we allowed our hearts to make our decision and moved forward with the purchase hoping that the cracks were not a big deal. The day we took title of the house and I had the opportunity to examine the cracks much closer, my concerns about the cracks began to grow more serious. During the initial tour of the home in January, and even during the almost two hour inspection, I was not able to see what was before my very eyes. Cracks, cracks, cracks, everywhere on the rear wall of the main house. Mostly hairline which are generally of no real concern, but a few looked like they had been patched and painted.
Keeping in mind that we are still living two hours away (and will be for the next six months or so), I contacted two structural engineers, both of them very highly credentialed and well respected in the Philadelphia area. I went with the lower priced one, but she was slow to respond and when I was finally able to meet with her, she said the issues could be solved with a few star anchors. But then things got really crazy....
Fast forward a few weeks, and I was back at the house on a Sunday night as we had electricians coming to replace all of our knob and tube. I was chatting with my best buddy on the phone and enjoying some wine. After a few glasses of wine, and conversation, I got curious about one specific area on the second floor of the main house where I knew there was drywall. So I took my phone, my glass of wine, and a hammer and went upstairs and started hacking away at the drywall (we were planning on renovating this area, so I wasn’t concerned about doing a bit of demo). As I broke through the wall, I began to see scary things. First, I could see that someone in the past had haphazardly covered the area with 1x4 firing strips to build out the wall enough to add the drywall. Then I saw the cracks and crevasses! Big cracks and big crevasses! The crevasses were mostly stuffed with insulation.
...Houston, we have a problem.
It was at that moment that I knew that star anchors were not going to resolve this problem. My heart began to sink, dollar signs began to flash in front of my eyes.... The wine did it’s best to comfort me in my sudden terror, but nothing prepared me for the sense of “Oh Sh*t, Oh Sh*t, Oh Sh*t” that took over my thoughts. What do we do now? It was time to bite the bullet and call in the other engineer.

I was not able to go to Philly on the day the second engineer came because of work , so my partner went for me. He met with the engineer, and a contractor whom the engineer brought along with him to put together an estimate. Thankfully, my partner was able to video record the hour long inspection, so I got to see (mostly listen) to the entire top to bottom inspection of our house.
There is a long laundry list of items the engineer suggested we needed to fix, but for this post I will stick to the big one... The cracks. I put together a couple of nifty visual diagrams to help all this make sense. The first one shows the floor plans with the highlighted yellow area being the wall which is the problem. This wall is the rear wall of the three story main house where it connects to the two story rear wing (highlighted in purple). The rear wing has low 7' 9" ceilings on both floors and was used as the kitchen on the first floor and living quarters for the servants on the second. The numbers on the diagram correspond to the images which follow to indicate what area the image is showing. Some areas have several images with the same number because they are either different angles or were taken at different stages in the process.

The second diagram is of the rear wall itself. This is to clarify where the wood beam is located and to show where the wood structure and the brick structure combine for the rear wall. You can see the area where the beam rests and how the weight of the entire third floor brick wall (about 8,000 lbs) was dependent on this one small area.

The repairs are mostly completed now, and I have included images of the repairs as of last weekend. Also, I am posting more detailed information about all of this on my blog over the next few days. Link is in my profile.
Area 1 - The main source of the problem was the crumbling brick caused by water infiltration and probably freeze thaw events.


Area 2 - This is the corner to the right of the source. The vertical crack extends up through the third floor.


Area 3 - This is the vertical crack on the third floor. The wall looks as though it is ready to shear right off.


Area 4 - This area is at the ceiling level of the second floor rear left. You can see the wooden beam on studs holding up the brick wall above. This area wasn't repaired until this week.


Area 5 - This is the scene from the other side in the second floor rear wing. The ends of two of the three beams were completely rotten. They cut them out, filled them in with new pressure lumber and then sistered a LVL beam to the side with carriage bolts. This will all be hidden once the repairs are complete.


Area 6 is in the stairwell halfway between the second and third floor. It is just to the left of where the beams rested atop the end of the intersecting rear side wall.


Area 7 - This is the view from the first floor dining room in the rear wing. They had to support from the basement level up through the first floor to the second floor to work on the beam repairs.