
I started working on this chair. It's sort of a slow motion restoration because other stuff keeps taking priority but I thought I'd take a pic once in a while to show progress.
the webbing had sagged a lot. then they had put a second layer of webbing under the chair to help support the springs, that had stretched too.
I took it apart to the frame, first removed upholstery for the seat, then the "pancake" which is the muslin , the burlap containing horsehair and some cotton, it was sewn near the front edge to create a rolled edge.
under the pancake was more burlap sitting on top of the springs and the springs were tied to the burlap on top. I took all that off.
I flipped it over and took all the webbing and nails out. wow this thing had lots of nails in it. the springs were tied with thick hemp cord to the rail on the underside as well , to keep them spaced evenly and also sewn to the webbing itself. I removed all that.
I was about to put the webbing back and decided maybe I better fix the holes up. I dont want a situation where the new nails come out because they went into an existing hole so I cut a tapered scrap of wood, took a chisel and made a pile of toothpick shapes sticks. you can see my wedge near the hammer and a "toothpick" Then I started dipping them in glue and sticking them in the nail holes , driving each in with a hammer as if they were wooden nails. That's time consuming but I can plug all the holes before I get further and cover things up. then I wont have issues with nails going into existing holes. I didn't use filler for that because it wouldn't be as solid. the rails have plenty of strength.
It has holes in the legs , so maybe it had wheels but it is hard to say if wheels were original. I guess they could be added at any time later. I'm wondering if I should fill the holes and re-drill them.
The inside sides of the chair are still covered. and the back is mostly intact. I'll keep all that for now and try to focus on getting the seat to the point where it is covered in muslin and shaped best I can. I dont want to go so far that I forget how it all was.
I got some muslin , some burlap, some tacks, needles and a bit of polyester stuffing. Ive got work to do before I need the upholstery fabric. the supplier won't sell upholstery to the public. Ill need some cord to tie the springs and I;d like to find some that is suitable, whatever it is hemp or
similar. I didnt really want o buy a giant roll of it but maybe I need to. shoelaces could work I guess. Ill check an art supply store since the upholstery place is hard to get to.
I've been reading that I can wash and re-use the horsehair. Ill leave my pancake intact so I can try to copy how it was made up. Making that all right is where a lot of the skill is and I might get help when I get to that stage. I have an upholsterer that's a neighbor so Ill ask him once I get further. I didn't want to involve him in the wood restoration or some of these easy but time consuming parts. mostly he does newer stuff and antique chairs aren't what I usually see him working on. He might know a lot about it though.
I have a whole roll of webbing , it's pretty old but the real thing. Its also about twice as wide but I dont think it will matter much.
there is a tool used to stretch the webbing so it is "drum tight" I'll try to make my own tool up.
I replaced my fluorescent tubes with LED tubes over the bench. It required removing the ballasts, then you just connect them so the bulbs see 110 volts, easy , and I like the light better. the photos come out better too.
victorian chair restoration
-
phil
- Has many leather bound books
- Posts: 4616
- Joined: Tue Aug 18, 2015 6:11 pm
- Location: Near Vancouver BC
victorian chair restoration
- Attachments
-
- 3a.jpg (276.88 KiB) Viewed 3600 times
-
- 2a.jpg (221.25 KiB) Viewed 3600 times
-
- 1a.jpg (123.33 KiB) Viewed 3600 times

Re: victorian chair restoration
I agree with you about the LED lighting, Phil. The photos are great. Keep 'em coming!
-
phil
- Has many leather bound books
- Posts: 4616
- Joined: Tue Aug 18, 2015 6:11 pm
- Location: Near Vancouver BC
Re: victorian chair restoration
I replaced the webbing, sewed the springs to the webbing. tried to get the hemp cord but it turned out that it would be over 100 bucks. more than half is shipping cost. its made in Italy but I found a place in New York that sells it. I used nylon cord instead. It cant' really be seen once it is together. There is a place I can get it locally but they are only open when I'm working so maybe I can get some when I do the couch.
I was sort of surprised how big and how crowded the springs are. the pick just shows rows one way but I will add more the other way and the sideways one isn't tight in the pic.
once I'm happy with the shape of them tied then I can put burlap over and nail it down and tie it in with the springs. I can leave some lops of twine loose so when I get to the next step of cleaning shaping and re-laying the horsehair they help tie it into place.
I plugged all the old nail holes in the underframe , I could do some more of that along the front edge.
one thing I'm not sure of is how high the springs at the back of the seat should be. right now they sort of interfere with the seat back. maybe when I do the seat back I can adjust how it forms along the bottom edge a little to make room.
some springs were shorter. I wished I had recorded where each came from but it's close to the way it was.
after watching some videos I found some quite different methods of tying the springs.
the knots they use vary. the ones I used allow the springs to be adjusted a bit. the nylon cord has a tendency for the knots to slip. I'll plan to tie some string around each to bind the knots once I have the springs where I want. the springs should be pretty much vertical but maybe the tops of the springs can be unlevel. part of the objective is to get them all tied in place and form the basic shape of the crown and since this is Victorian the shape of the seat reflects the style. no straight lines. im sure we have all sat on chairs and noted that the springs interfered so part of the job is to tie them in such a way they can compress and snap back once the person gets up. often over time they come loose and puncture the stuffing above , the strings prevent some of that. if they get crossed up and touching each other it will not be correct. Ill stand on it and sit on it and give it a little stress test because if anything wants to come apart it might as well be now while I can do something about it. it had some bits of cloth tied to the springs, Not sure if that was a later repair to try to cope with them touching each other, maybe. I think I will end up with more strings tying the springs. the way they had done it seemed to rely on the strength of the burlap and in some videos they really did a lot of strings which forms sort of a net as they all work together.
Im not so good with the knots. part of upholstering is knowing where to use different types of knots so it's a learning process for me. I might not get it just right but Im pretty sure I can make it functional and close to right. experienced people learn techniques they like and it really seems to vary between the pros and the furniture styles and age vary too.
most of them use air staplers. Im thinking of just using the tiny tacks instead since its more authentic and I dont really want to invest lots unless I like doing this a lot. I'll find a used one if I really want for one. No staples in this chair which shows it wasn't recently worked on.
On some things the springs are all in neat rows but with this they are more of a circular arrangement. I made a template of the imprint in the burlap that goes over the springs and used that to help locate their position.
Definitely a slow motion project but that's OK, the chair wont mind. my cat likes helping with the string. I'm sure she will love scratching it once its all done.
i still dont have the fabric. I'll have to look online maybe get samples or talk to my neighbor who is a real upholsterer. once I get the shape and the muslin cover on it can be upholstered. I might not need to do a lot with the rest other than putting it back together and recovering it. Not sure the back needs to come all apart.
- Attachments
-
- 02.jpg (220 KiB) Viewed 3521 times
-
- 01.jpg (241.19 KiB) Viewed 3521 times
Re: victorian chair restoration
It's interesting to see your progress as you go, Phil.
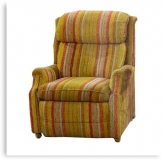
It's a handsome chair and well worth the effort. I know a guy who, for a price, can get you the same upholstery as this chair:
Let me know.
It's a handsome chair and well worth the effort. I know a guy who, for a price, can get you the same upholstery as this chair:
Let me know.
-
Gothichome

- Moderator

- Posts: 4184
- Joined: Sun Aug 16, 2015 8:34 pm
- Location: Chatham Ont
Re: victorian chair restoration
Manalto wrote:It's interesting to see your progress as you go, Phil.
It's a handsome chair and well worth the effort. I know a guy who, for a price, can get you the same upholstery as this chair:
Let me know.
-
Gothichome
- Moderator
- Posts: 4184
- Joined: Sun Aug 16, 2015 8:34 pm
- Location: Chatham Ont
Re: victorian chair restoration
Phill, I have no experience with upholstery but it certainly looks good to me.
-
phil
- Has many leather bound books
- Posts: 4616
- Joined: Tue Aug 18, 2015 6:11 pm
- Location: Near Vancouver BC
Re: victorian chair restoration
I've noticed a pair of similar vintage chairs on Craigslist as well as a leather covered one.
they aren't quite the same but the pricing seems to reflect that this is not a very profitable business. Thanks James the 70's stripes are just perfect
Phil
they aren't quite the same but the pricing seems to reflect that this is not a very profitable business. Thanks James the 70's stripes are just perfect
Phil
Re: victorian chair restoration
I assumed it was a cultural icon but I'd better explain. It's Martin Crane's chair from "Frasier."
-
phil
- Has many leather bound books
- Posts: 4616
- Joined: Tue Aug 18, 2015 6:11 pm
- Location: Near Vancouver BC
Re: victorian chair restoration
I thought maybe it was from that 70's show