
So here is what I would likely do, given the limited info and pictures:
1. cut the nails and drop the center stringer right out for clearance
2. do as described above by myself and heartwood to clean and close the gap / strengthen the tread
3. tighten the spindles from below if you can get at the wedges ok
4. replace the stringer (recutting around the wood added in the above repairs as necessary. Using screws rather than nails and making sure it goes tight against the treads (pack out / use shims as necessary)
I think you might get into all sorts of trouble if you disassemble it, and gluing those treads without adding some will result in a very early re-failure.
If you did end up successfully dismantling it, I strongly recommend biscuits over dowels as they give a stronger joint (the biscuits are designed to expand in the slot). Plate jointers and the biscuits can be found cheaply at most big box home stores or places like harbor freight.
Stair Tread Repair
Re: Stair Tread Repair
Mick...
-
Gothichome

- Moderator

- Posts: 4184
- Joined: Sun Aug 16, 2015 8:34 pm
- Location: Chatham Ont
Re: Stair Tread Repair
Ok, my take for a solution. Remove the nails that secure the tread to the riser from the under side. Then screw several blocks to the tread, the under side would be preferable but the top side would be easier. Using appropriate sized carpenters clamps across your newly fastened blocks and slowly squeeze the tread together. Hopefully the back of the tread will pull tight to the front of the tread. To sucre, from the underside, glue and screw a peice of plywood in such a way as to stop the crack from spreading again. Remove your blocks and fill the screw holes. Might be worth a try as an experiment on one of the treads, it it works, your off to the races.
-
Lily left the valley

- Inventor of Knob and Tube
- Posts: 2170
- Joined: Sun Aug 14, 2016 2:07 pm
- Location: Gardner, MA, USA
- Contact:
Re: Stair Tread Repair
I don't know how I missed this thread before.
When I was property manager at an 1860 servant's quarters that had been converted to a multi family, the stairs to the second floor had quite a few cracked treads. The owner would not allow a full dismantle (one solid piece of wood closed stringer on each side all the way up, plaster walls with lead paint buried under other paint), so I had to work in place. I also could not do work from below because I would have had to dismantle a bedroom closet built underneath (plaster with lead again), with a knee closet as well in that same wall for use of the lower stair space (same). A tenant occupied the first floor apartment at the time of my repair.
What I found that worked for me was timber screws. Some come with a star screw end, some with hex ends. I used the hex, as that's what Home Despot had on hand.
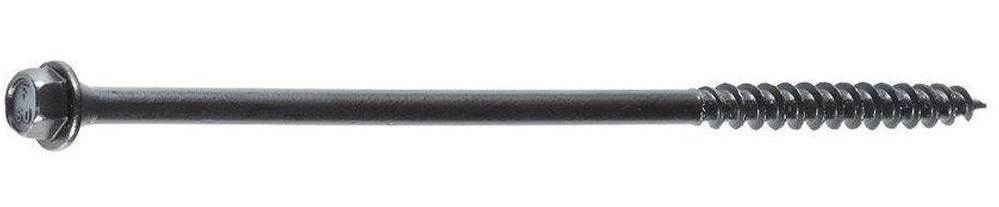
Now there are special dowels you can buy that taper to use for such a purpose. This Old House has a 2014 video that shows how to use them. Just so you know in case you want to go that route.
The hardest part is the pre-drill. Don't believe the box in that they cut through wood like butter with their self drilling tip. I fortunately had read a few sites where folks had used these for such, and everyone said the same thing: for composite decking, they probably don't need the pilot, but for any wood, especially hardwood, you want to pre-drill.
I bought a set of extra long drill bits for this fix. Your pilot hole needs to be true or you'll be cussing up a storm. (Well, I did when I realized one of the tread's bow was so deep I might be too close to surface, so had to make another pilot just to the left and then dowel fill the other as far as I had drilled it before I realized. Yay, rubber mallet.)
I would recommend, if any are only partial splits, to start your drill and fill from where it is not split. That helped me as the board did make a bit of an effort to right itself when the support from the timber screw reminded it how it used to be. It wasn't a huge difference, but it was still noticeable in a good way to me, so I thought it worth mentioning.
I drilled the pilots from the front of the tread (tricky if yours are still rounded which mine were for the most part--one bullnose had partially broken off who knows when before). Since you have what looks to be clear access to many of them from the rear, you'd probably want to go from that side as much as you can so you won't have to worry about after care to make your work disappear since you won't be covering with carpet or paint.
Then I glued the crack(s), then went from outside edges inwards to the center, using the timber screws to join the cracked tread. If you'll be fixing quite a few, and your rise height is the same on the stairs in question, you can make a jig rest for your drill to help you stay square since you'll be sprawled on the stairs for a lot of the work and trying to watch the drill's level is difficult enough while you're dealing with awkward placement of self while working. The stairs in this case were very steep.
To be clear, once I realized the timber screws were helping the horizontal plane of the tread to true itself, my procedure became: from outside edges in--drill, partial glue section, screw, switch to other outside edge, repeat until meeting at center.
Some folks squirt some glue in the pilot before putting in the screw, I did not. However, the stair treads I worked on were very small, both in width and depth. As in barely wide enough to take a low backed couch upstairs held back end down with all the feet removed, and you still had to remove the handrail to fit--that narrow.
I countersunk the screws, and capped them with dowel bits I carved a bit on the entry side to cup the hex end. So glue, dowel bit, then sanded, filled if needed, sanded some more, finished to match (paint, in this case).
They made a world of difference, they even helped the squeaking stop which was a bonus to me. The treads were much truer than they've probably been in years.
When I was property manager at an 1860 servant's quarters that had been converted to a multi family, the stairs to the second floor had quite a few cracked treads. The owner would not allow a full dismantle (one solid piece of wood closed stringer on each side all the way up, plaster walls with lead paint buried under other paint), so I had to work in place. I also could not do work from below because I would have had to dismantle a bedroom closet built underneath (plaster with lead again), with a knee closet as well in that same wall for use of the lower stair space (same). A tenant occupied the first floor apartment at the time of my repair.
What I found that worked for me was timber screws. Some come with a star screw end, some with hex ends. I used the hex, as that's what Home Despot had on hand.
Now there are special dowels you can buy that taper to use for such a purpose. This Old House has a 2014 video that shows how to use them. Just so you know in case you want to go that route.
The hardest part is the pre-drill. Don't believe the box in that they cut through wood like butter with their self drilling tip. I fortunately had read a few sites where folks had used these for such, and everyone said the same thing: for composite decking, they probably don't need the pilot, but for any wood, especially hardwood, you want to pre-drill.
I bought a set of extra long drill bits for this fix. Your pilot hole needs to be true or you'll be cussing up a storm. (Well, I did when I realized one of the tread's bow was so deep I might be too close to surface, so had to make another pilot just to the left and then dowel fill the other as far as I had drilled it before I realized. Yay, rubber mallet.)
I would recommend, if any are only partial splits, to start your drill and fill from where it is not split. That helped me as the board did make a bit of an effort to right itself when the support from the timber screw reminded it how it used to be. It wasn't a huge difference, but it was still noticeable in a good way to me, so I thought it worth mentioning.
I drilled the pilots from the front of the tread (tricky if yours are still rounded which mine were for the most part--one bullnose had partially broken off who knows when before). Since you have what looks to be clear access to many of them from the rear, you'd probably want to go from that side as much as you can so you won't have to worry about after care to make your work disappear since you won't be covering with carpet or paint.
Then I glued the crack(s), then went from outside edges inwards to the center, using the timber screws to join the cracked tread. If you'll be fixing quite a few, and your rise height is the same on the stairs in question, you can make a jig rest for your drill to help you stay square since you'll be sprawled on the stairs for a lot of the work and trying to watch the drill's level is difficult enough while you're dealing with awkward placement of self while working. The stairs in this case were very steep.
To be clear, once I realized the timber screws were helping the horizontal plane of the tread to true itself, my procedure became: from outside edges in--drill, partial glue section, screw, switch to other outside edge, repeat until meeting at center.
Some folks squirt some glue in the pilot before putting in the screw, I did not. However, the stair treads I worked on were very small, both in width and depth. As in barely wide enough to take a low backed couch upstairs held back end down with all the feet removed, and you still had to remove the handrail to fit--that narrow.
I countersunk the screws, and capped them with dowel bits I carved a bit on the entry side to cup the hex end. So glue, dowel bit, then sanded, filled if needed, sanded some more, finished to match (paint, in this case).
They made a world of difference, they even helped the squeaking stop which was a bonus to me. The treads were much truer than they've probably been in years.
--Proud member of the Industrious Cheapskate Club
--Currently pondering ways to encourage thoughtful restovation and discourage mindless renovation.
--Currently pondering ways to encourage thoughtful restovation and discourage mindless renovation.
-
phil
- Has many leather bound books
- Posts: 4616
- Joined: Tue Aug 18, 2015 6:11 pm
- Location: Near Vancouver BC
Re: Stair Tread Repair
Ive done that for cracked window sills or ones that I neeed to extend because PO's cut them off.
these little plug cutters work well. you can make plugs out of a scrap that you find that matches for grain pattern. or just use wood filler. I tried both and actually found it easier to match the putty but that depends on the grain. If you predrill the first little but with a forestner bit it makes the plug fit a bit tighter as they cut a more perfect hole.
http://www.leevalley.com/en/wood/Page.a ... ,180,42288
what the screws may do is draw the cracks closed with the treads in place. you cant' glue them properly if you cant' close up the crack properly so if there is junk in the crack you need to look after that and if it isn't possible to get a really good fit I'd use epoxy, just try not to slop it all over everywhere you dont' need it. because the screw works by pulling between the head and the threaded section you might have better luck if the threaded section between the head and up to the split is actually drilled a bit bigger so those threads can slip, otherwise you can have a situation where the threads between the head and the crack are preventing the gap from being able to close up. actually referring back to Lily's pic she did show a screw that was only threaded near the end so that would work.
I dont' know if I explained it well but if you visualize driving a screw between two sheets of plywood that are held apart slightly you could see a situation where the screw is tight but the gap isnt' closed and the threads on either side are preventing the gap from closing but if the hole in the plywood on the side of the head was drilled larger or if the screw didnt' have threads there it would close up easier because it then isnt' fighting itself.
if some of the treads are split lengthwise it might not be such a structural problem as cosmetic. If you have overhang and dont' like the look of the risers you might consider just laminating some new ( 1/8" thick) wood over the ones you have. stairs are hard to clean paint off because of so many corners and that might make things move a little faster. I used some fir I cut to about 1/8th or so to cover one of my bottom treads and you can't tell it from the others. for some reason scraping that one wasn't an option I forget why.
if you wanted to re-cut the roundover you could use the screws and plugs, then hide them with a fresh cut. I did that but the router wont' go near the wall so I had to make a scraper with the roundover profile and just scrape the last bit by hand to get up to the ends. (since the router won't fit there)
I hadn't even remembered until Lily mentioned it but I did put some long screws in mine along through the roundover edge as lily suggests. Since it was edge grain there the plugs worked well but when I tried using the plugs where it was flat sawn I found it harder to get an invisible match. I did set a lot of the plugs in the surface and they really dont' show much but for some reason I found the putty worked as well by the time I got more accurate with the color matching. i think I had quite a lot of small holes from carpet tacks so those weren't big enough to need the wood plugs.
mine was painted red so the stripping was difficult. I use sanders and scrapers, belt sander. I bought one of those little mouse sanders and it seemed like a mickey mouse tool to me. It actually worked in the corners pretty well. by the end of it I found it maddening to have this red dye in the corners and I spread a tiny bead of wood filler along the tight corners and then sanded it and that hid some of the dye. If you remove almost all of it sometimes you find the paint is stuck in tiny tight or recessed areas but those can be filled rather than trying to dig out every speck. some people are happy to just strip the treads and paint the risers but I was stubborn and wanted them bare wood. I won but it was a lot of work and that will be too. disassembling one at a time might not be a bad idea depending how fussy you want to be or how long you can stand working on the stairs. I wondered how you would do if you just tried to complete one step from disassembly to finished. sometimes it's easier to take stuff apart but it isn't always the best advice to pull everything to bits.
Re: Stair Tread Repair
If you are going to go this route, then you might want to consider using a Kreg system rather than freehand adding screws
Mick...
-
phil
- Has many leather bound books
- Posts: 4616
- Joined: Tue Aug 18, 2015 6:11 pm
- Location: Near Vancouver BC
Re: Stair Tread Repair
sure the Kreg jigs are nice. or if that isn't' handy a quick and dirty method is just to drill a bit of scrap with a hole that is square, and you can start the drill through that and once it's going it wont' wander too much. I just use a bit that is like a foot long and put a scrap on top of the tread to eyeball against. You just dont' want to break through the top of course.
places that make planes use really nice quality drill bits that are super long and they just use them so many times and discard them to maintain tight tolerances, so you can find sellers that are buying them cheap and reselling them in bulk.
places that make planes use really nice quality drill bits that are super long and they just use them so many times and discard them to maintain tight tolerances, so you can find sellers that are buying them cheap and reselling them in bulk.